> ## Documentation Index
> Fetch the complete documentation index at: https://docs.nebuly.com/llms.txt
> Use this file to discover all available pages before exploring further.
# Taxonomy
> See and govern the categories that power your Nebuly reports: groups, classes, and how changes apply to your data.
## What is Taxonomy
Taxonomy is where you inspect and control the categories behind every Nebuly report. Your reports show numbers, but it isn't always obvious which data those numbers are built on. Taxonomy makes that explicit: it exposes every way Nebuly organizes your conversations, lets you inspect each category down to the underlying interactions, and lets you adapt the categories to your own business.
You can find it under **Live Data** in the left navigation.
 ## How it's organized
Taxonomy has two levels:
* **Groups** are classification axes, such as *Topics* or *Car models*. Each group answers one question about an interaction.
* **Classes** are the values inside a group. For example, the *Topics* group might contain *Billing*, *Returns*, and *Technical support*.
Every interaction is sorted into the relevant class of each group, and that classification is what your reports aggregate.
### Group types
Groups come in three types, shown in separate sections with a type badge:
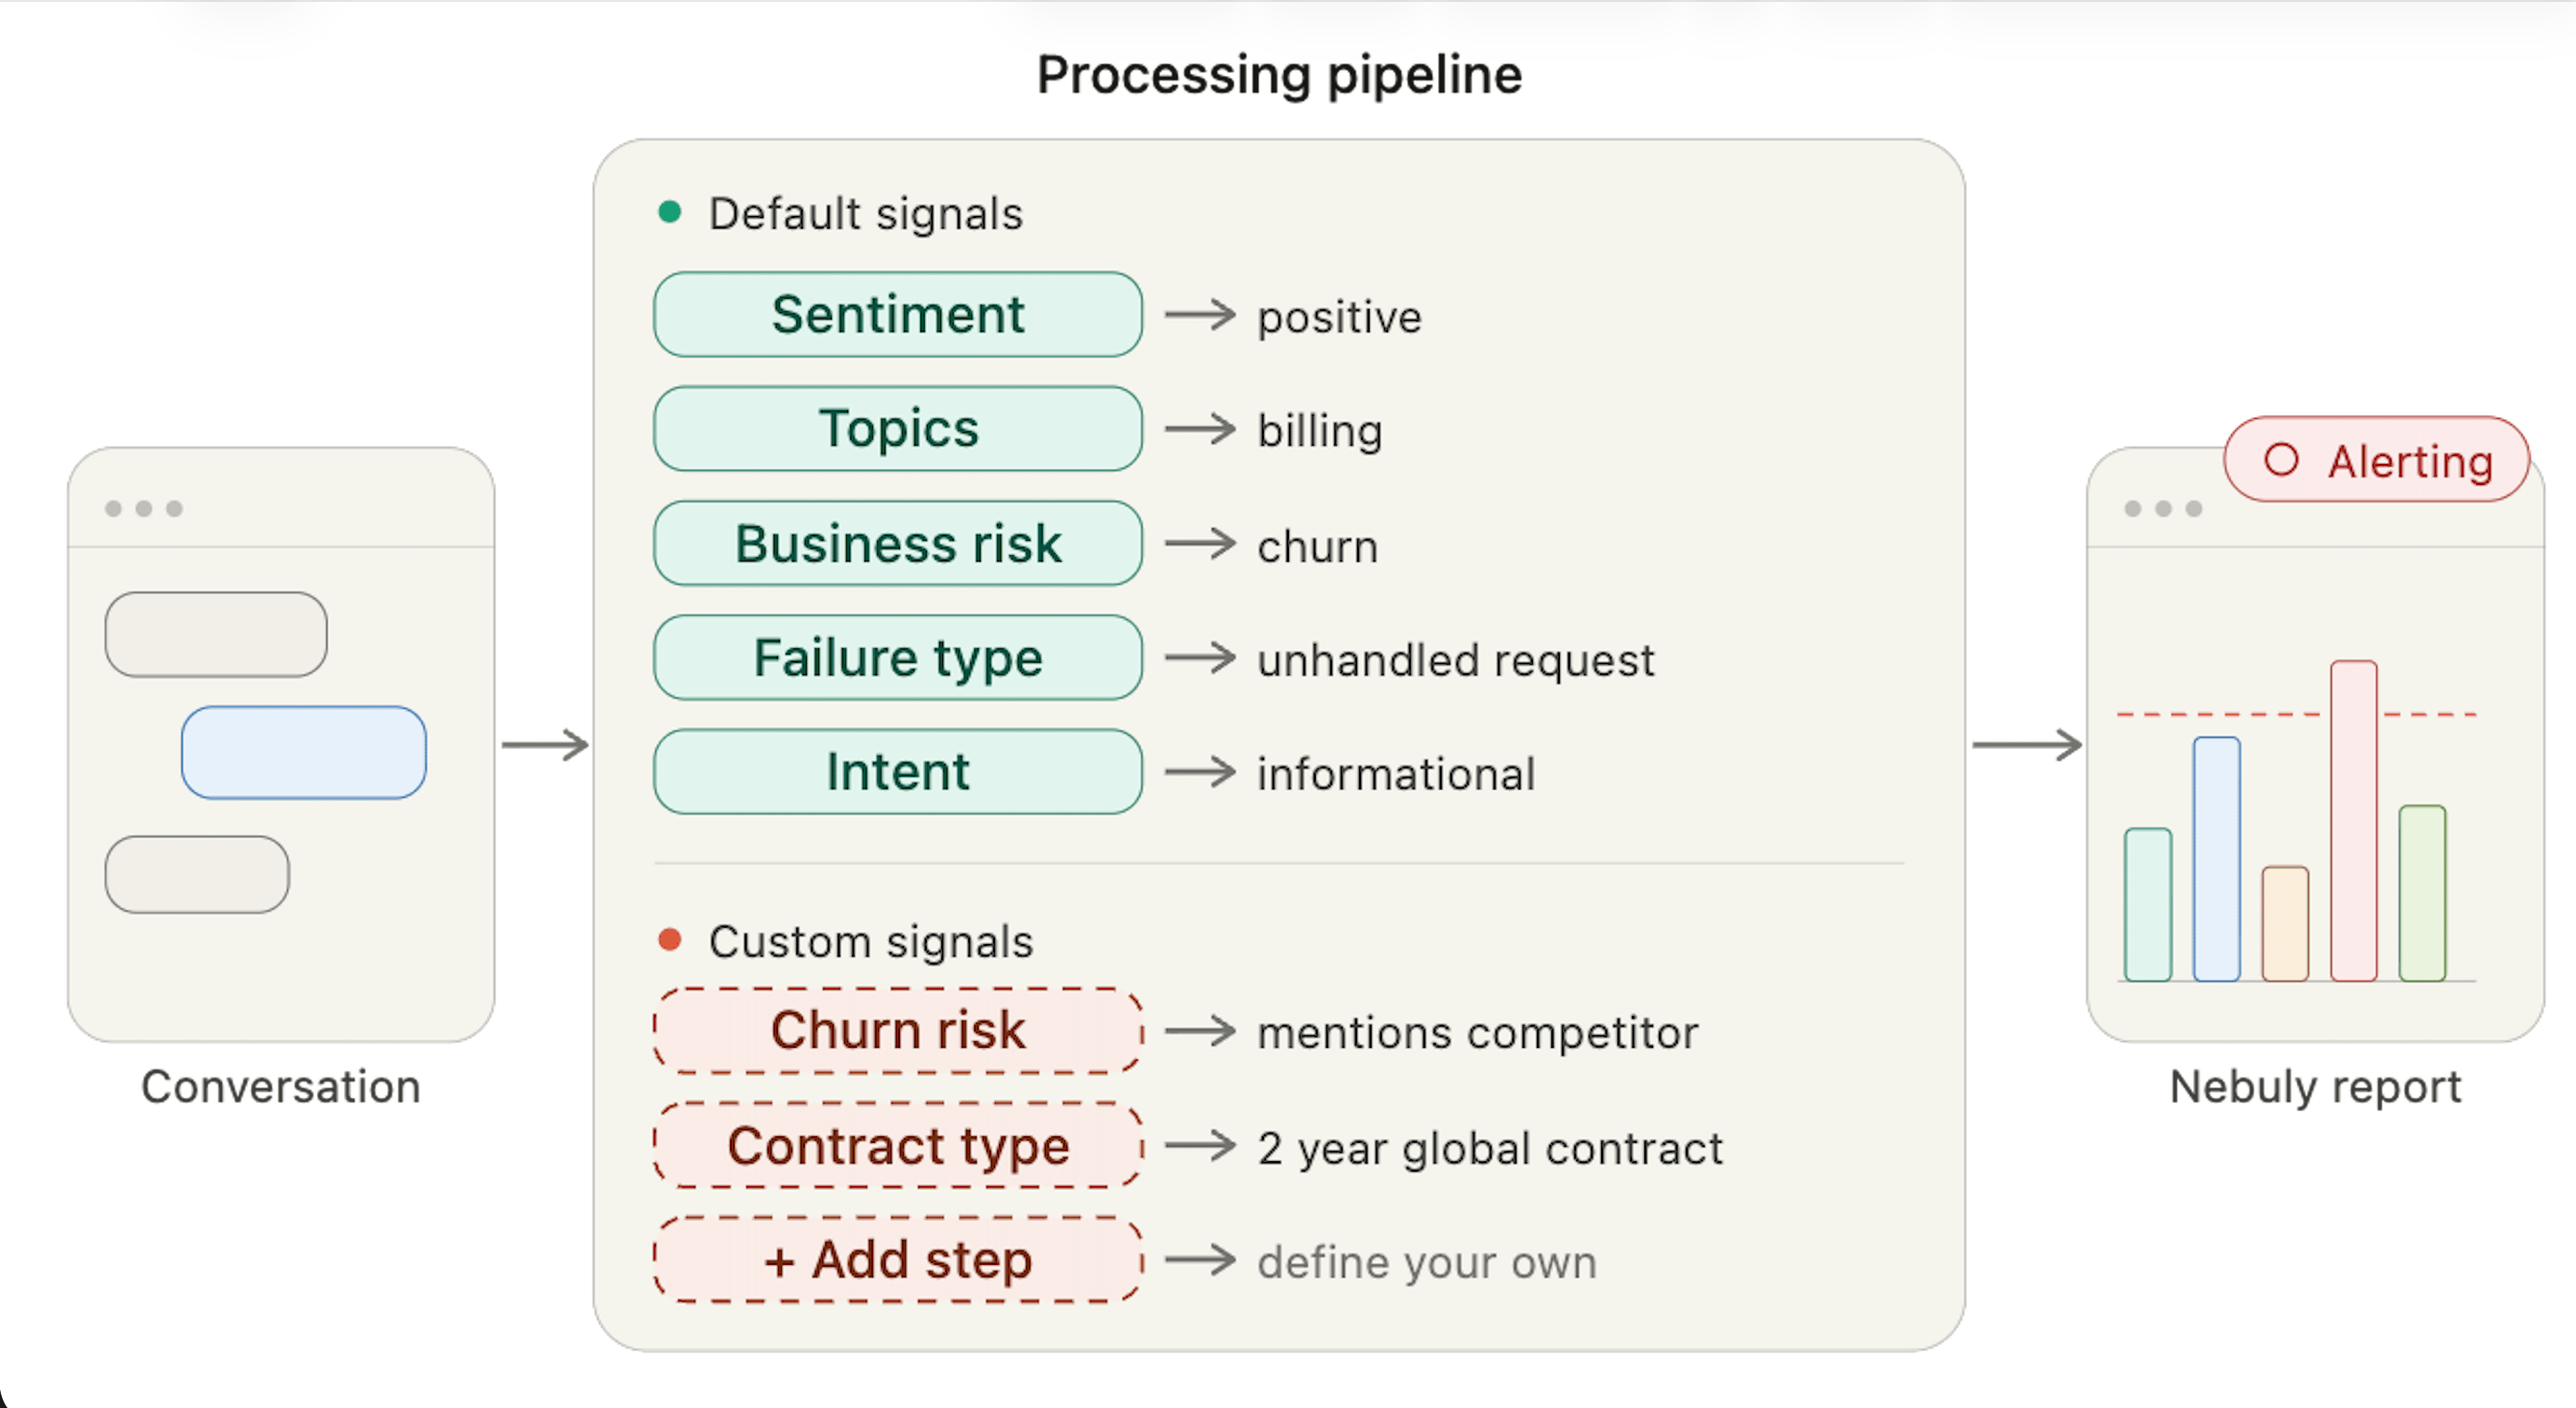
* **System** groups are defined by Nebuly and populated automatically. These include Topics, User Intent, Business Risks, Type of Failure (failure intelligence), Conversation Health, User Sentiment, Language, User Emotion, and others.
* **Tag** groups are created automatically from the tag keys you send during integration. Their classes are the distinct values received for each tag.
* **Custom** groups are the ones you create yourself to cluster interactions along a dimension that matters to you.
## Viewing and browsing
On the Taxonomy page you can:
* See all groups grouped by type (**System**, **Tag**, **Custom**).
* Search across groups and classes to find a specific one quickly.
* Read what each group represents from its definition.
## Creating a custom group
Click **Create group**. You choose one of two paths upfront:
* **Automatic class generation.** You give the group a name (required), an optional description, and guidelines describing what the group should capture (required, minimum 30 characters). Nebuly then discovers and generates the classes for you. The group appears immediately in the Custom section with a *processing* status and an expected completion time. Classes are not available instantly: they appear after the next scheduled processing run. {/* Claude (per your TBD): added mobile-offers auto-class-generation example */} For example, for a telecom assistant you could create a group called *Mobile offers* with guidelines describing the tariff plans you sell. Nebuly then discovers the specific offers users actually discuss and populates the classes for you, such as *Europe All-Inclusive Tariff M*, *Prepaid Starter*, or *Family Data Plan*.
* **Manual class setup.** You give the group only a name (required) and an optional description. The group is created immediately as empty, ready for you to add classes one by one.
## Adding classes to a group
Inside a Custom or System group you can add a class in three ways, depending on how you think about the data:
* **From a description.** Provide a class name and a description of what it should capture. **Important:** you can think of the description as a system prompt, with which Nebuly decides if an interactions should be part of this class or not. Be precise, give context, while not making it confusing and long. Nebuly generates and assigns the matching interactions at the next processing run.
* **From keyword match.** Provide a class name and one or more keywords. Interactions containing those keywords are assigned to the class immediately. {/* Claude (per your TBD): note to also add a description for ongoing classification */} For ongoing classification, still add a **description** (as above) so that future interactions are matched with proper context, not just the ones captured by the initial keywords.
* **From a filter.** Select an existing filter combination. Interactions matching that filter are assigned to the class immediately. {/* Claude (per your TBD): noted filter assignment is deterministic */} This assignment is **deterministic**: only interactions that match the exact filter are included.
**When do I start seeing the data**?
How interactions populate your classes depends on whether the group is new. When you **create a new group**, the next processing run looks for its classes and assigns matching interactions going back **up to 3 months**. After that, any **class added to an existing group** only takes into account interactions **from the day it was created** onward.
## Managing groups and classes
As your understanding of the data evolves, you can keep the taxonomy clean:
* **Rename** a class or a group. For Tag and System groups, you can rename them to a readable display name without breaking the underlying mapping.
* **Merge** classes that overlap into a single class.
* **Delete** classes you no longer need, or delete a Custom group entirely. System groups can't be deleted, but their classes can be renamed, merged, and deleted. Tag group classes keep updating automatically as new tag values arrive.
## How it's organized
Taxonomy has two levels:
* **Groups** are classification axes, such as *Topics* or *Car models*. Each group answers one question about an interaction.
* **Classes** are the values inside a group. For example, the *Topics* group might contain *Billing*, *Returns*, and *Technical support*.
Every interaction is sorted into the relevant class of each group, and that classification is what your reports aggregate.
### Group types
Groups come in three types, shown in separate sections with a type badge:
* **System** groups are defined by Nebuly and populated automatically. These include Topics, User Intent, Business Risks, Type of Failure (failure intelligence), Conversation Health, User Sentiment, Language, User Emotion, and others.
* **Tag** groups are created automatically from the tag keys you send during integration. Their classes are the distinct values received for each tag.
* **Custom** groups are the ones you create yourself to cluster interactions along a dimension that matters to you.
## Viewing and browsing
On the Taxonomy page you can:
* See all groups grouped by type (**System**, **Tag**, **Custom**).
* Search across groups and classes to find a specific one quickly.
* Read what each group represents from its definition.
## Creating a custom group
Click **Create group**. You choose one of two paths upfront:
* **Automatic class generation.** You give the group a name (required), an optional description, and guidelines describing what the group should capture (required, minimum 30 characters). Nebuly then discovers and generates the classes for you. The group appears immediately in the Custom section with a *processing* status and an expected completion time. Classes are not available instantly: they appear after the next scheduled processing run. {/* Claude (per your TBD): added mobile-offers auto-class-generation example */} For example, for a telecom assistant you could create a group called *Mobile offers* with guidelines describing the tariff plans you sell. Nebuly then discovers the specific offers users actually discuss and populates the classes for you, such as *Europe All-Inclusive Tariff M*, *Prepaid Starter*, or *Family Data Plan*.
* **Manual class setup.** You give the group only a name (required) and an optional description. The group is created immediately as empty, ready for you to add classes one by one.
## Adding classes to a group
Inside a Custom or System group you can add a class in three ways, depending on how you think about the data:
* **From a description.** Provide a class name and a description of what it should capture. **Important:** you can think of the description as a system prompt, with which Nebuly decides if an interactions should be part of this class or not. Be precise, give context, while not making it confusing and long. Nebuly generates and assigns the matching interactions at the next processing run.
* **From keyword match.** Provide a class name and one or more keywords. Interactions containing those keywords are assigned to the class immediately. {/* Claude (per your TBD): note to also add a description for ongoing classification */} For ongoing classification, still add a **description** (as above) so that future interactions are matched with proper context, not just the ones captured by the initial keywords.
* **From a filter.** Select an existing filter combination. Interactions matching that filter are assigned to the class immediately. {/* Claude (per your TBD): noted filter assignment is deterministic */} This assignment is **deterministic**: only interactions that match the exact filter are included.
**When do I start seeing the data**?
How interactions populate your classes depends on whether the group is new. When you **create a new group**, the next processing run looks for its classes and assigns matching interactions going back **up to 3 months**. After that, any **class added to an existing group** only takes into account interactions **from the day it was created** onward.
## Managing groups and classes
As your understanding of the data evolves, you can keep the taxonomy clean:
* **Rename** a class or a group. For Tag and System groups, you can rename them to a readable display name without breaking the underlying mapping.
* **Merge** classes that overlap into a single class.
* **Delete** classes you no longer need, or delete a Custom group entirely. System groups can't be deleted, but their classes can be renamed, merged, and deleted. Tag group classes keep updating automatically as new tag values arrive.