

Improved Feature: ROI
We’ve redesigned the ROI page to make it easier to understand the value your AI is generating — and where that value comes from.At the top of the page, you can now see the key ROI metrics for the selected period:- ROI — Net value generated for every $1 spent on AI
- Total Value Generated — Estimated economic value created from the hours returned to your employees, after accounting for AI costs
- Hours Returned — Estimated working time employees get back by successfully using AI
- FTE Equivalent — The amount of returned time expressed as a share of full-time employees
Understand what drives ROI
The new ROI breakdown lets you see which types of work contribute most to the value generated by AI.Break the results down by dimensions such as Task, Team, or Market and compare each area across different ROI metrics.This makes it easier to understand not only how much value AI is creating, but also which workflows and use cases are responsible for it — helping you identify where AI is already delivering strong returns and where there may be more opportunity to expand adoption.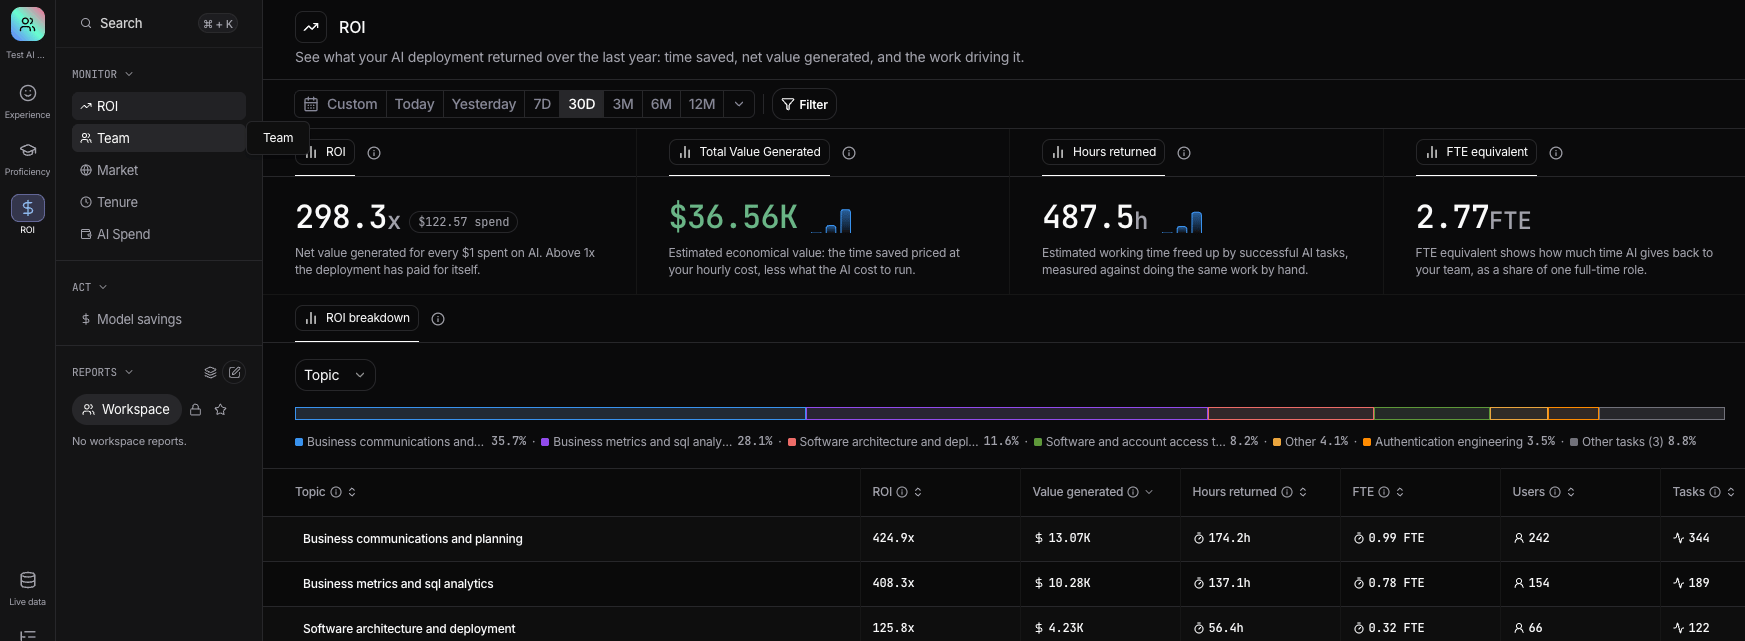
A new, simpler navigation
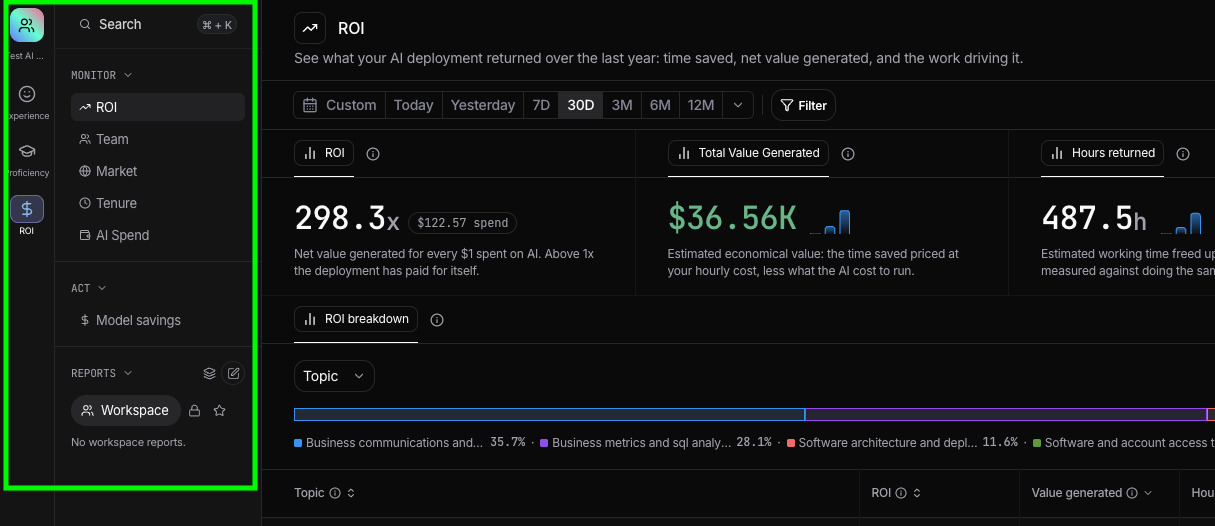
We’ve reorganized the left sidebar to make it easier to move between monitoring AI proficiency and ROI, taking action, and building customized reports.The navigation is now split into three main areas:- Monitor — Find Nebuly’s monitoring products here. Use this section to track AI Proficiency and ROI metrics across your organization.
- Act — Turn insights into action. Identify cost-saving opportunities, improve how AI is used, and upskill your workforce.
- Reports — Build and access your own customized reports. Choose the metrics you need, create charts, and explore your data. You can also switch between workspaces to access shared reports, quickly open your favorites, or view your private reports.
New Feature: AI Spend
You can now get a much clearer view of how much your organization is spending on AI.AI Spend helps you track overall AI expenditure and understand how those costs are distributed across your organization and teams.You can drill down into the work being performed and see how much individual tasks cost to execute, which tasks account for the most spend, and how costs are distributed across different models.This makes it easier to connect AI usage with its actual operating cost and identify where optimization matters most.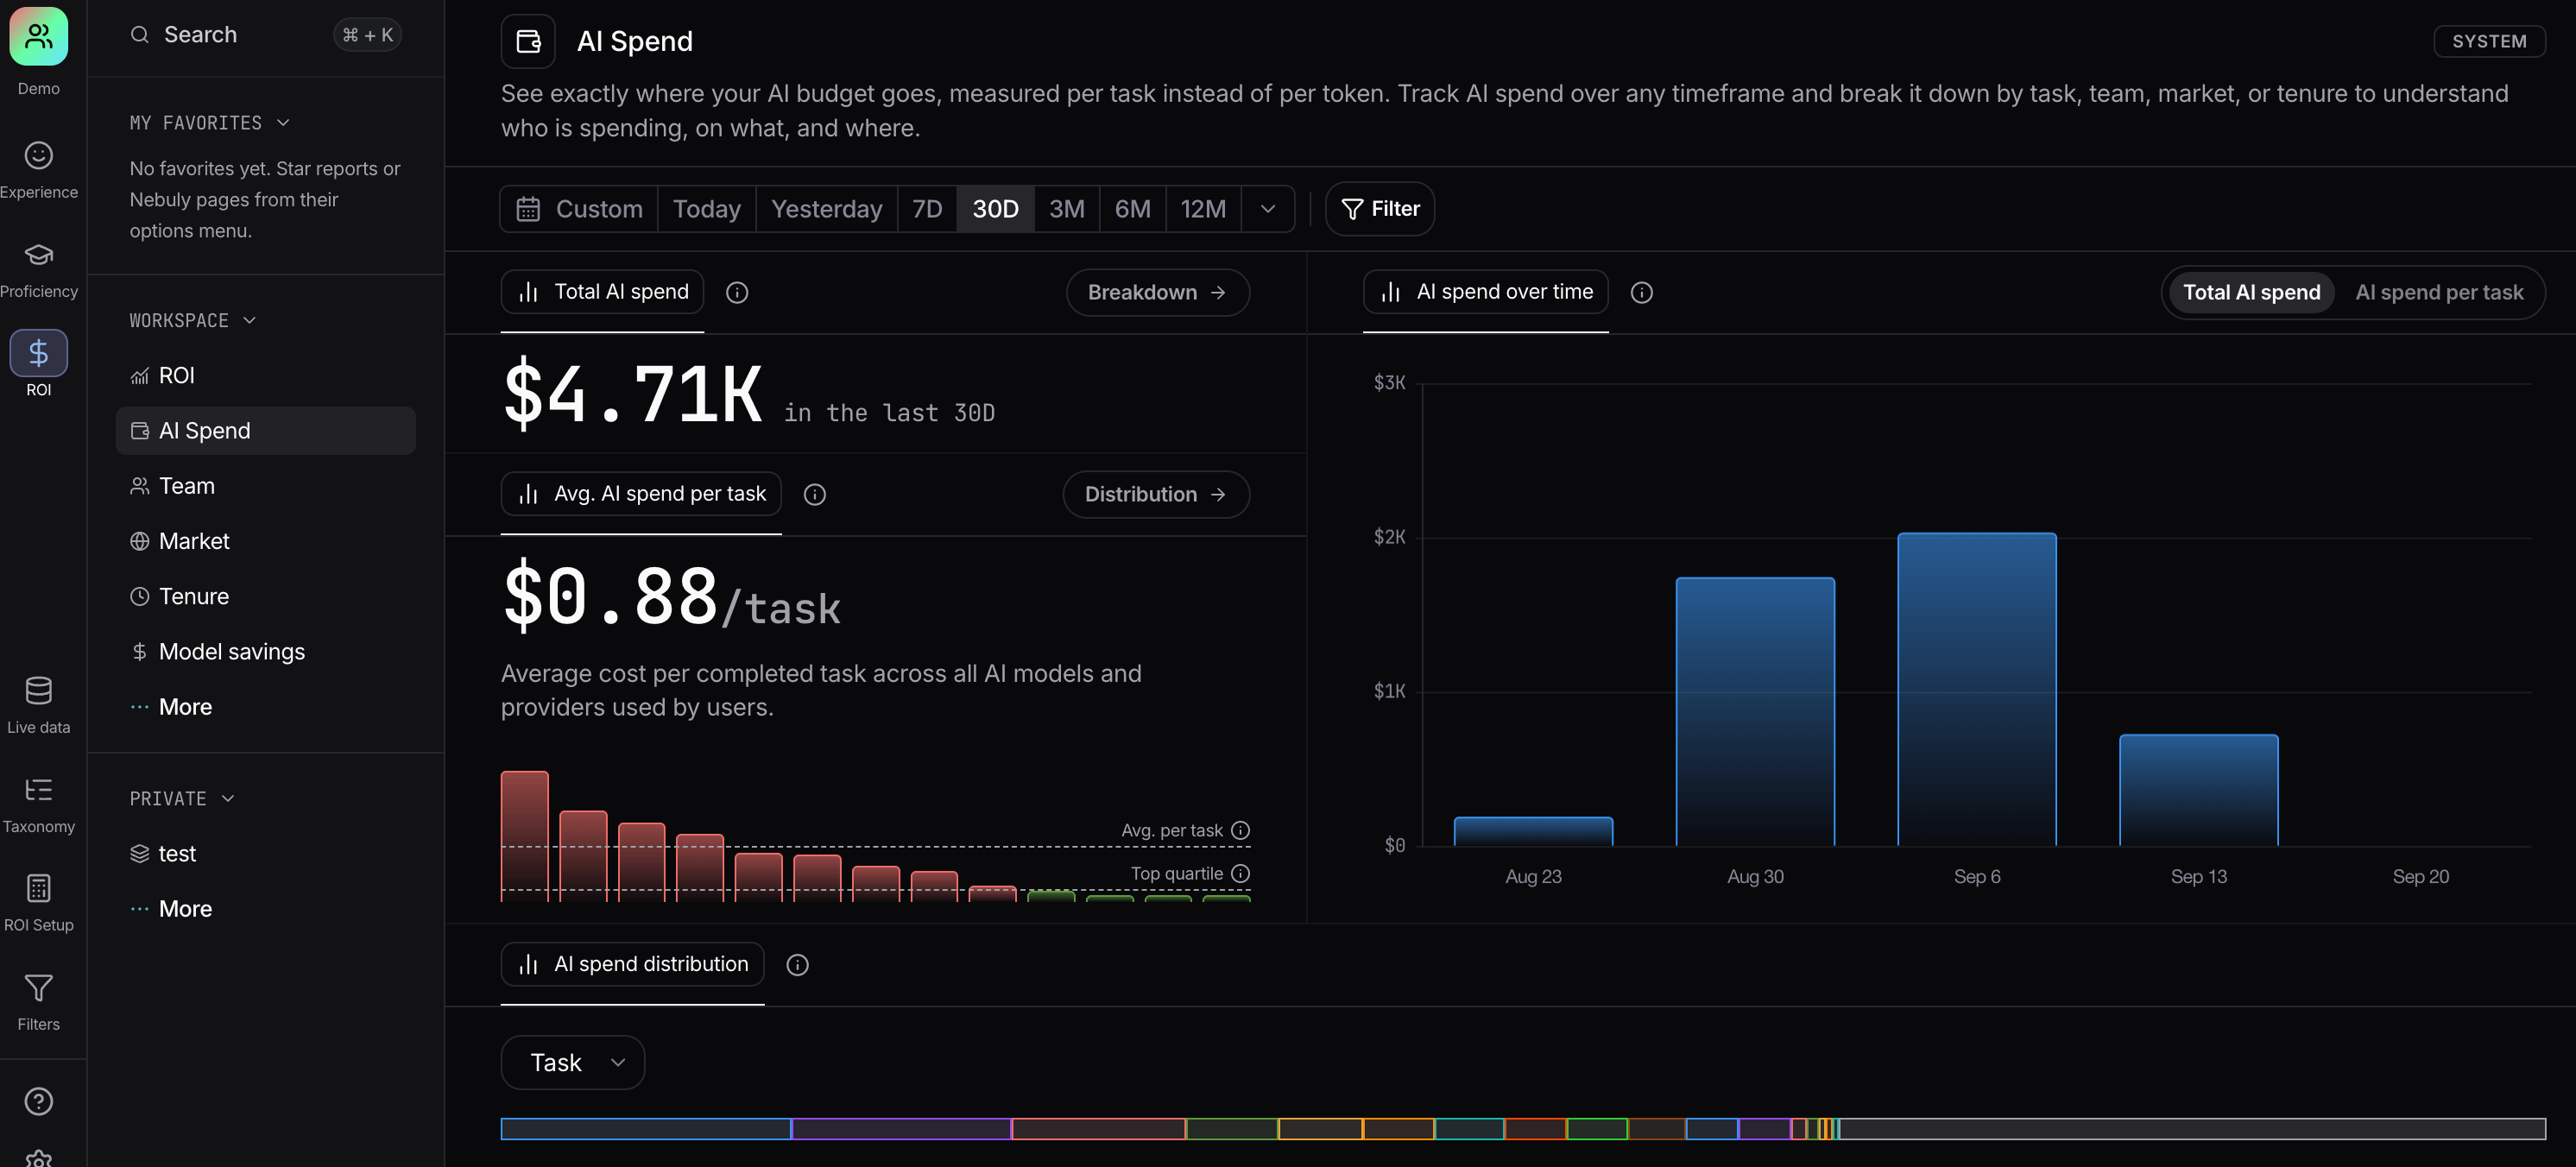
New Feature: Model Savings
Not every task needs the most powerful model available.Model Savings helps you understand your current model mix and identify opportunities to reduce costs without compromising output quality.See which model tiers are being used across your AI workloads, from lightweight models to frontier models, and understand which tasks are driving the most expensive usage.Nebuly then identifies cases where a cheaper model could have been used for the same task while maintaining the required quality.The result is a practical way to find savings opportunities without reducing quality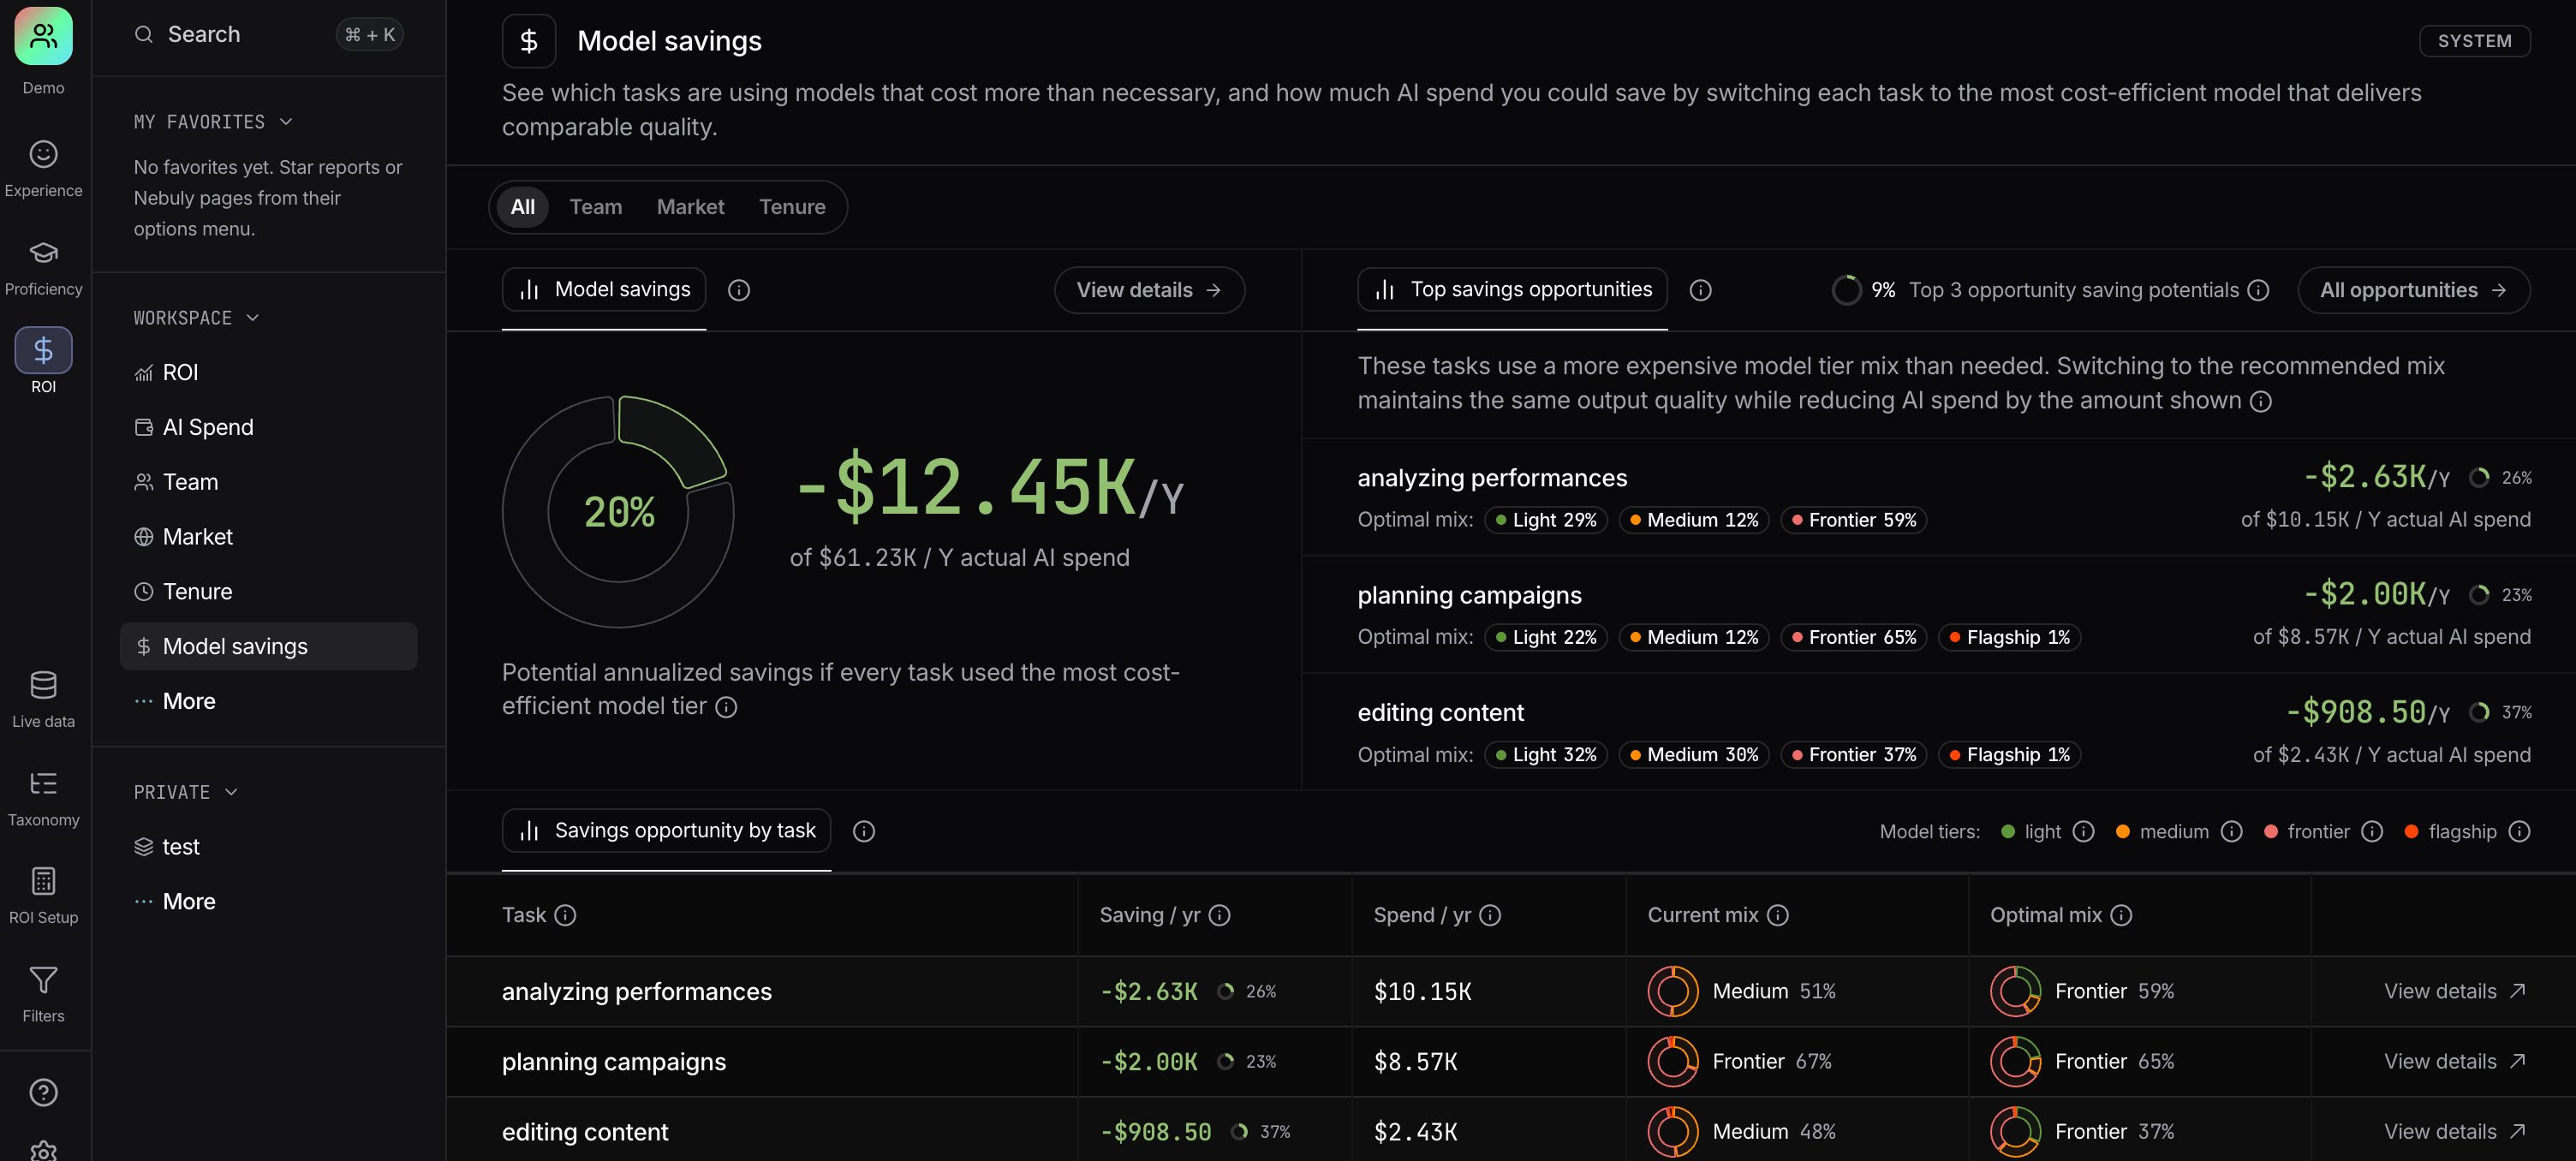
New Feature: Upskilling
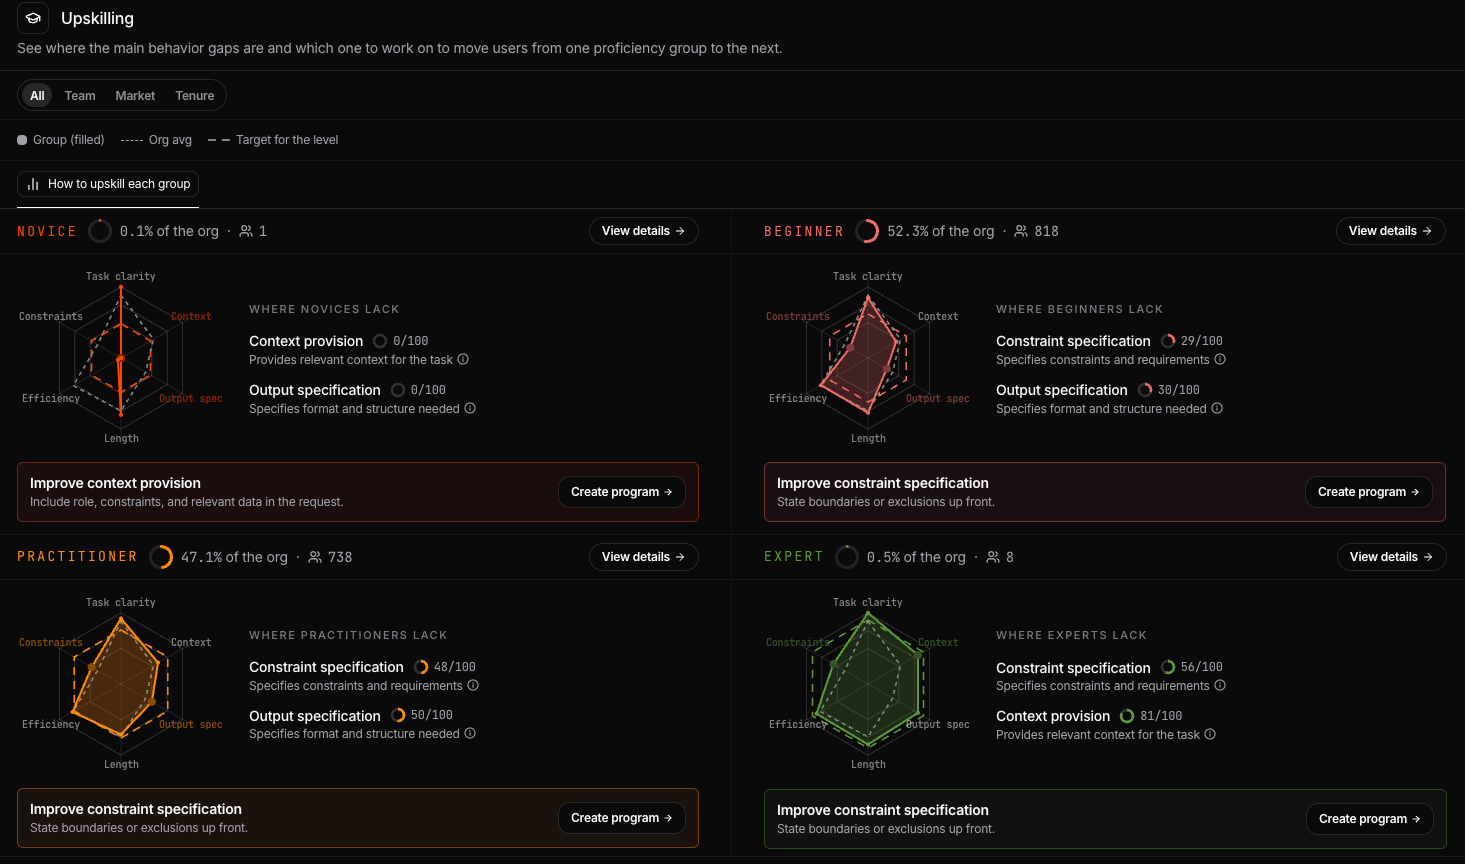
Understanding proficiency is only useful if you know what to improve.The new Upskilling experience breaks AI Proficiency down into six measurable behaviors, so you can see where each group performs well and where there is room to improve:- Task clarity
Measures whether the user clearly and precisely explains what they want the AI to do. - Context provision
Looks at whether the user provides the relevant background, information, or data the AI needs to answer effectively. - Output specification
Measures whether the user specifies the expected format, length, or structure of the response. - Prompt length
Looks at the amount of information included in the prompt. - Conversation efficiency
Measures how efficiently the user reaches a resolution. Fewer unnecessary turns result in a higher score. - Constraint specification
Looks at whether the user clearly defines boundaries, exclusions, or requirements for the response.
New Feature: AI Proficiency
The new AI Proficiency experience gives you a measurable view of how effectively your workforce uses AI. You can access it by clicking on the AI proficiency product in your left product rail.Start with your organization’s AI Proficiency Score and compare it with benchmarks to understand where your workforce stands.Then see how employees are distributed across four proficiency groups:Novice, Beginner, Practitioner, and Expert.You can compare that distribution across teams and other organizational dimensions, and see how it changes over time.Track how many employees are moving up the proficiency ladder, how many are slipping back, and whether your organization is becoming more effective with AI.This turns AI proficiency into something you can continuously measure, rather than a one-off assessment.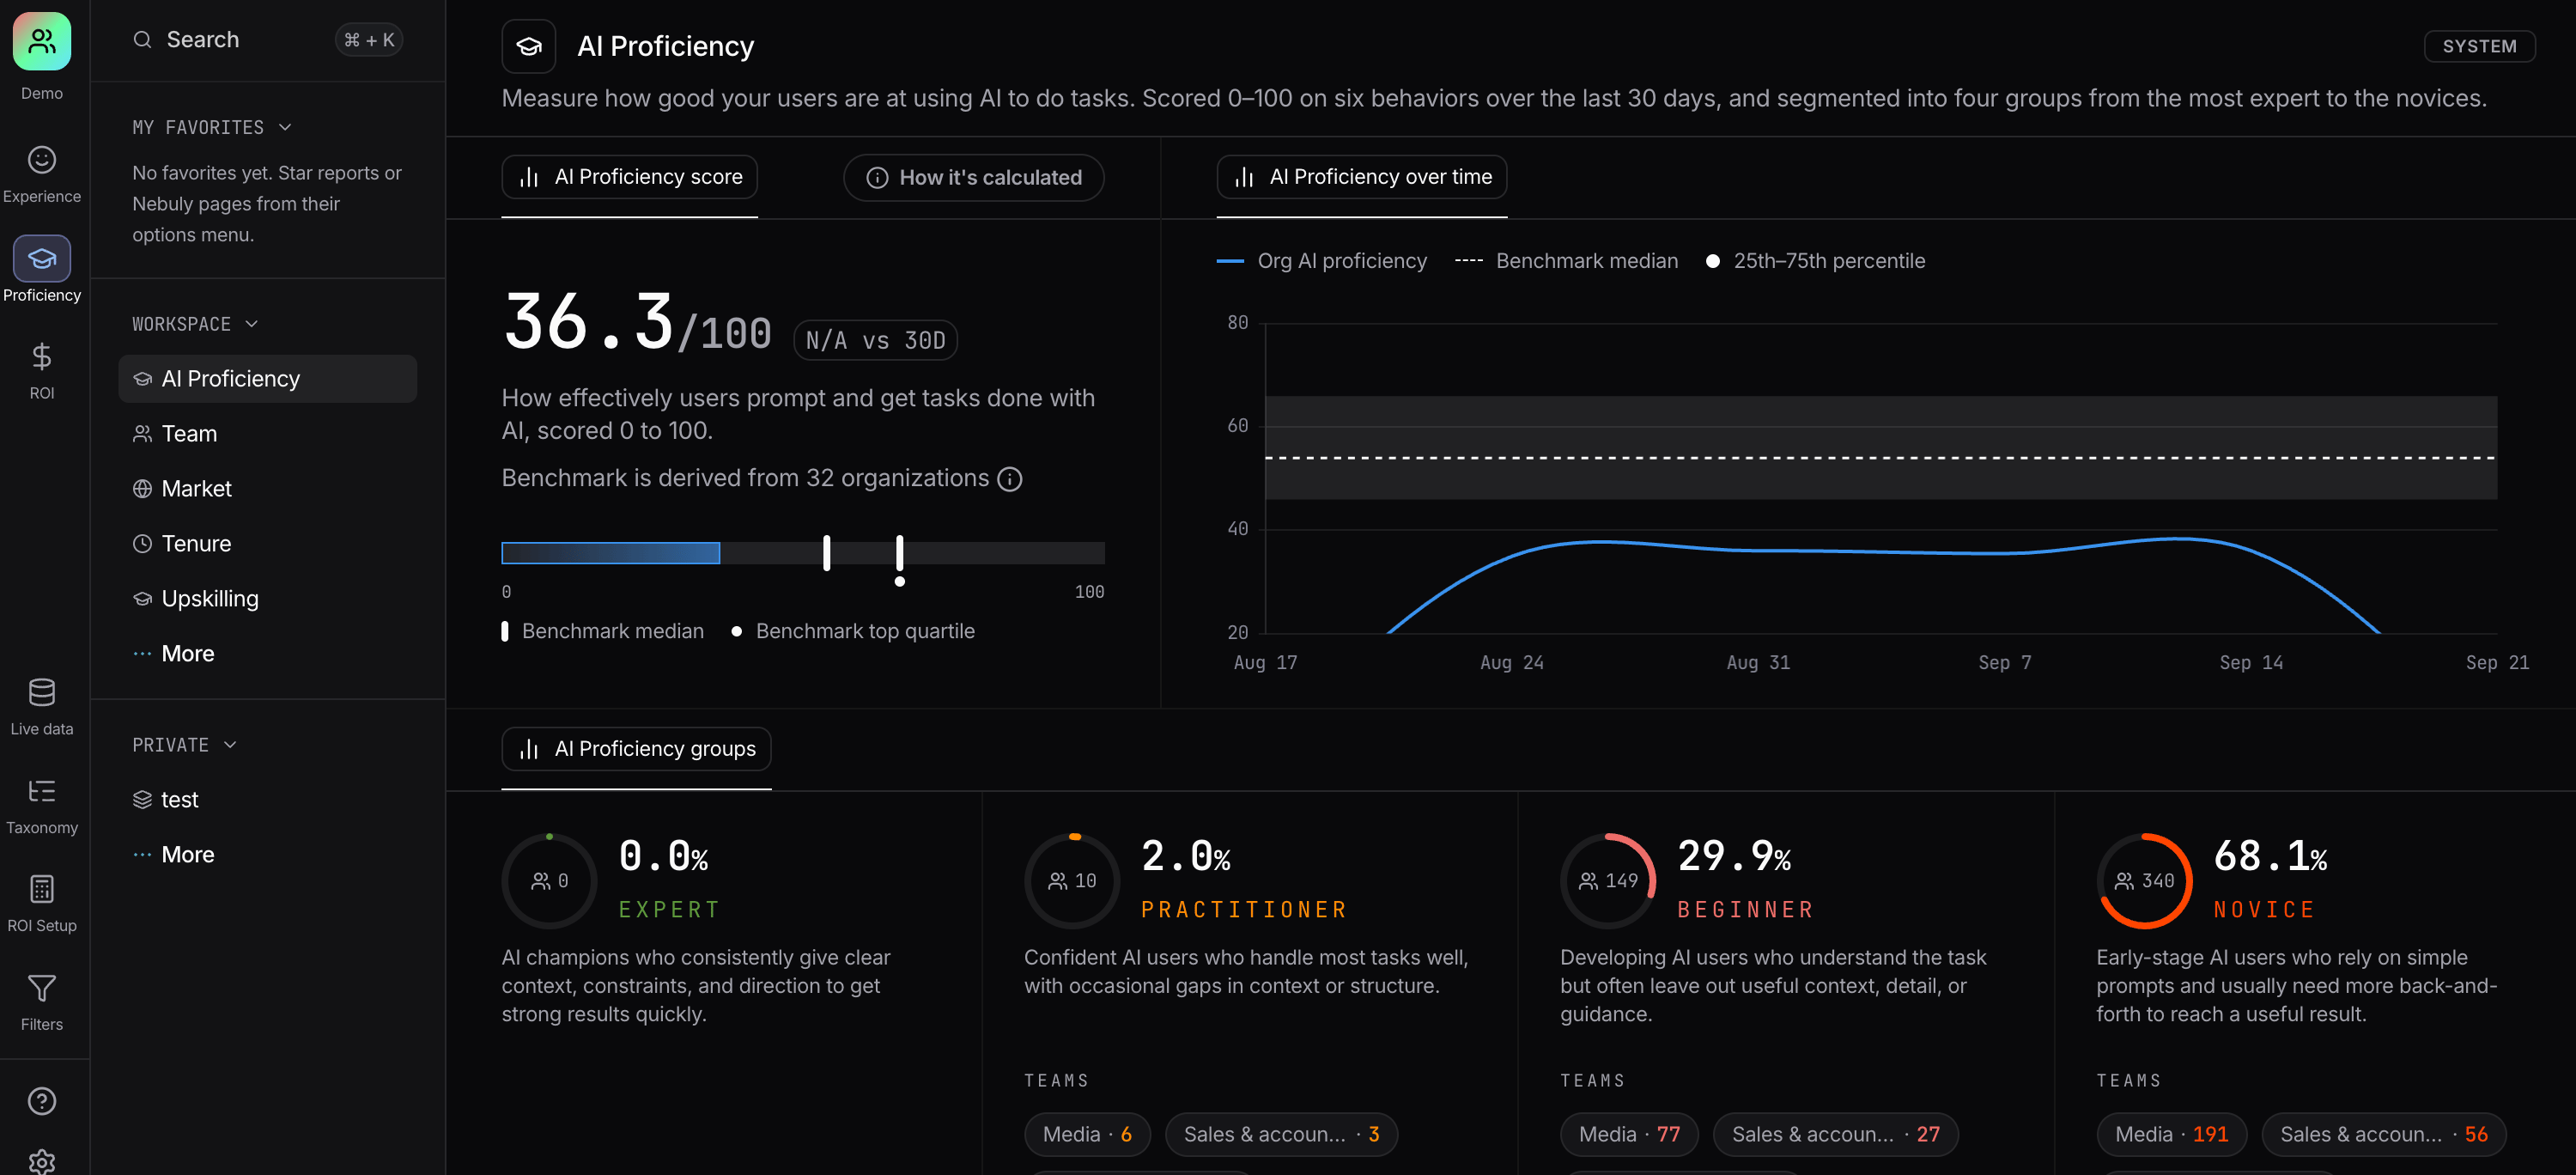
Three products, built around three questions
The new Nebuly platform is organized around three core products: Experience, ROI, and Proficiency.You can access and move between them directly from the left product rail.Experience
What are people experiencing when they use AI?Experience helps you understand what users actually do and experience when interacting with your AI applications.You can explore the topics people discuss, understand what they are trying to accomplish, monitor failures and friction, analyze emotions and user reactions, and inspect individual conversations when you need more context.For customer agents, this helps you continuously monitor the quality of the experience your agent delivers.For employee agents, it helps you understand how people are actually putting AI to work, and help them improve.Experience is available for both customer and employee agents
ROI
What value is AI creating?ROI helps you understand the economic impact of AI across your organization.Measure the time saved by AI, estimate the economic value generated from that time, monitor AI costs, and identify opportunities to improve efficiency.Instead of looking only at adoption or usage, ROI helps you answer a more important question: what return are we actually getting from AI?ROI is available for employee agents only
AI Proficiency
How effectively are people using AI?Proficiency helps you understand how well your workforce uses AI and where people can improve.Measure AI Proficiency across your organization, compare teams and segments, understand where employees sit on the proficiency ladder, and identify opportunities for targeted upskilling.AI Proficiency is available for employee agents only
New employee and customer agent projects
We’re also introducing two distinct types of projects: employee and customer.AI used by your employees and workforce serves a very different purpose from an AI agent used by customers, so the questions you need to answer are different too.When creating a new project, you can now choose which type of AI application you are analyzing:Employee agent projects are designed for AI used by your workforce. They help you understand how employees use AI, how proficient they are, how much time and economic value AI is creating, and where there are opportunities to improve adoption, skills, and ROI.Customer projects are designed for customer-facing AI agents. They help you understand what customers are trying to accomplish, what they discuss with your agent, where the experience breaks down, and where you can improve it.Based on the project type you choose, Nebuly adapts the experience and gives you access to the products and insights most relevant to that use case.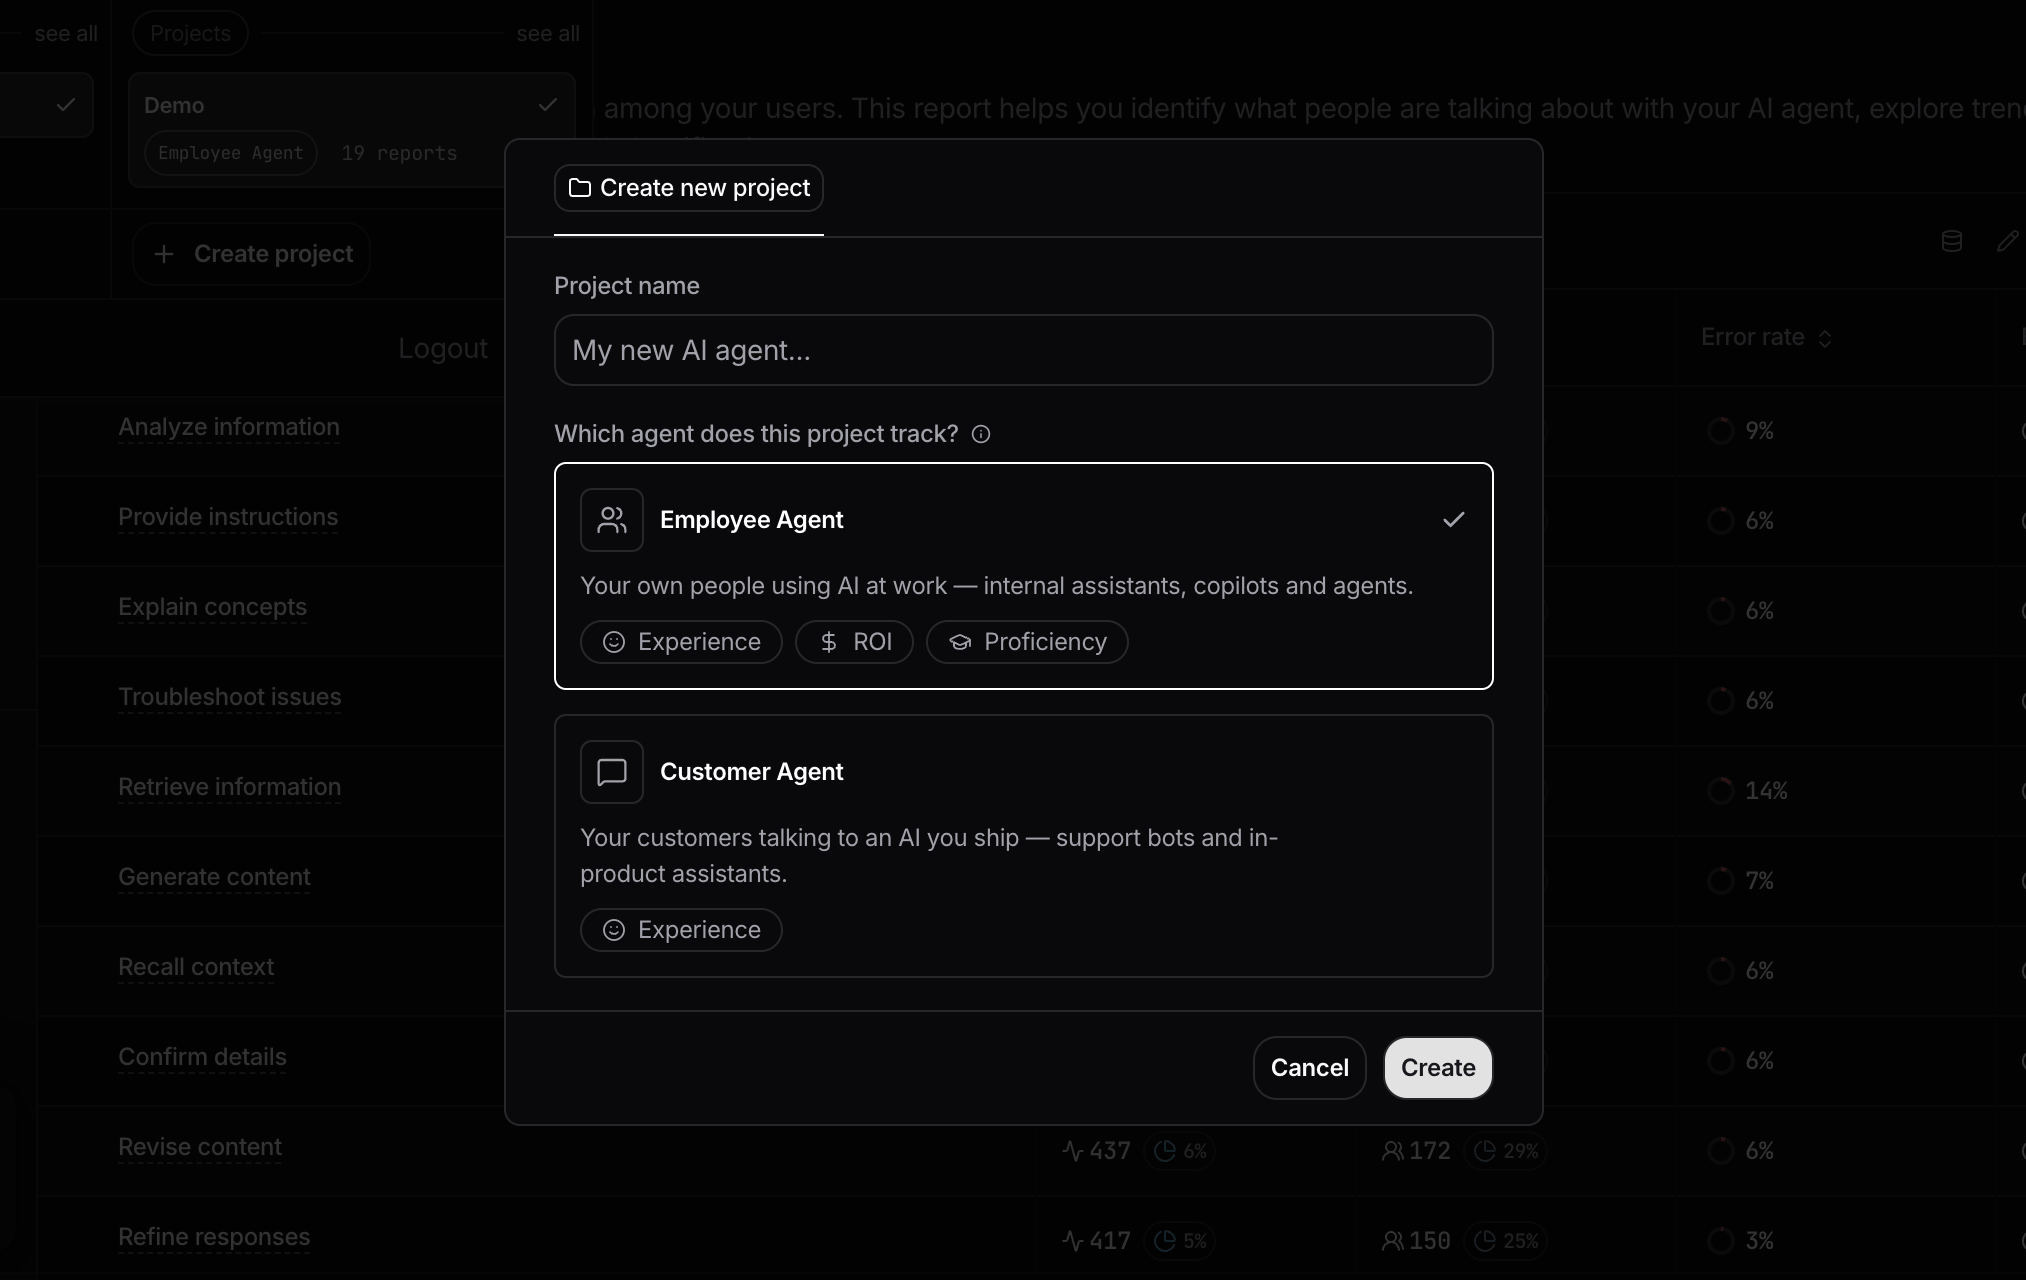
A new product bar — everything in one place
Nebuly is expanding beyond a single analytics experience into a broader set of products. To make that possible, we needed a simpler way to move between them.The new product bar is now the main navigation across Nebuly. From here, you can switch between our three products — Experience, ROI, and Proficiency — while also accessing your applications, Live Data, Settings, and the other tools in your workspace.We also cleaned up the overall navigation and product structure, so everything now has a clearer place. From the new product bar, you can access your organizations and projects from the main button in the top-left, move between Nebuly products, check Live Data, manage your Taxonomy and ROI settings, and apply global filters across your workspace.It’s also where you can access your workspace and account settings.The result is a simpler foundation for Nebuly today, and one that gives us room to keep expanding the product over time.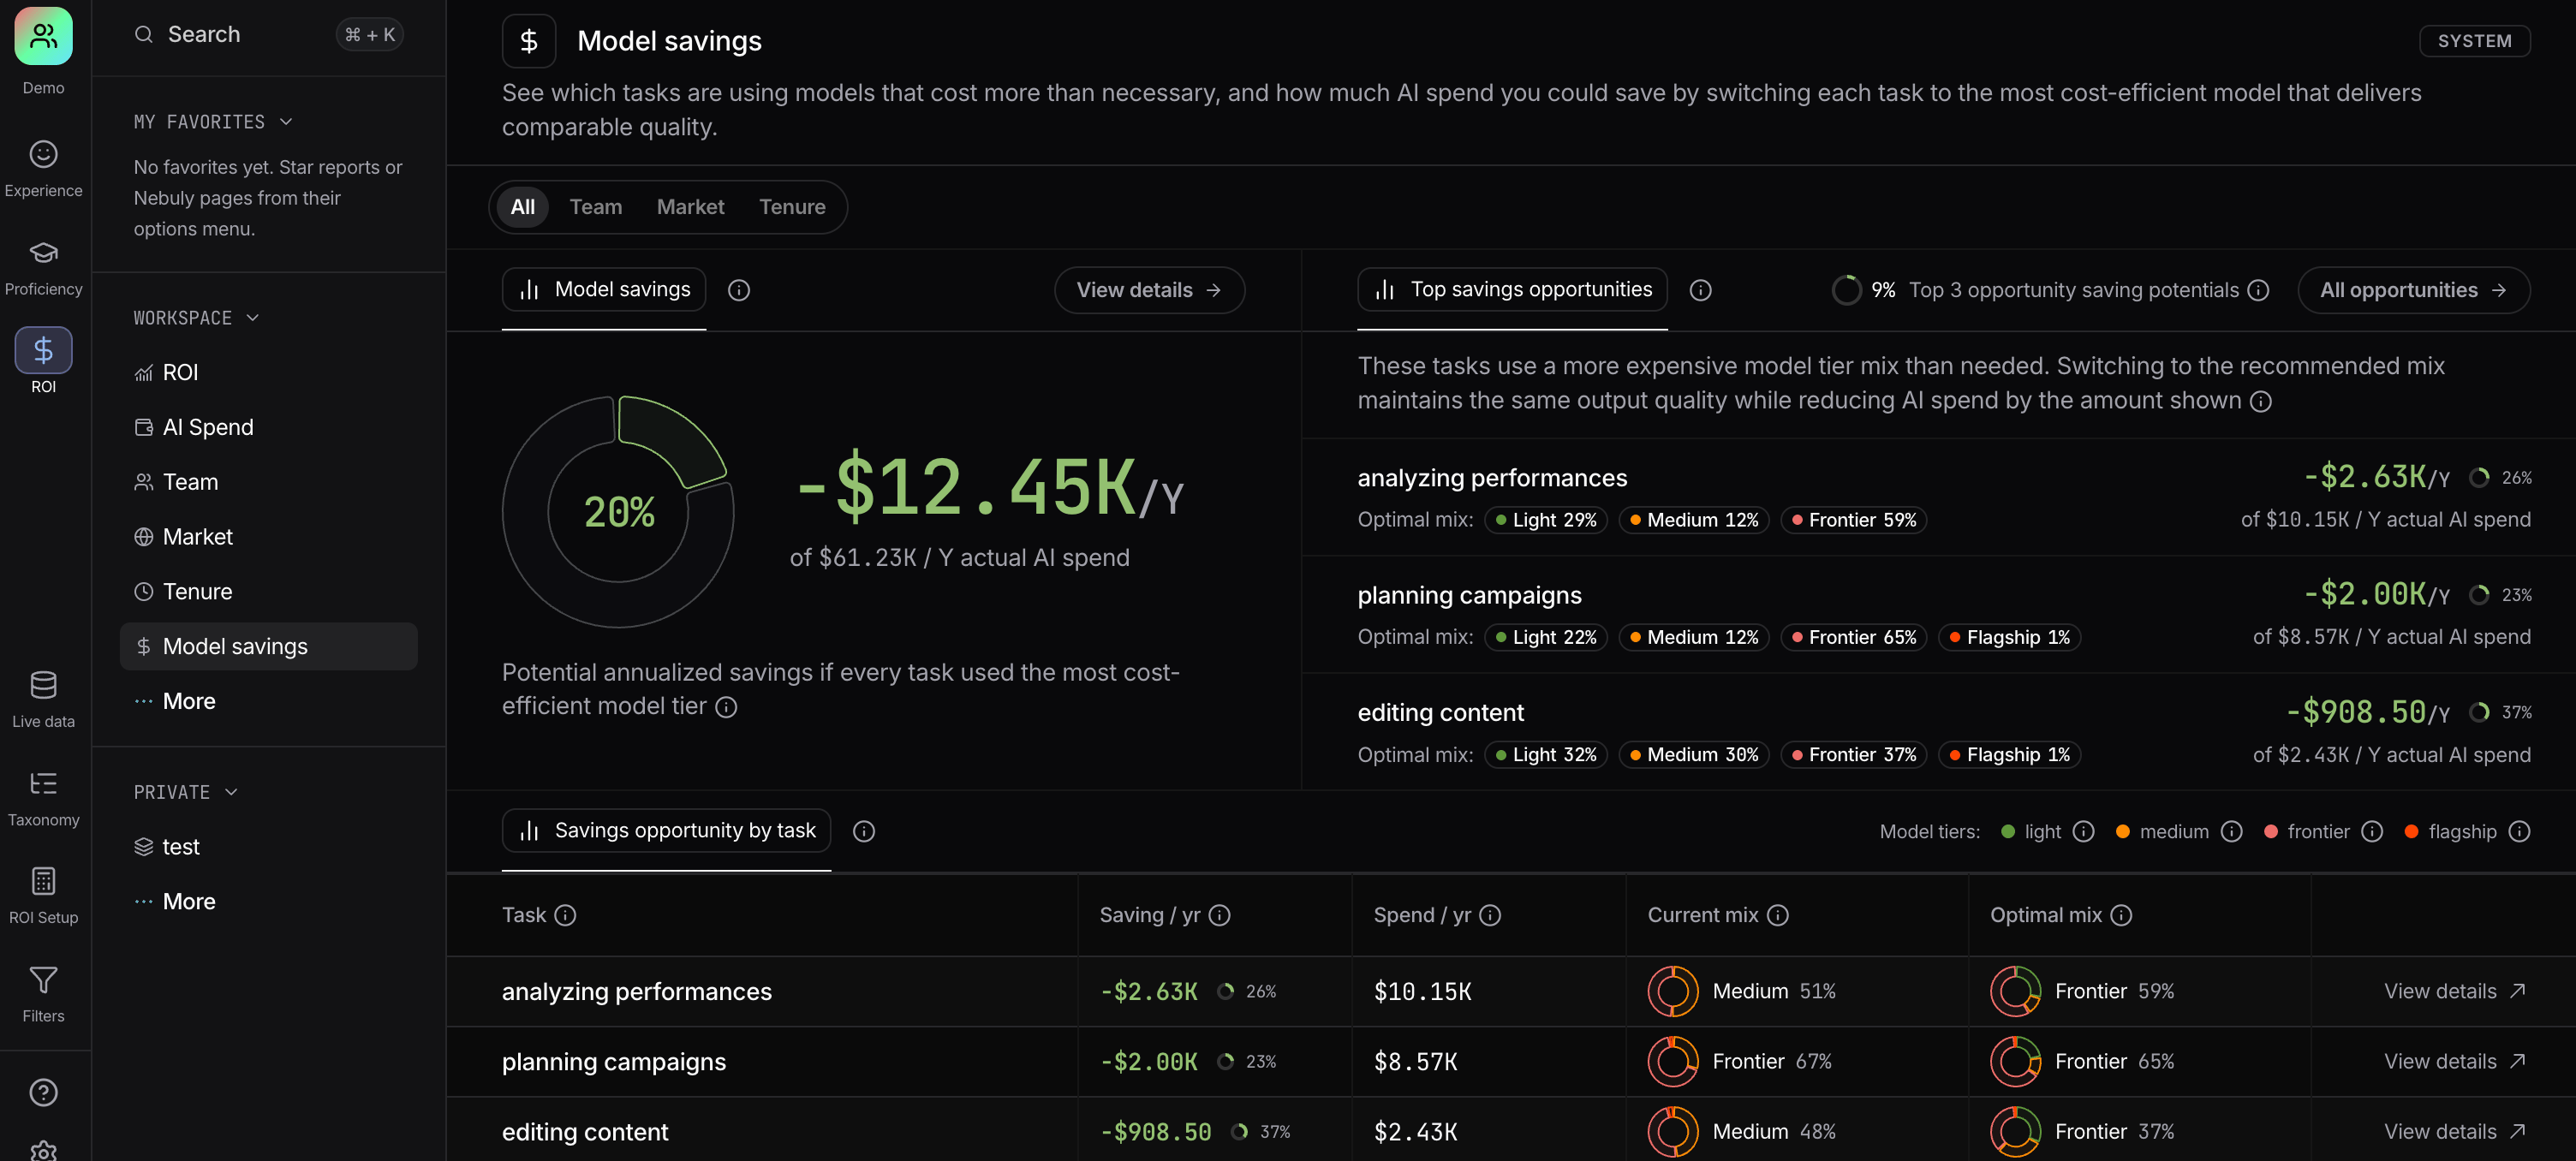
New fields in the ingestion API
We’ve expanded the event-ingestion API with dedicated fields for team, market, and tenure.Previously, these organizational dimensions had to be inferred from tags. They can now be sent explicitly with your data, making it easier and more reliable to analyze AI usage, ROI, and Proficiency across different parts of your organization.This powers views such as Proficiency by team, AI spend by market, and comparisons across different employee tenure groups.Reports now have a clear identity
Every report now has a header with an icon, title, description, and last-edited information, including the author’s avatar.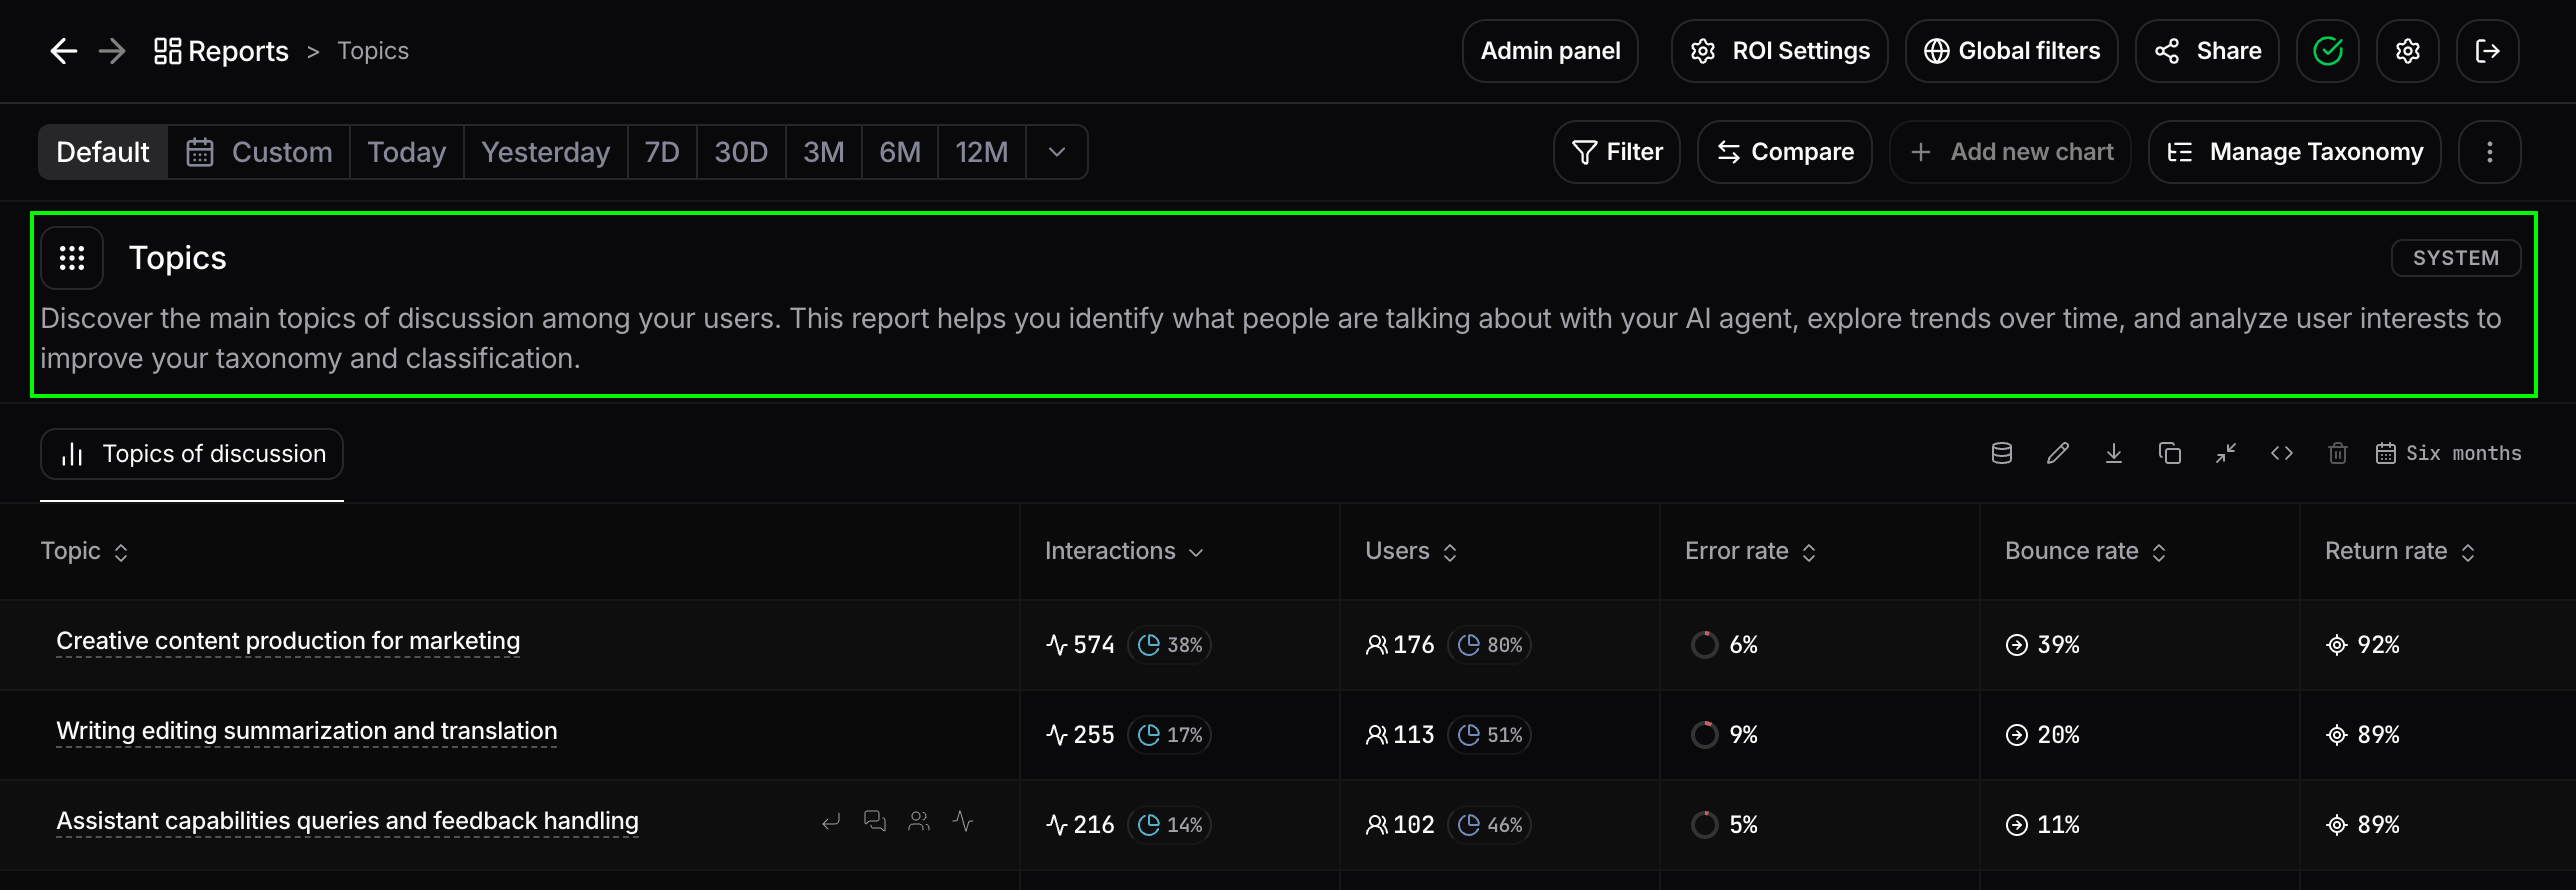
System-generated reports use the same header in read-only mode
Advanced create user groups based on behavior
User groups can now be defined by what people actually do over time, using behavioral conditions, rolling windows, and nested AND/OR logic.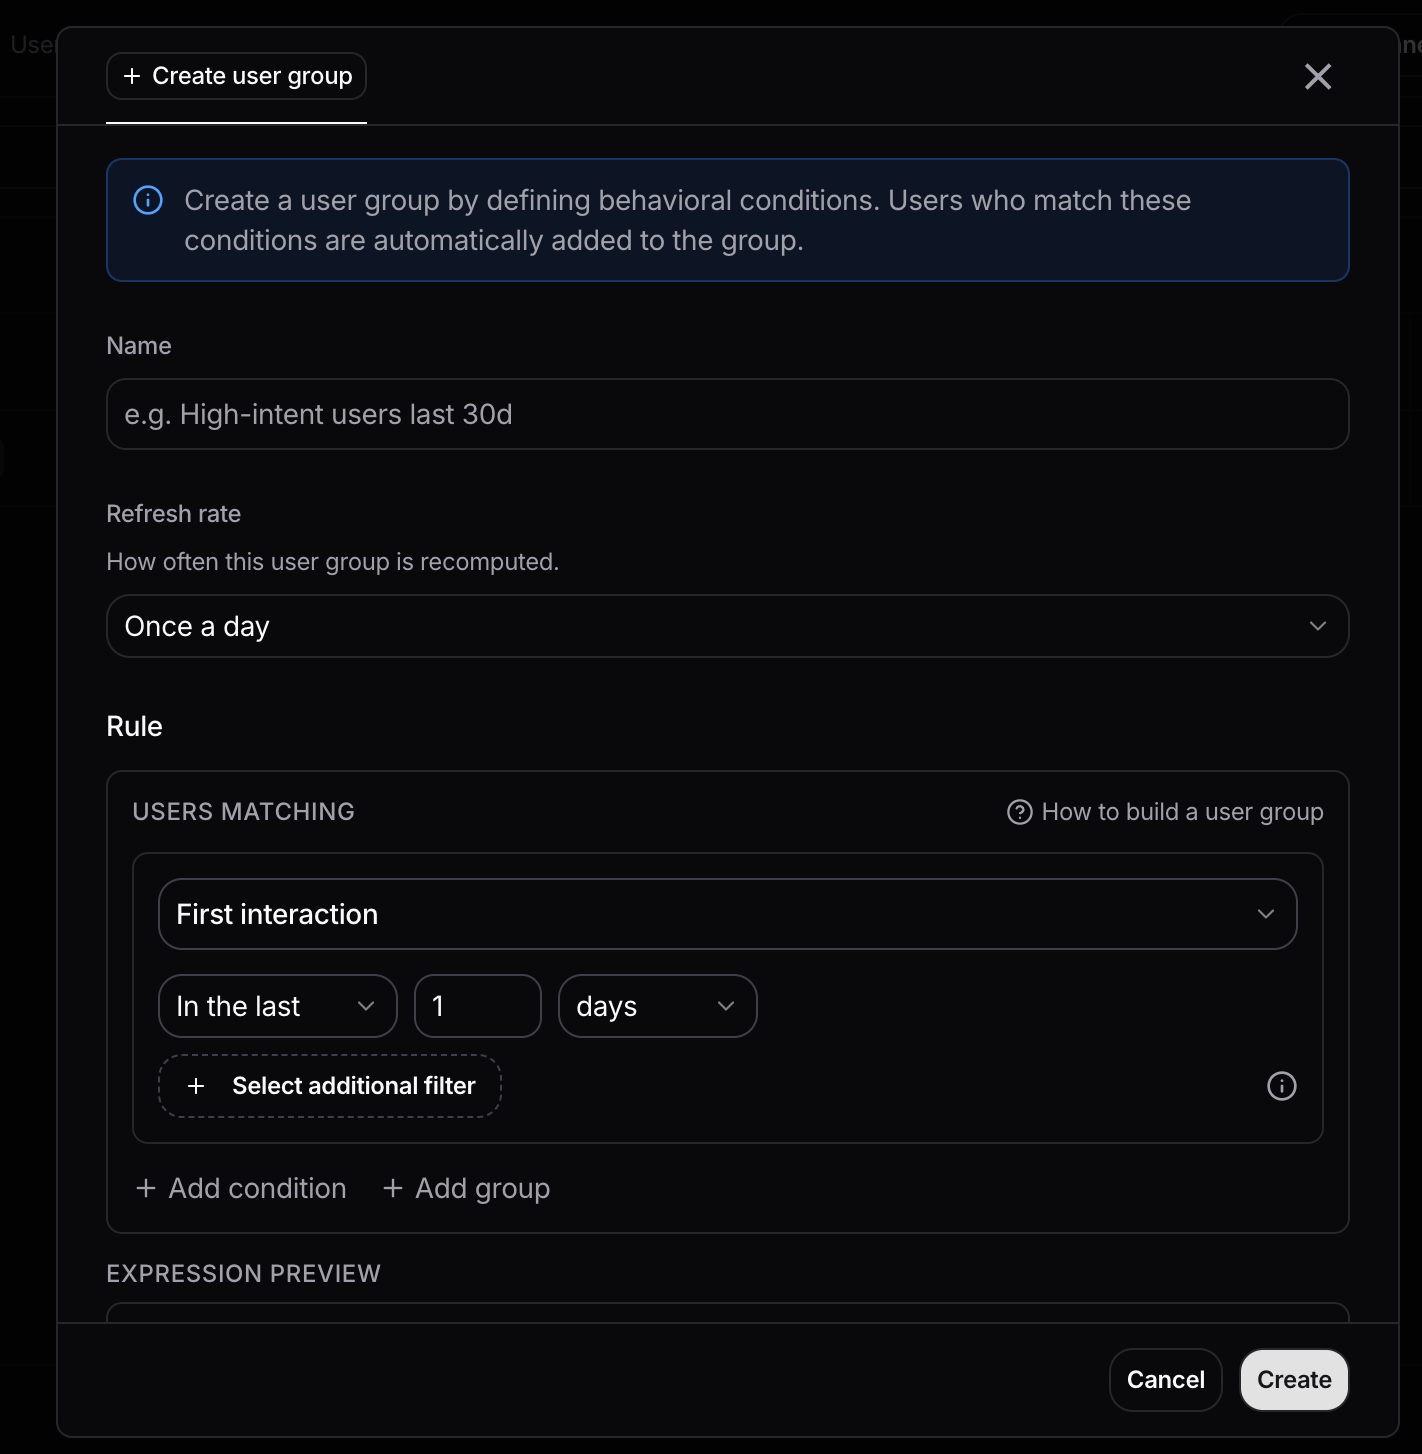
- First interaction: when a user first interacted.
- Last interaction: when they most recently interacted
- Interaction tag: whether their interactions match a specific tag.
- Number of interactions: how many individual interactions they had.
- Number of conversations: how many conversations they started or took part in.
- Active periods: how consistently they were active across the selected time window.
- Average session length: how long their sessions typically last.
active frequently AND (many conversations OR long sessions) stays readable as it gets more specific.Behavioral conditions can use a rolling window, so rules can evaluate a user’s recent activity, such as the last 4, 8, or 12 weeks, instead of their entire history. As time moves forward, the window moves with it and group membership updates accordingly.A live preview translates the definition into plain language as you build it, and group membership is recalculated against the report’s selected time range.Once created, user groups can be used across Nebuly to filter and compare different parts of your audience.More control when creating taxonomy groups
Taxonomy groups now include an Advanced section with controls for classifier targeting and retroactive classification.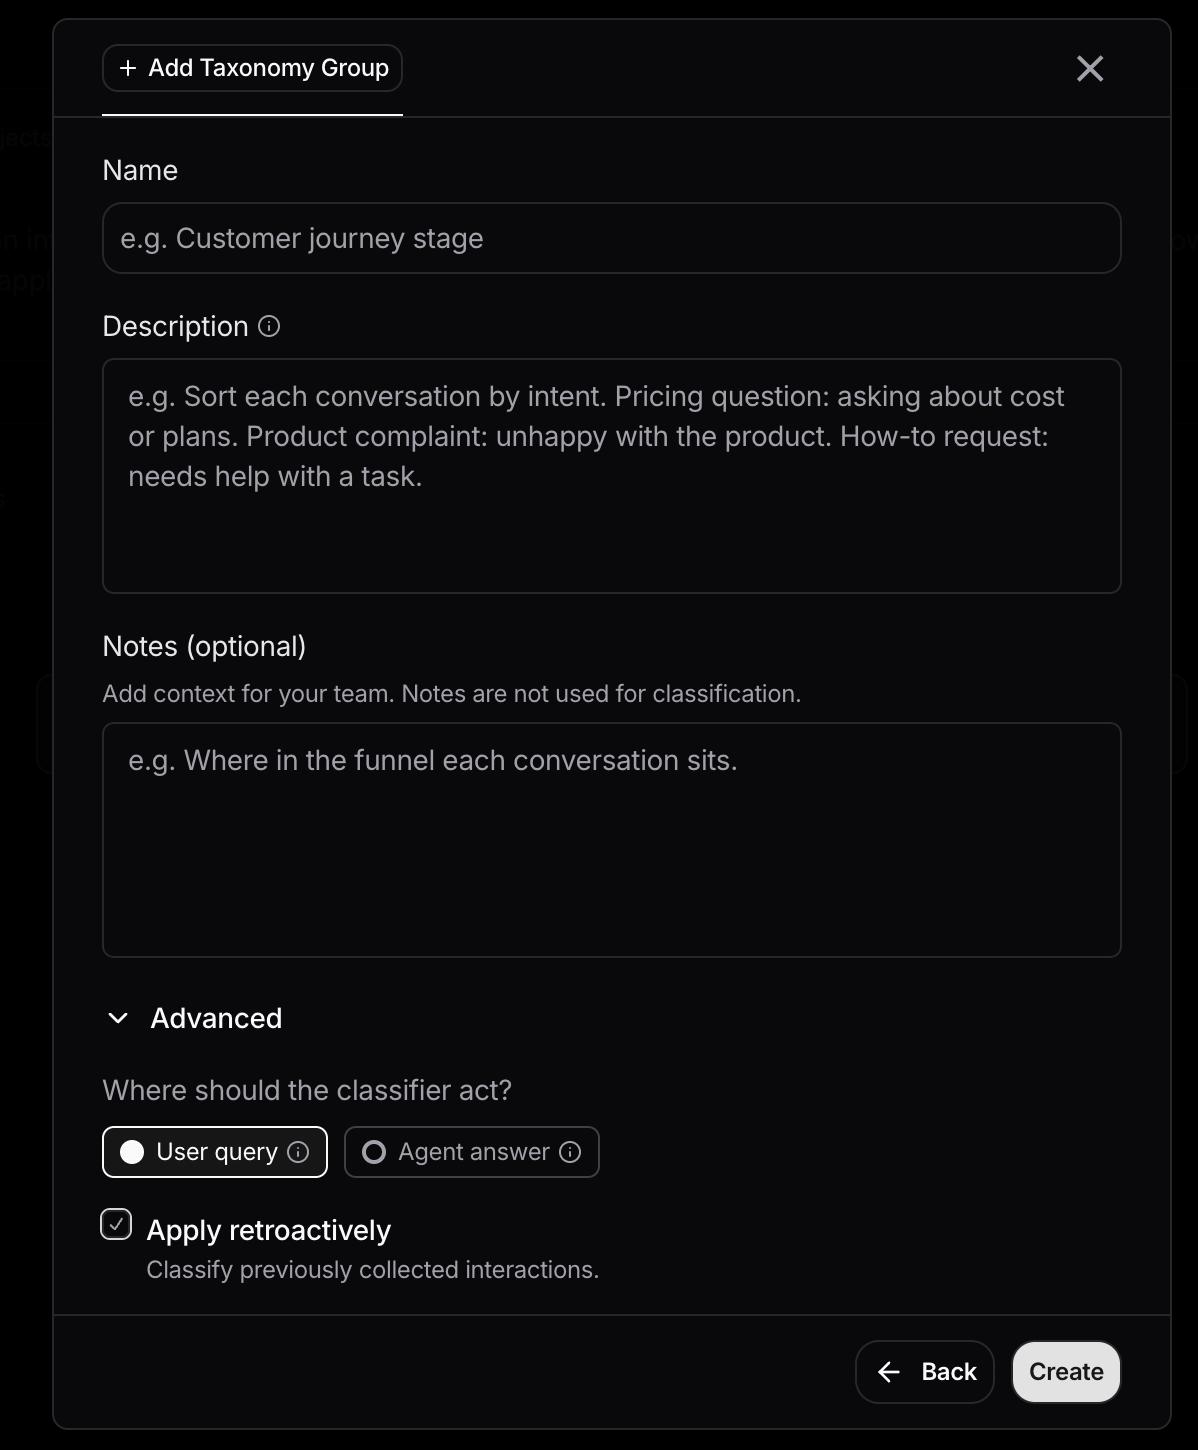
- User query: the message the user sends to your AI agent.
- Agent answer: the response your AI agent sends to your user.
For self-hosted deployments, taxonomy groups can be applied retroactively to up to 3 months of historical interactions. Reprocessing historical data uses additional compute, so processing time and cost depend on the number of interactions in the selected period.Contact Sales to learn more about enabling historical reprocessing for your deployment.
New Global Search
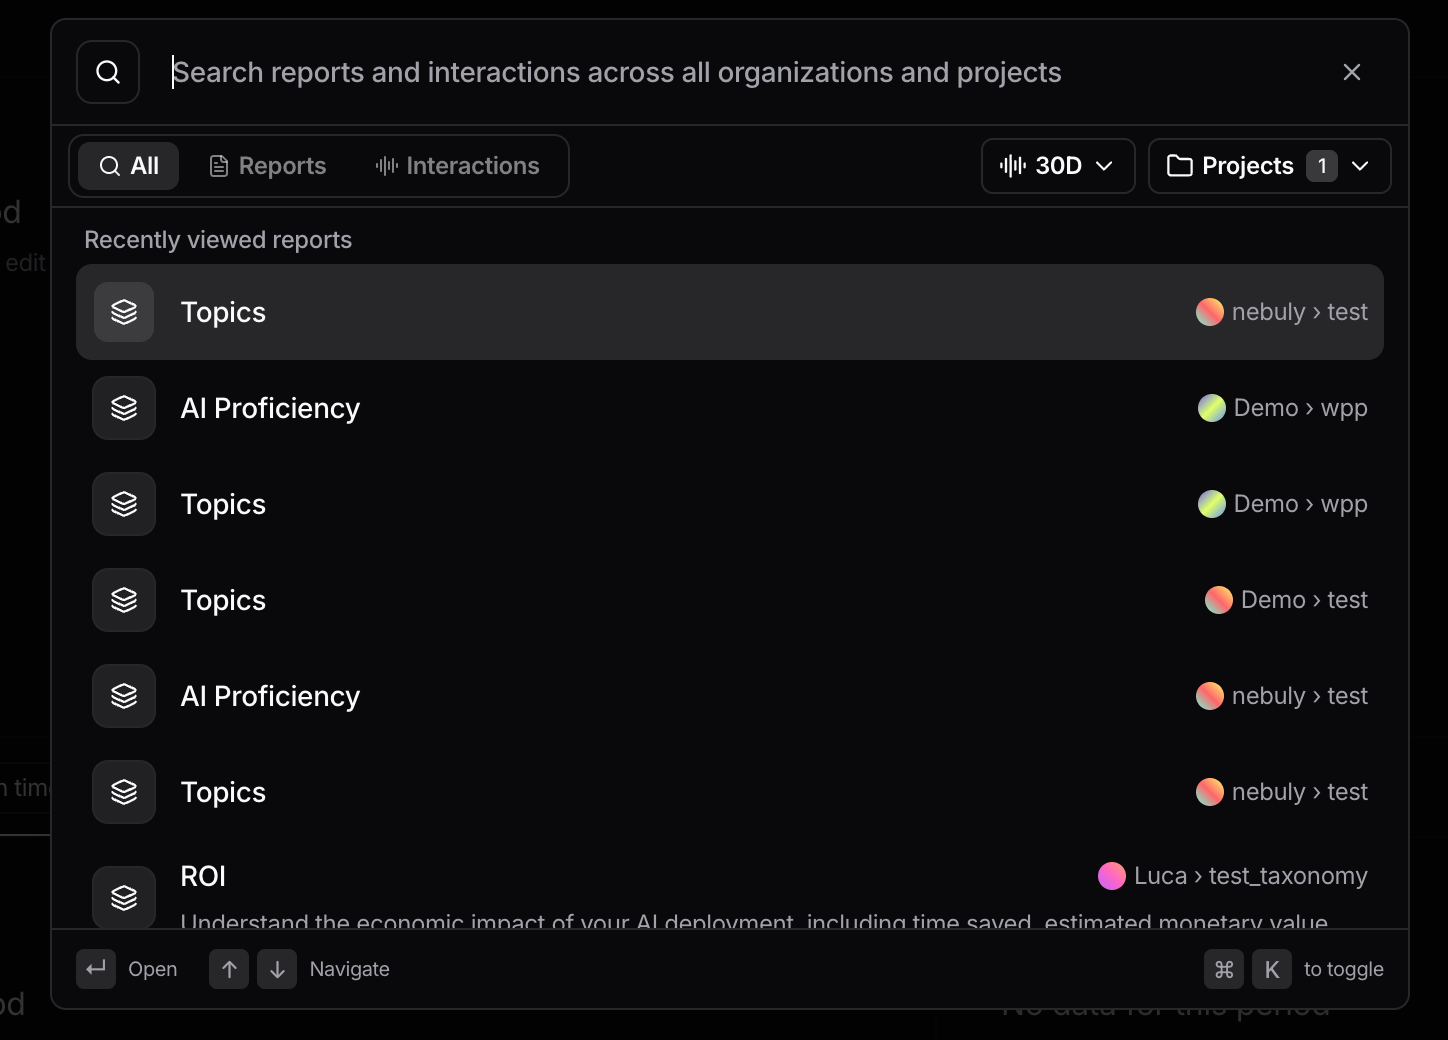
Global search is now a much faster way to navigate your workspace. From one place, you can search across reports and interactions from every organization and project you have access to — no need to switch projects first.You can also narrow down results to get exactly what you’re looking for:- Choose what to search: see everything, or focus specifically on Reports or Interactions.
- Filter by time: limit interactions search to a specific time range, such as the last 30 days.
- Filter by project: search across everything you can access or select the specific projects that matter.
- Navigate with your keyboard: quickly open search, move through results, and jump to the right report or interaction without leaving the keyboard.
MCP: Microsoft Copilot integration
You can now setup a copilot agent that can be used to query Nebuly data directly from Microsoft Copilot, check how the integration works in the dedicated page.Other minor improvements
Numbers that are easier to read
Large numbers are now formatted consistently across Nebuly using compact units like K, M, and B. So instead of3,400,000, you’ll see 3.4M — making dashboards and reports much easier to scan.Smoother loading
We replaced disruptive loading states with skeleton previews across tables, reports, Explore, Live Activity, and Settings. Content now keeps its shape while data loads, reducing layout shifts and making the product feel faster.Filters restyling
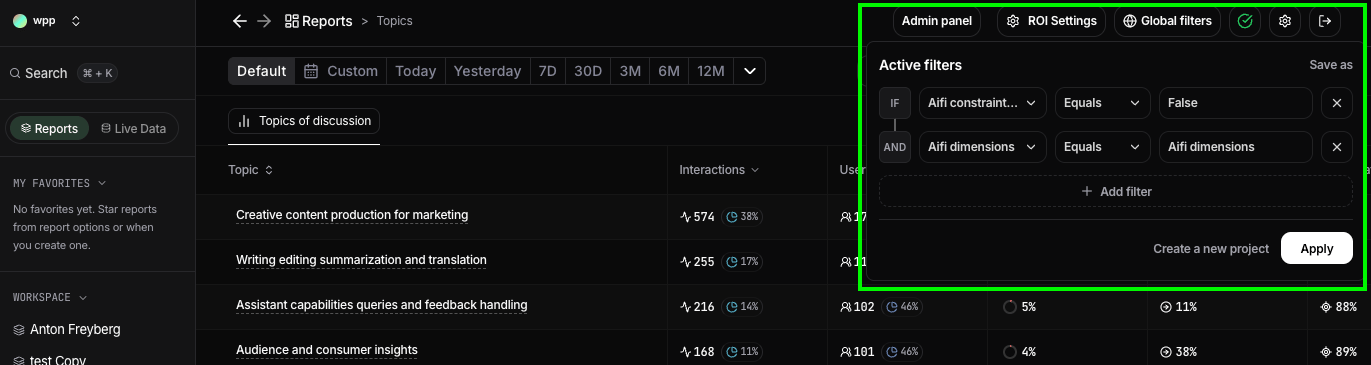
We’ve refreshed the filters experience to make existing actions clearer and easier to understand.- Clearer AND conditions. When multiple filters are applied, the filter button now explicitly shows that they’re combined with an AND condition, making it immediately clear how the result set is being filtered.
- Clearer save-for-everyone action. We’ve made the existing option to save reports filters for everyone more prominent, helping report creators define the default filtered view of a report.
- Clearer sub-project creation. The option to create a new project from the current global filters is now easier to find and understand, helping project managers create focused sub-projects based on a specific subset of data.
Improved reports management
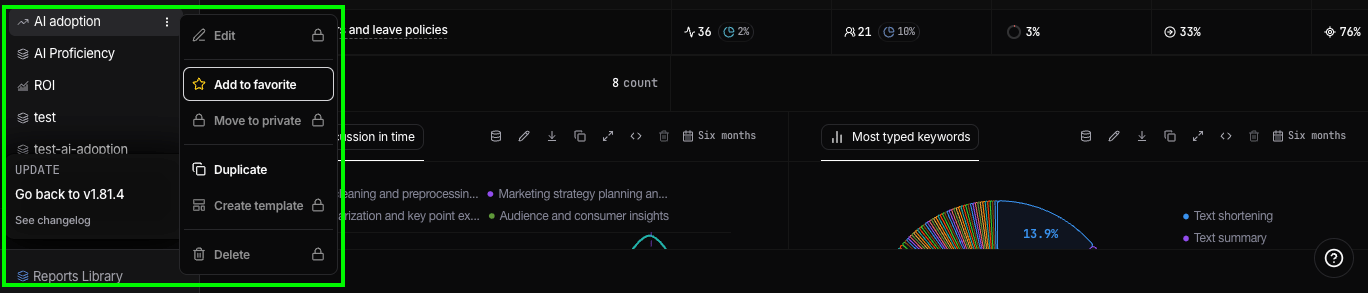
Every report action is now available directly from the sidebar. Each report row has a 3-dots menu that opens the full set of actions in place — you no longer have to open All reports just to rename or duplicate something.From the menu you can:- Edit the report name, description, and icon
- Duplicate the report
- Create a template from it
- Move it between Favorites and Private
- Delete it
AI Proficiency (Beta)
You can now measure how effectively your team and employees work with AI, not just how often they use it.AI Proficiency analyzes how users interact with AI in real workflows and provides an AI Fluency Index (AIFI) from 0 to 100. This gives organizations a consistent way to understand AI proficiency across their workforce and track how it develops over time.With AI Proficiency, you can:- Measure AI fluency for individual users with the AIFI score.
- Track proficiency over time to understand whether users are improving.
- Compare proficiency across users and groups to identify differences between teams or populations.
- Automatically segment users into Expert, Practitioner, Beginner, and Novice proficiency levels.
- Identify up-skilling areas and users who may benefit from additional training or support.
- Measure whether training, coaching, and AI adoption initiatives are actually improving how people work with AI.
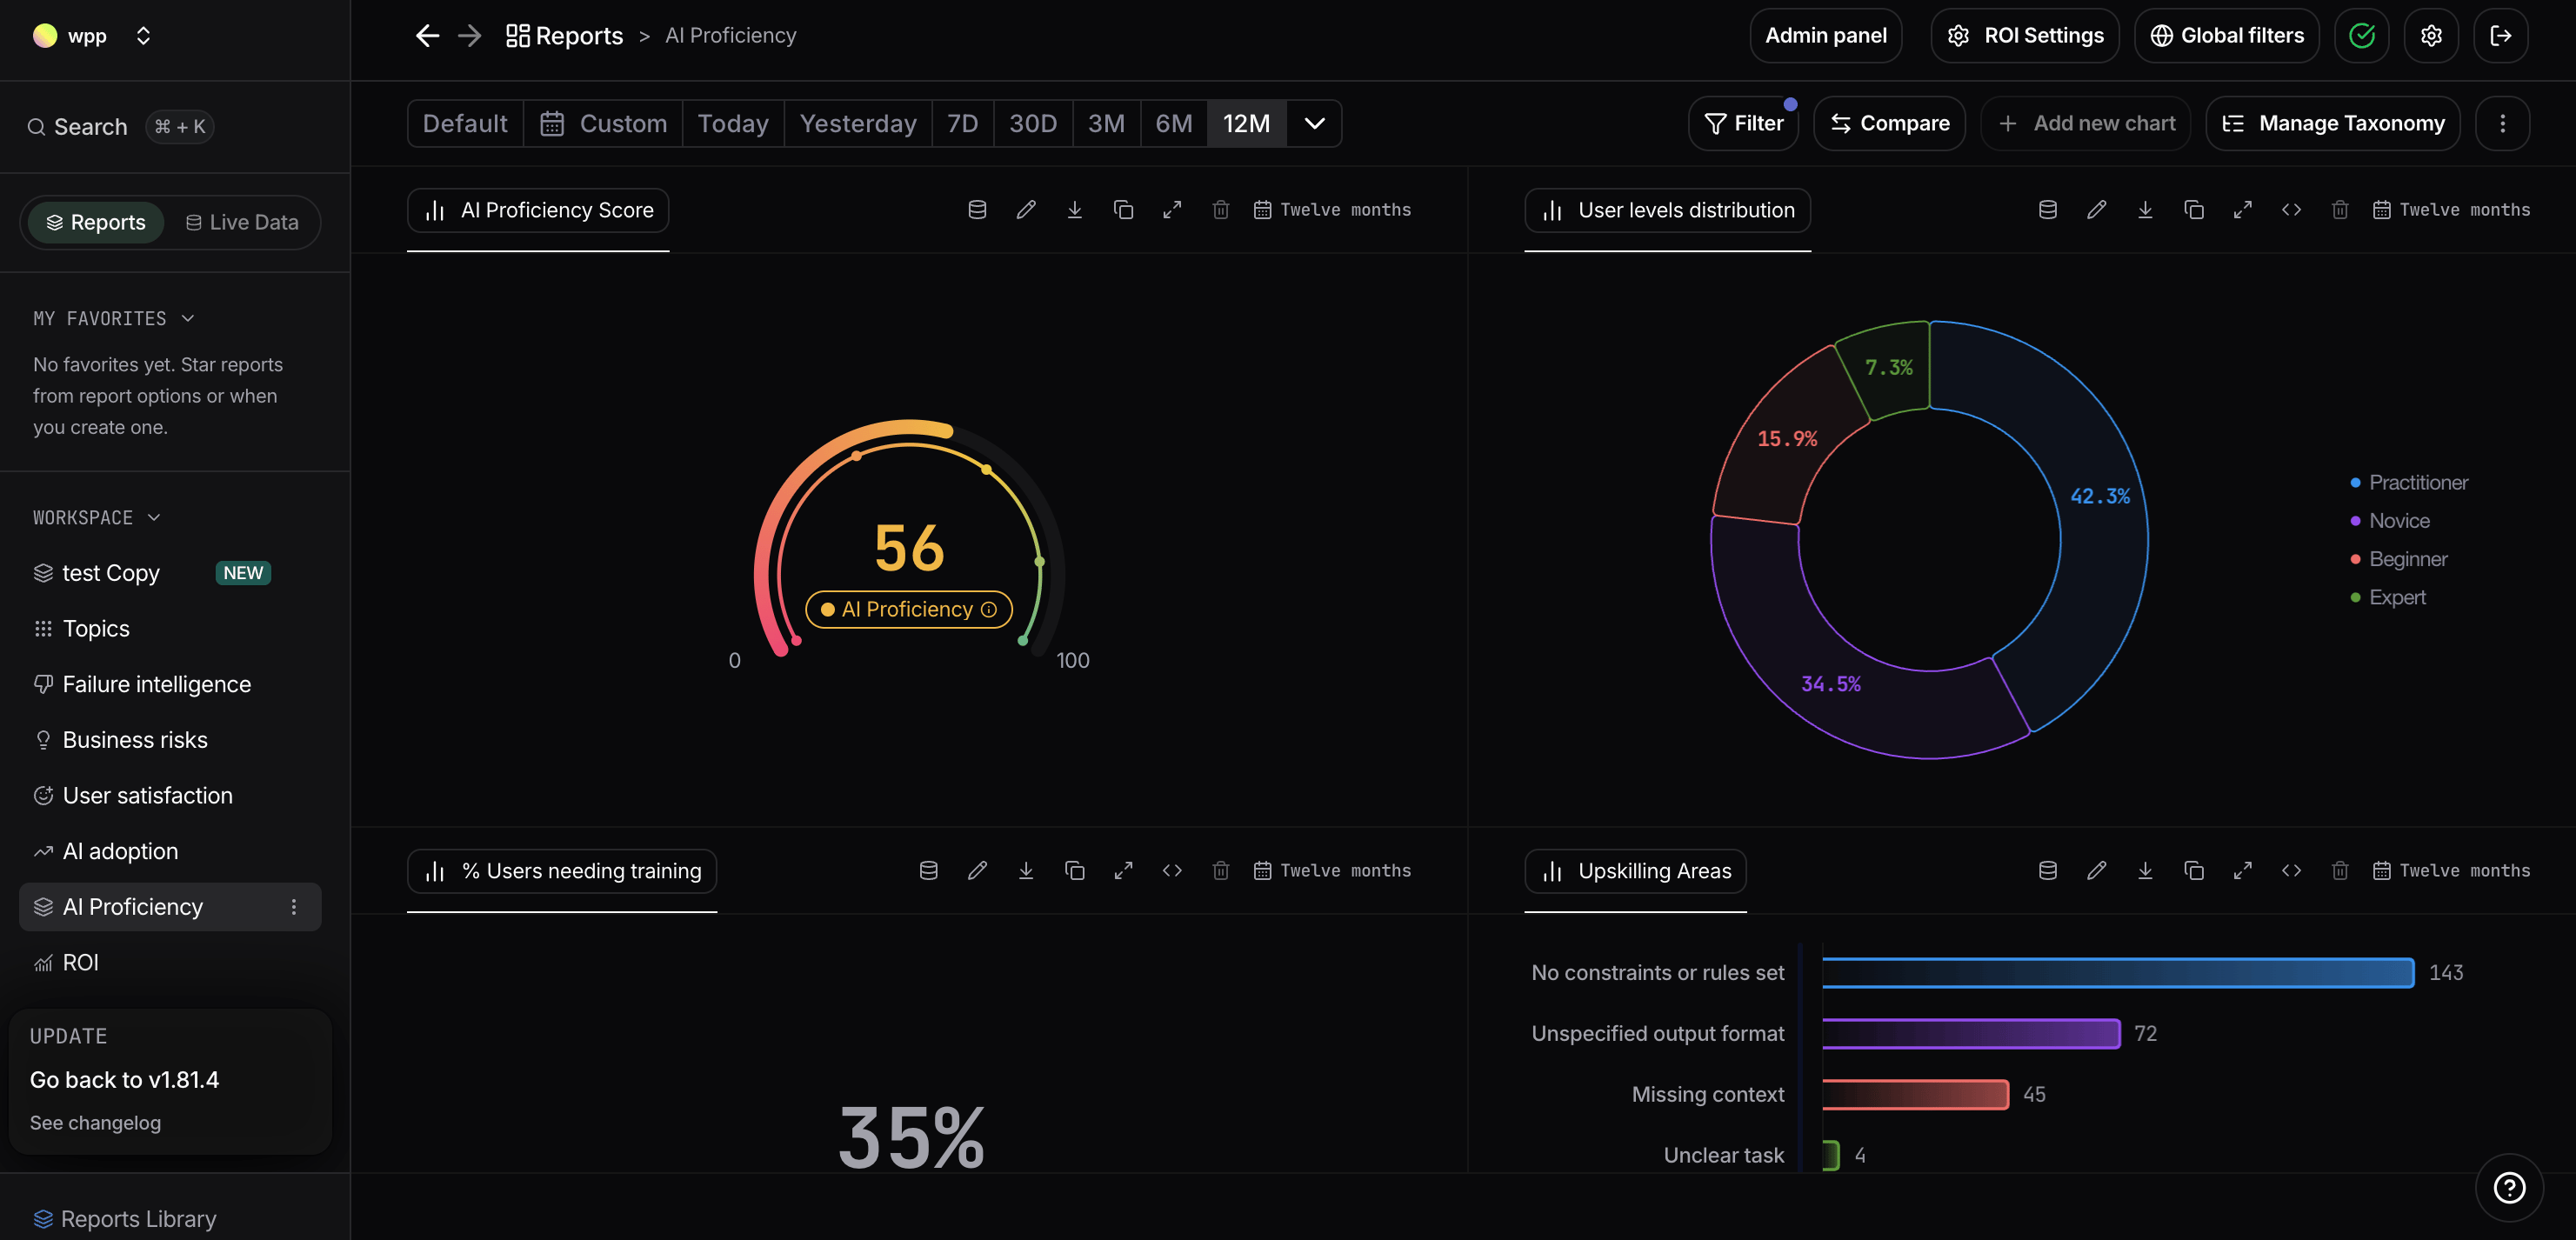
AI Proficiency is currently in beta. Reach out to our sales team to enable it for your organization.
Taxonomy Management (Beta)
You can now manage your taxonomies directly in Nebuly, giving you full control over how interactions and conversations are organized across the platform.Taxonomies are the foundation of Nebuly analytics: they turn unstructured AI conversations into meaningful business dimensions such as Topics, Business Risks, Failure Types, User Intent, Sentiment, and your own custom categories.With the new Taxonomy management experience, you can manage the full lifecycle of your taxonomy from one place.Manage all your taxonomies in one place
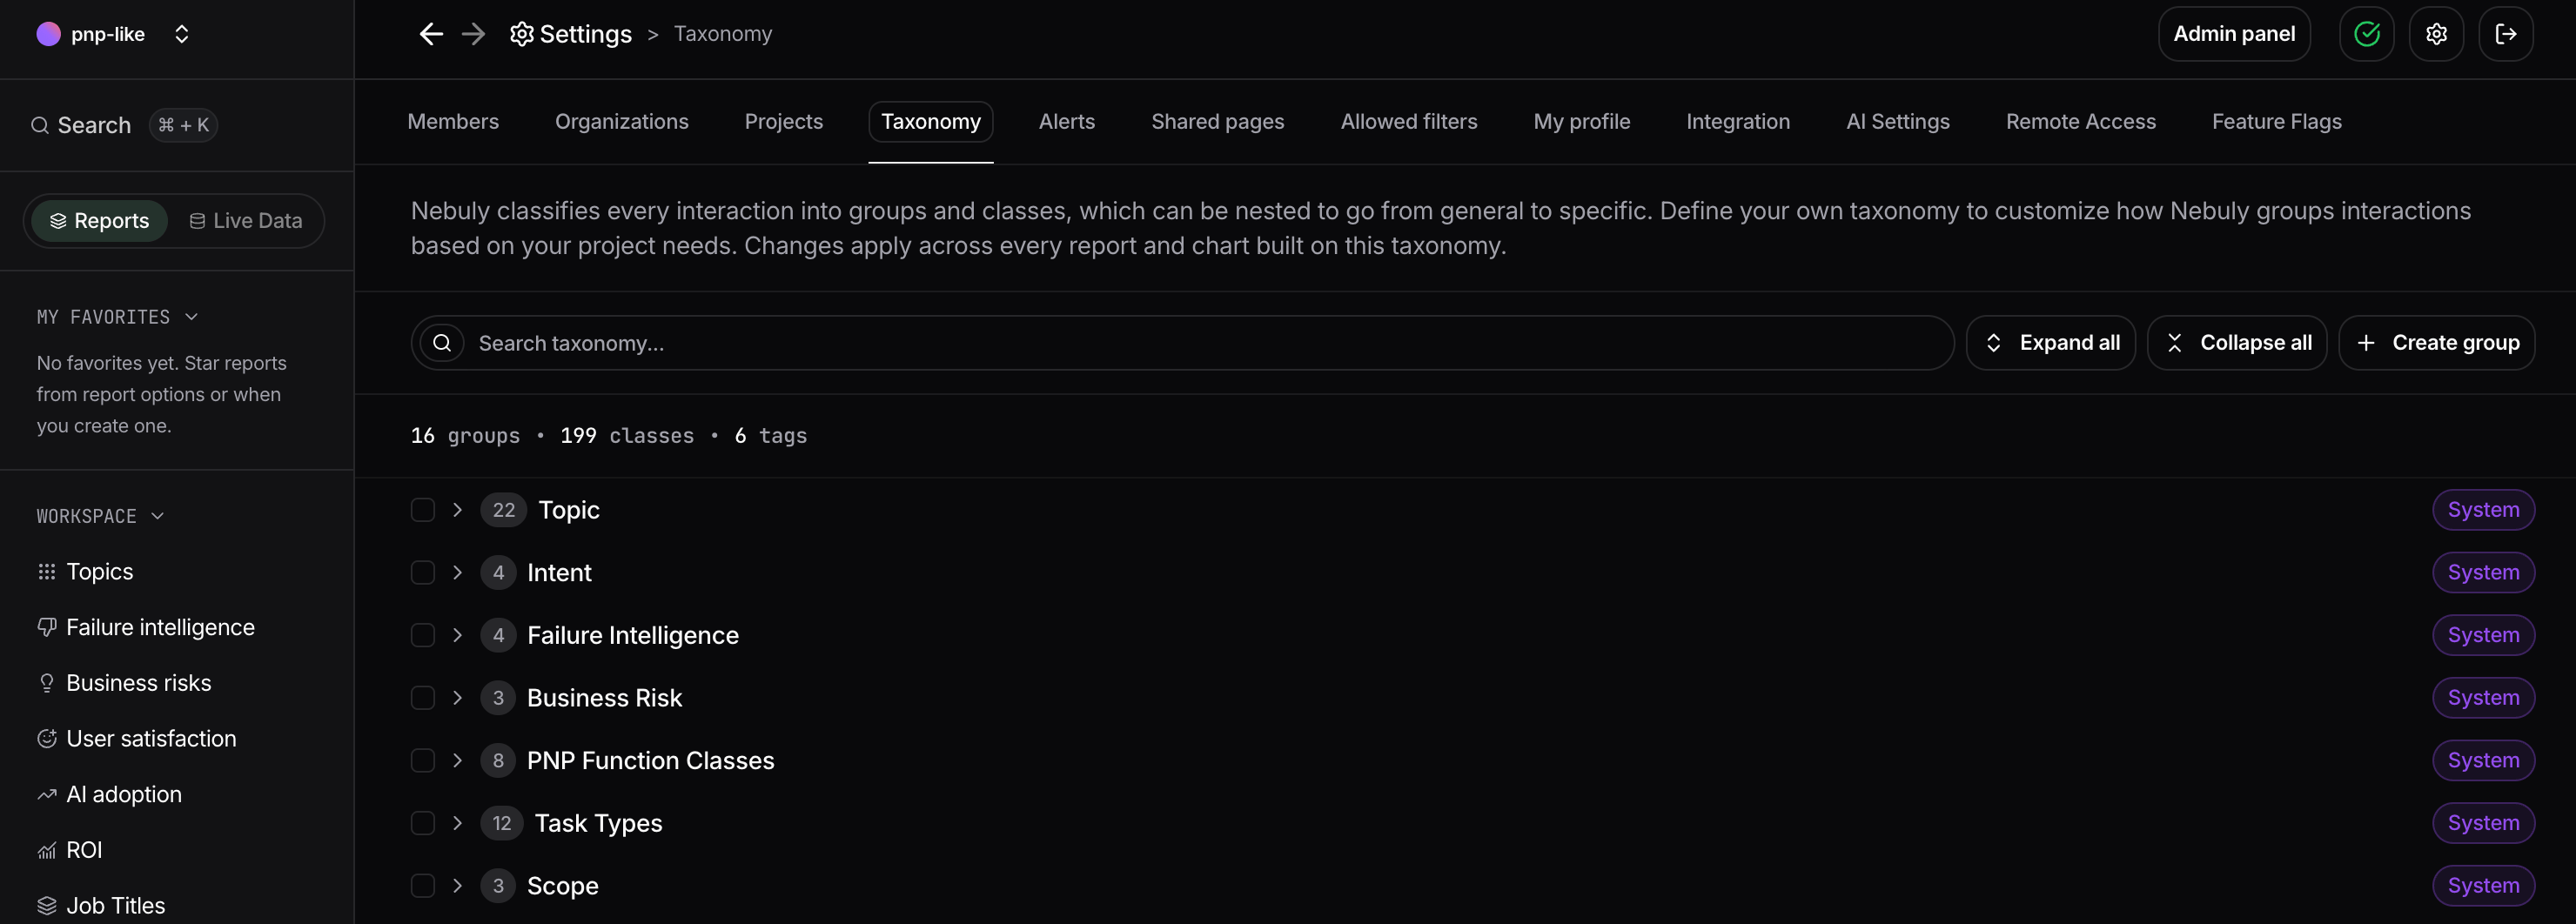
The new Taxonomy page brings together System, Tag, and Custom taxonomies, so you can browse and manage the groups and classes used across your analytics.You can:- Browse groups by type — System, Tag, or Custom.
- Search across groups and classes to quickly find what you’re looking for.
- See each group’s definition and classes from the same workspace.
- Manage taxonomies generated by Nebuly alongside the ones defined by your organization.
Create custom taxonomy groups
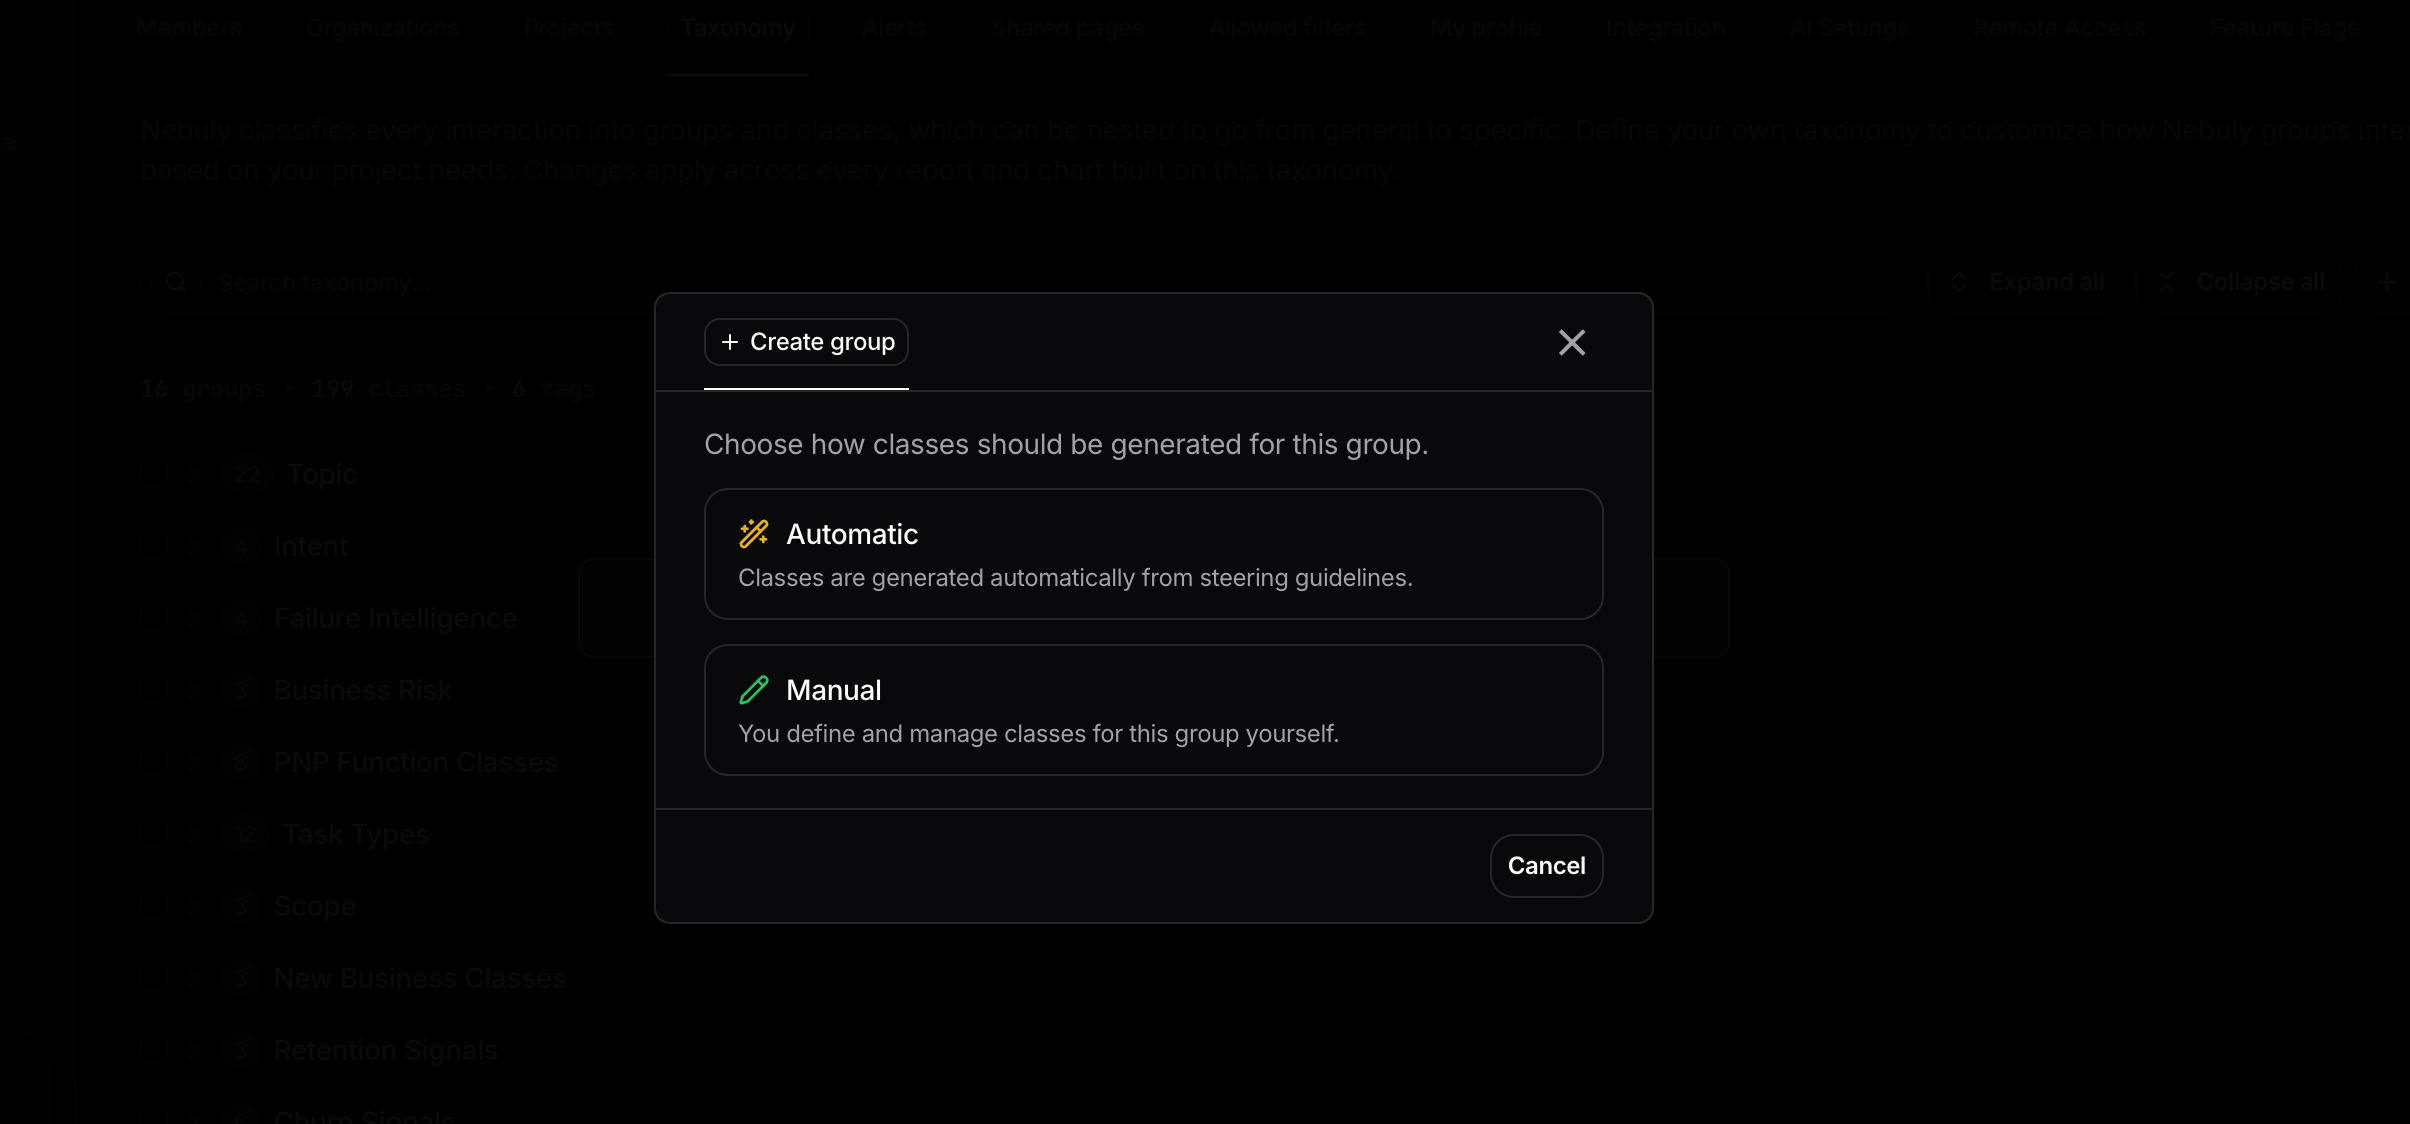
Create Custom groups for any business dimension you want to analyze, such as products, services, workflows, customer needs, or internal processes.You can create them in two ways:- Automatic class generation — provide a name, description, and guidelines for what the taxonomy should capture, and Nebuly discovers and generates the relevant classes from your data.
- Manual class setup — create an empty group and define exactly which classes it should contain yourself.
Add classes in different ways
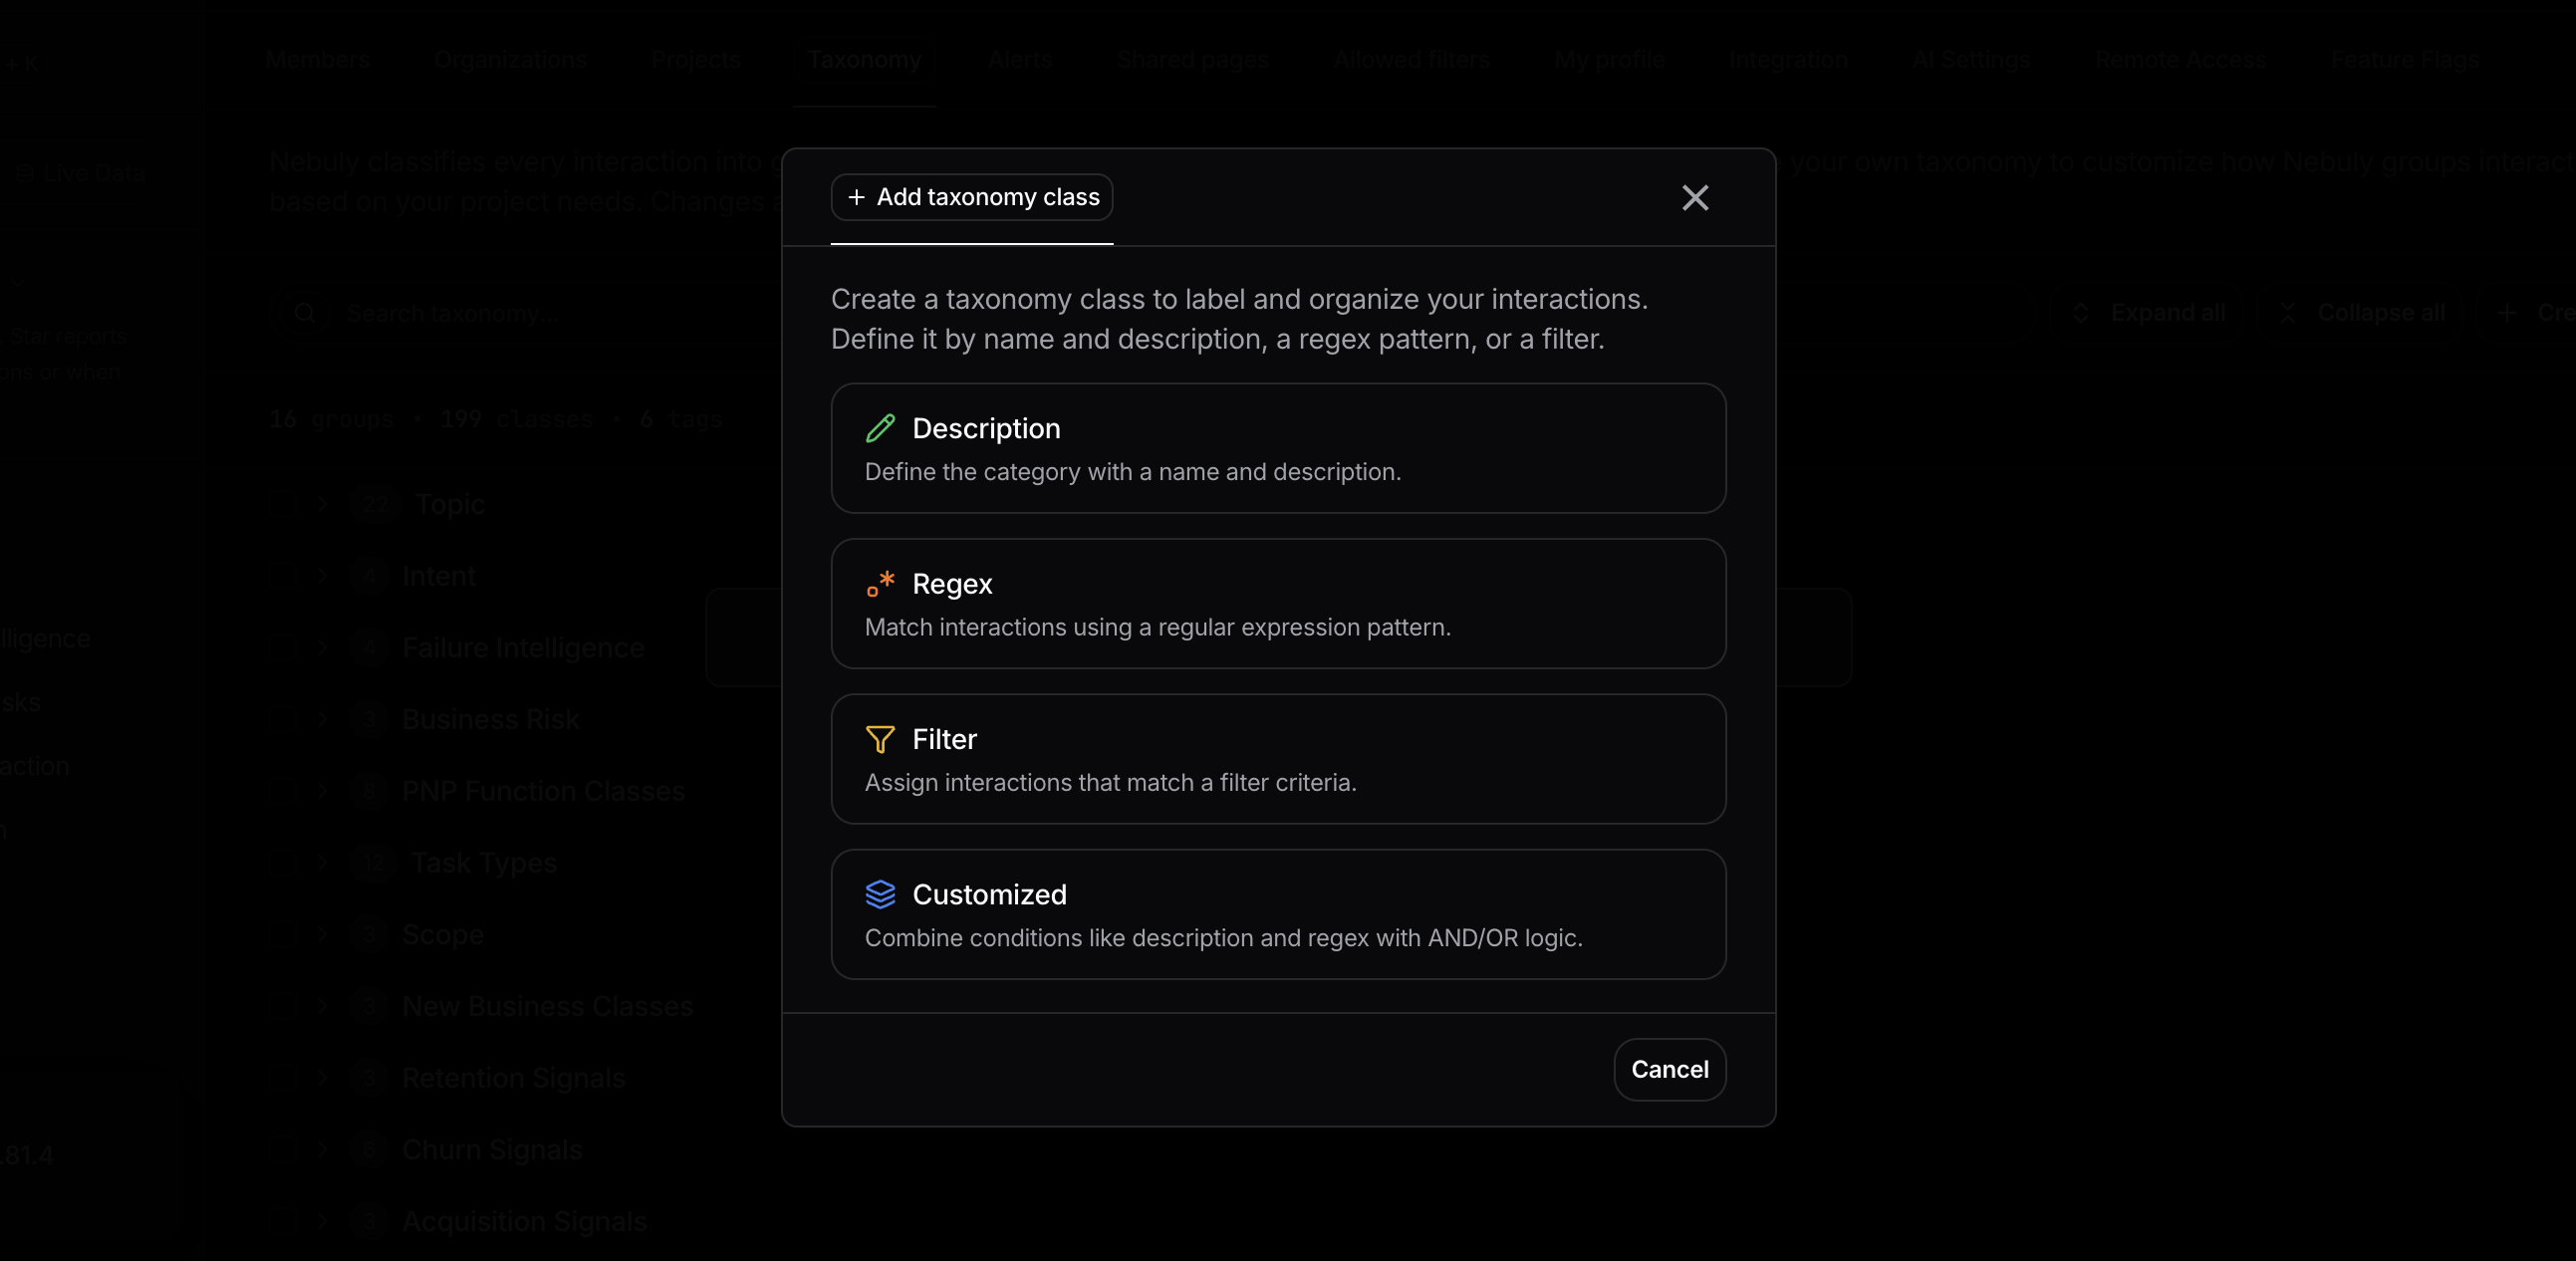
You can manually add classes to your taxonomies using different classification methods depending on what you want to capture:- Natural-language description — describe what the class represents and Nebuly uses that definition to identify matching interactions.
- Regex matching — define patterns that determine which interactions belong to the class.
- Existing filters — use a combination of Nebuly filters to deterministically assign matching interactions to a class.
- Customized classification — fine-tune how a class is evaluated by choosing exactly which part of the interaction Nebuly should analyze, such as the user query, agent answer, input, or output.
Control what gets classified
Advanced options let you decide which part of an interaction Nebuly should analyze when determining whether it belongs to a class.You can configure classification based on the:- User query: the message the user sends to your AI application
- Agent answer: the response your AI application sends to your user
- Input: the full input passed to your AI model, including system and context metadata
- Output: the raw AI output before any post-processing
Apply taxonomy changes retroactively
New classes don’t have to apply only to future data.You can apply classes retroactively to existing interactions, allowing you to introduce a new business classification and use it to analyze historical activity as well.This makes it possible to evolve your taxonomy without losing the ability to compare or investigate past data.Keep your taxonomy up to date
As your products, users, and business evolve, you can continuously refine the taxonomy that powers your analytics.You can:- Update custom group and class definitions as the meaning or scope of a category changes.
- Delete custom groups and classes you no longer need.
Simpler taxonomy terminology
We’ve also simplified how we name the different layers of a taxonomy, making the parent-child relationship between them easier to understand.Previously, the top-level taxonomy dimension was called an Axis, while the levels underneath had different names for each sub-level as Categories, Actions, or Queries.We’ve standardized this terminology:- Axis → Group — the top-level dimension used to classify interactions.
- Categories, Actions, Queries → Classes — previously, each taxonomy layer had a different name depending on its depth (L1 → Category, L2 → Action, L3 → Query). These are now consistently called Classes, regardless of their level in the taxonomy hierarchy.
Easier interaction and conversation deep links with /go
Deep links to interactions and conversations are now easier to share with /go URLs. They send authenticated Nebuly users directly to the right interaction or conversation page and resolve the required project and organization context automatically, making them simpler to use from tools such as spreadsheets or internal workflows. See Deep-link to an interaction or conversation for setup details.This is currently available only on the new UI (v2).
Table charts: metrics limit raised to 10
Table charts previously capped metric columns at 4. You can now add up to 10 metrics to a single table, both in reports and in Explore mode.This is currently available only on the new UI (v2).
ROI
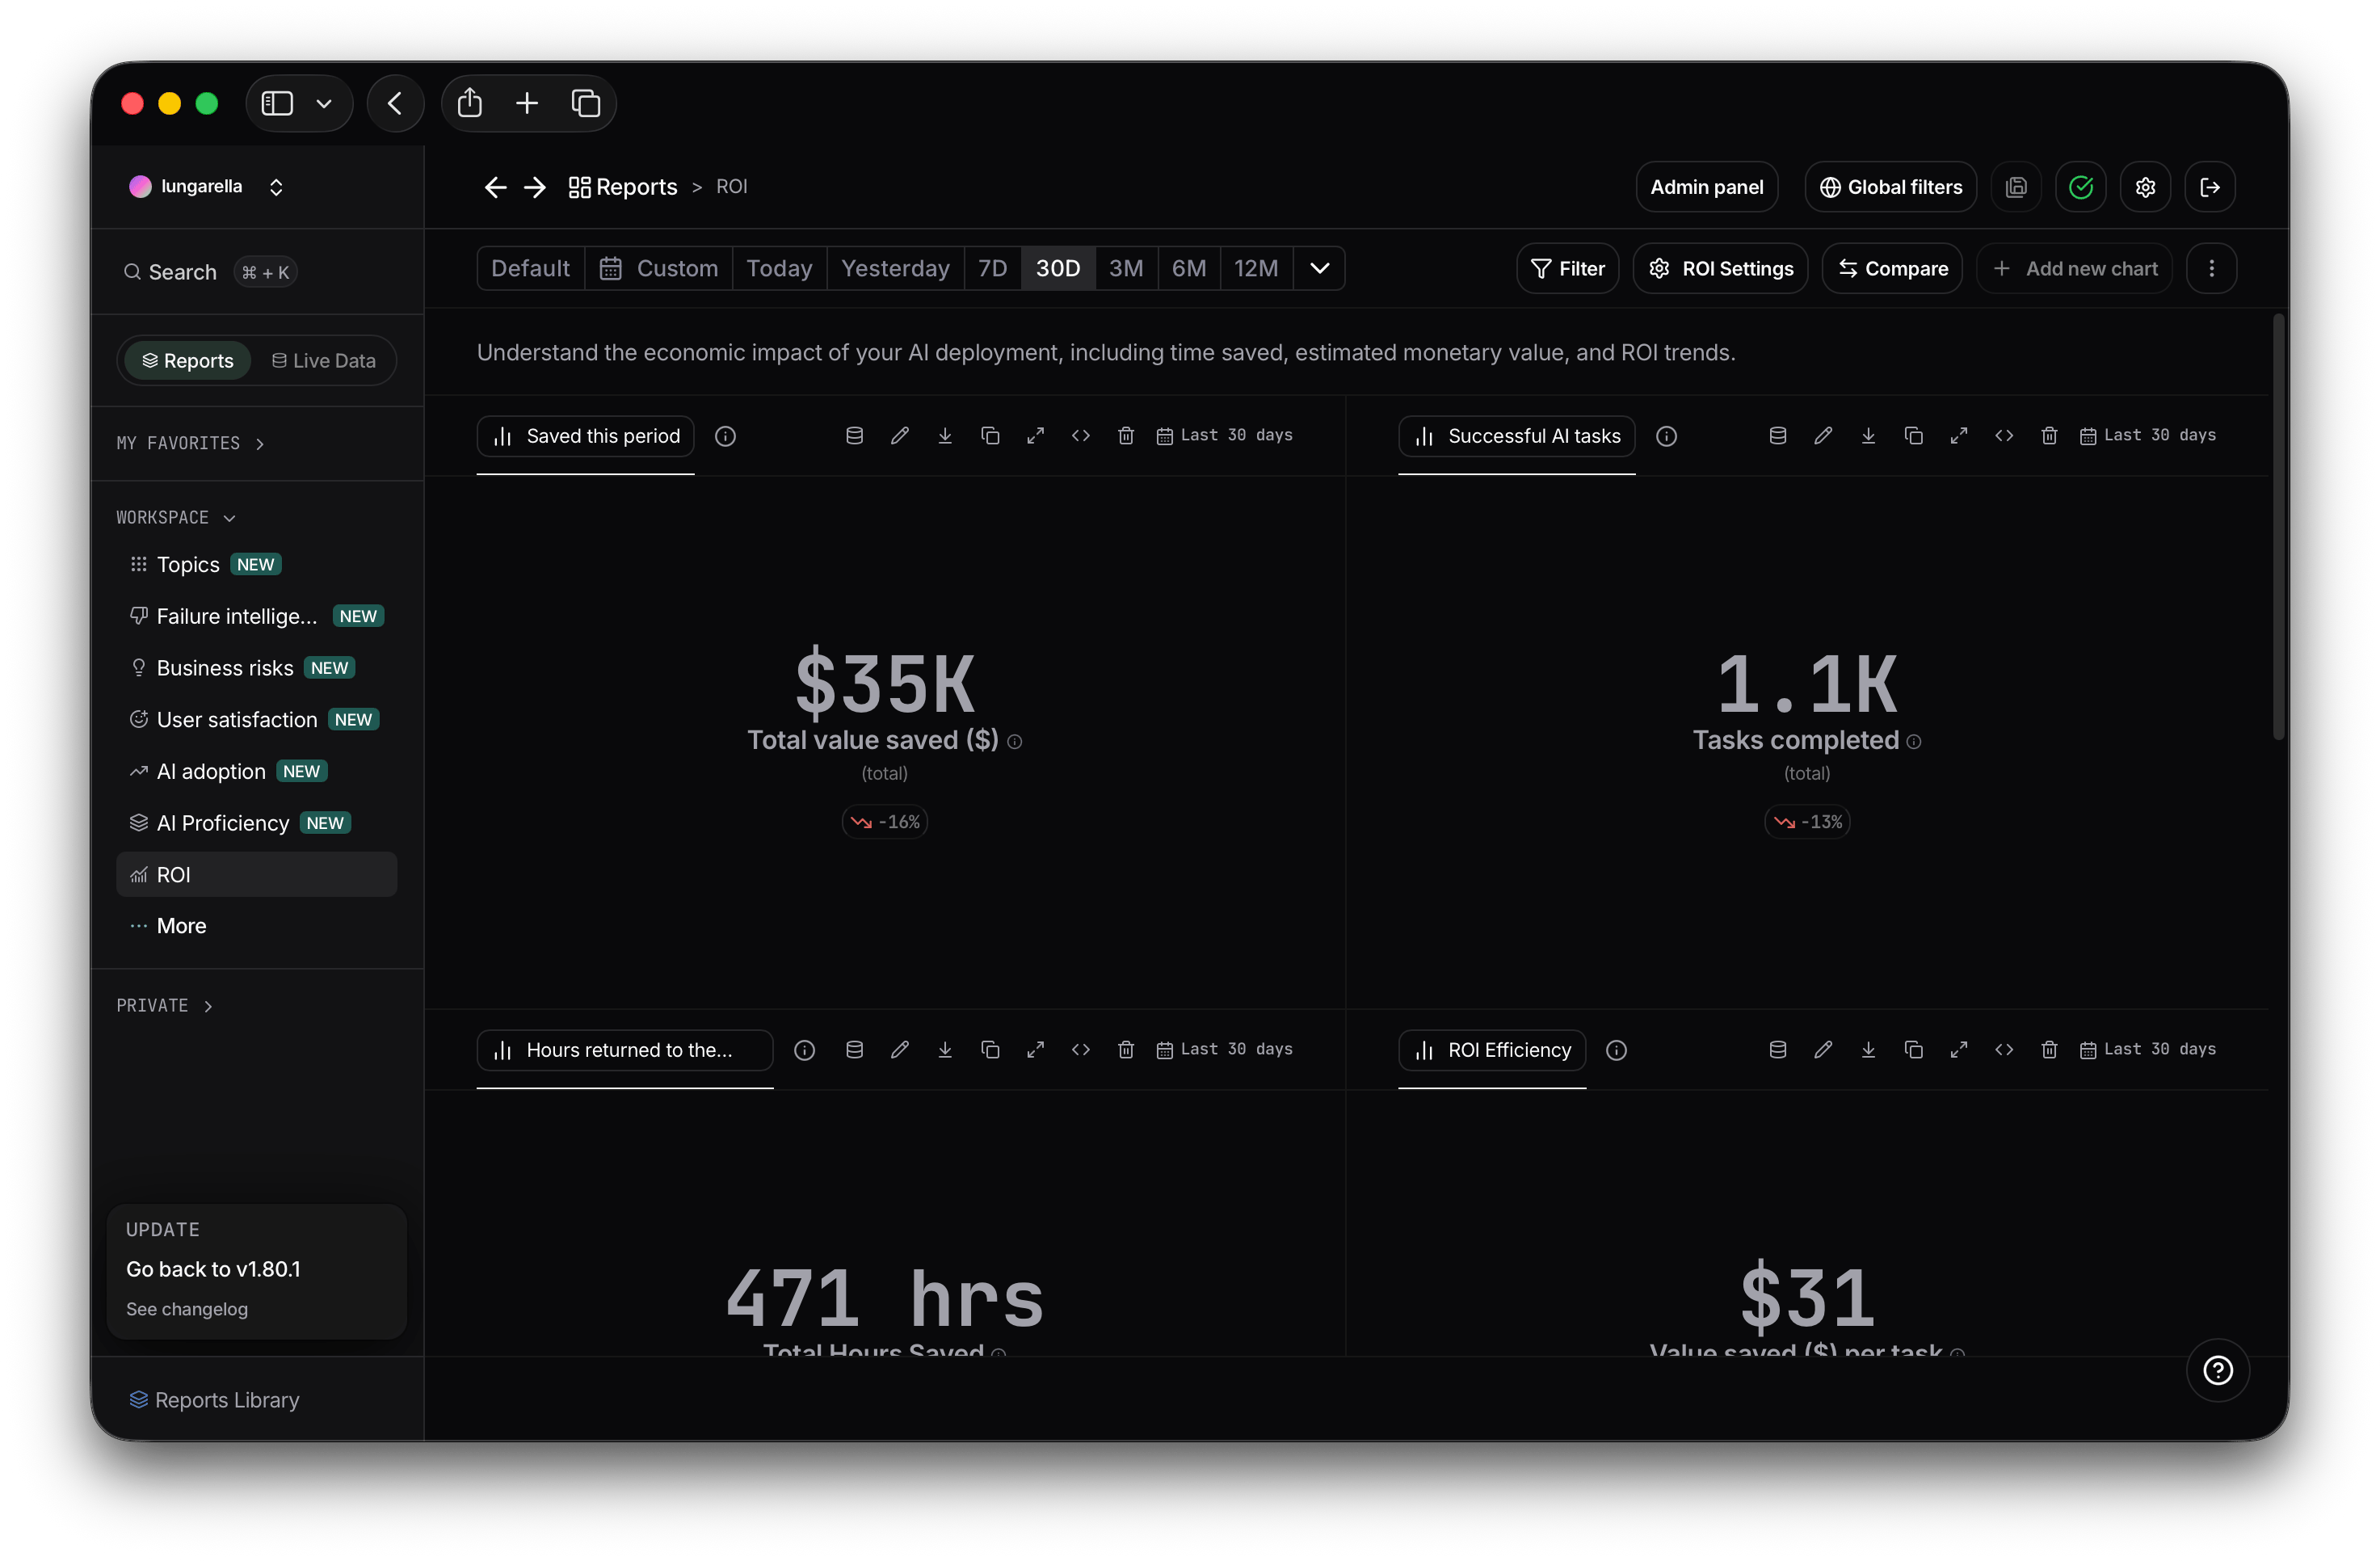
Measure the business impact of AI directly in Nebuly. The new ROI feature translates AI usage into hours and business value automatically. When enabled, Nebuly uses sensible defaults and thanks to a proprietary model we calculate each action time cost. You can customize at any time to make it fit your organization and needs.ROI reporting is now available in beta on both v1 and v2. Enable it from Settings > Feature Flags > ROI Analysis.After enabling ROI, Nebuly’s model needs some time to compute time-per-action estimates for your workspace. Until then, the platform uses default values: 15 minutes per action and $75/hour employee cost. You can adjust the employee cost at any time from ROI Settings.
ROI Report
The new ROI report surfaces the metrics that matter most:- Total hours saved
- Hours saved per user
- Hours saved per task
- Tasks completed
- Task completion rate
- Total value saved
- Value saved per task
- KPI Overview
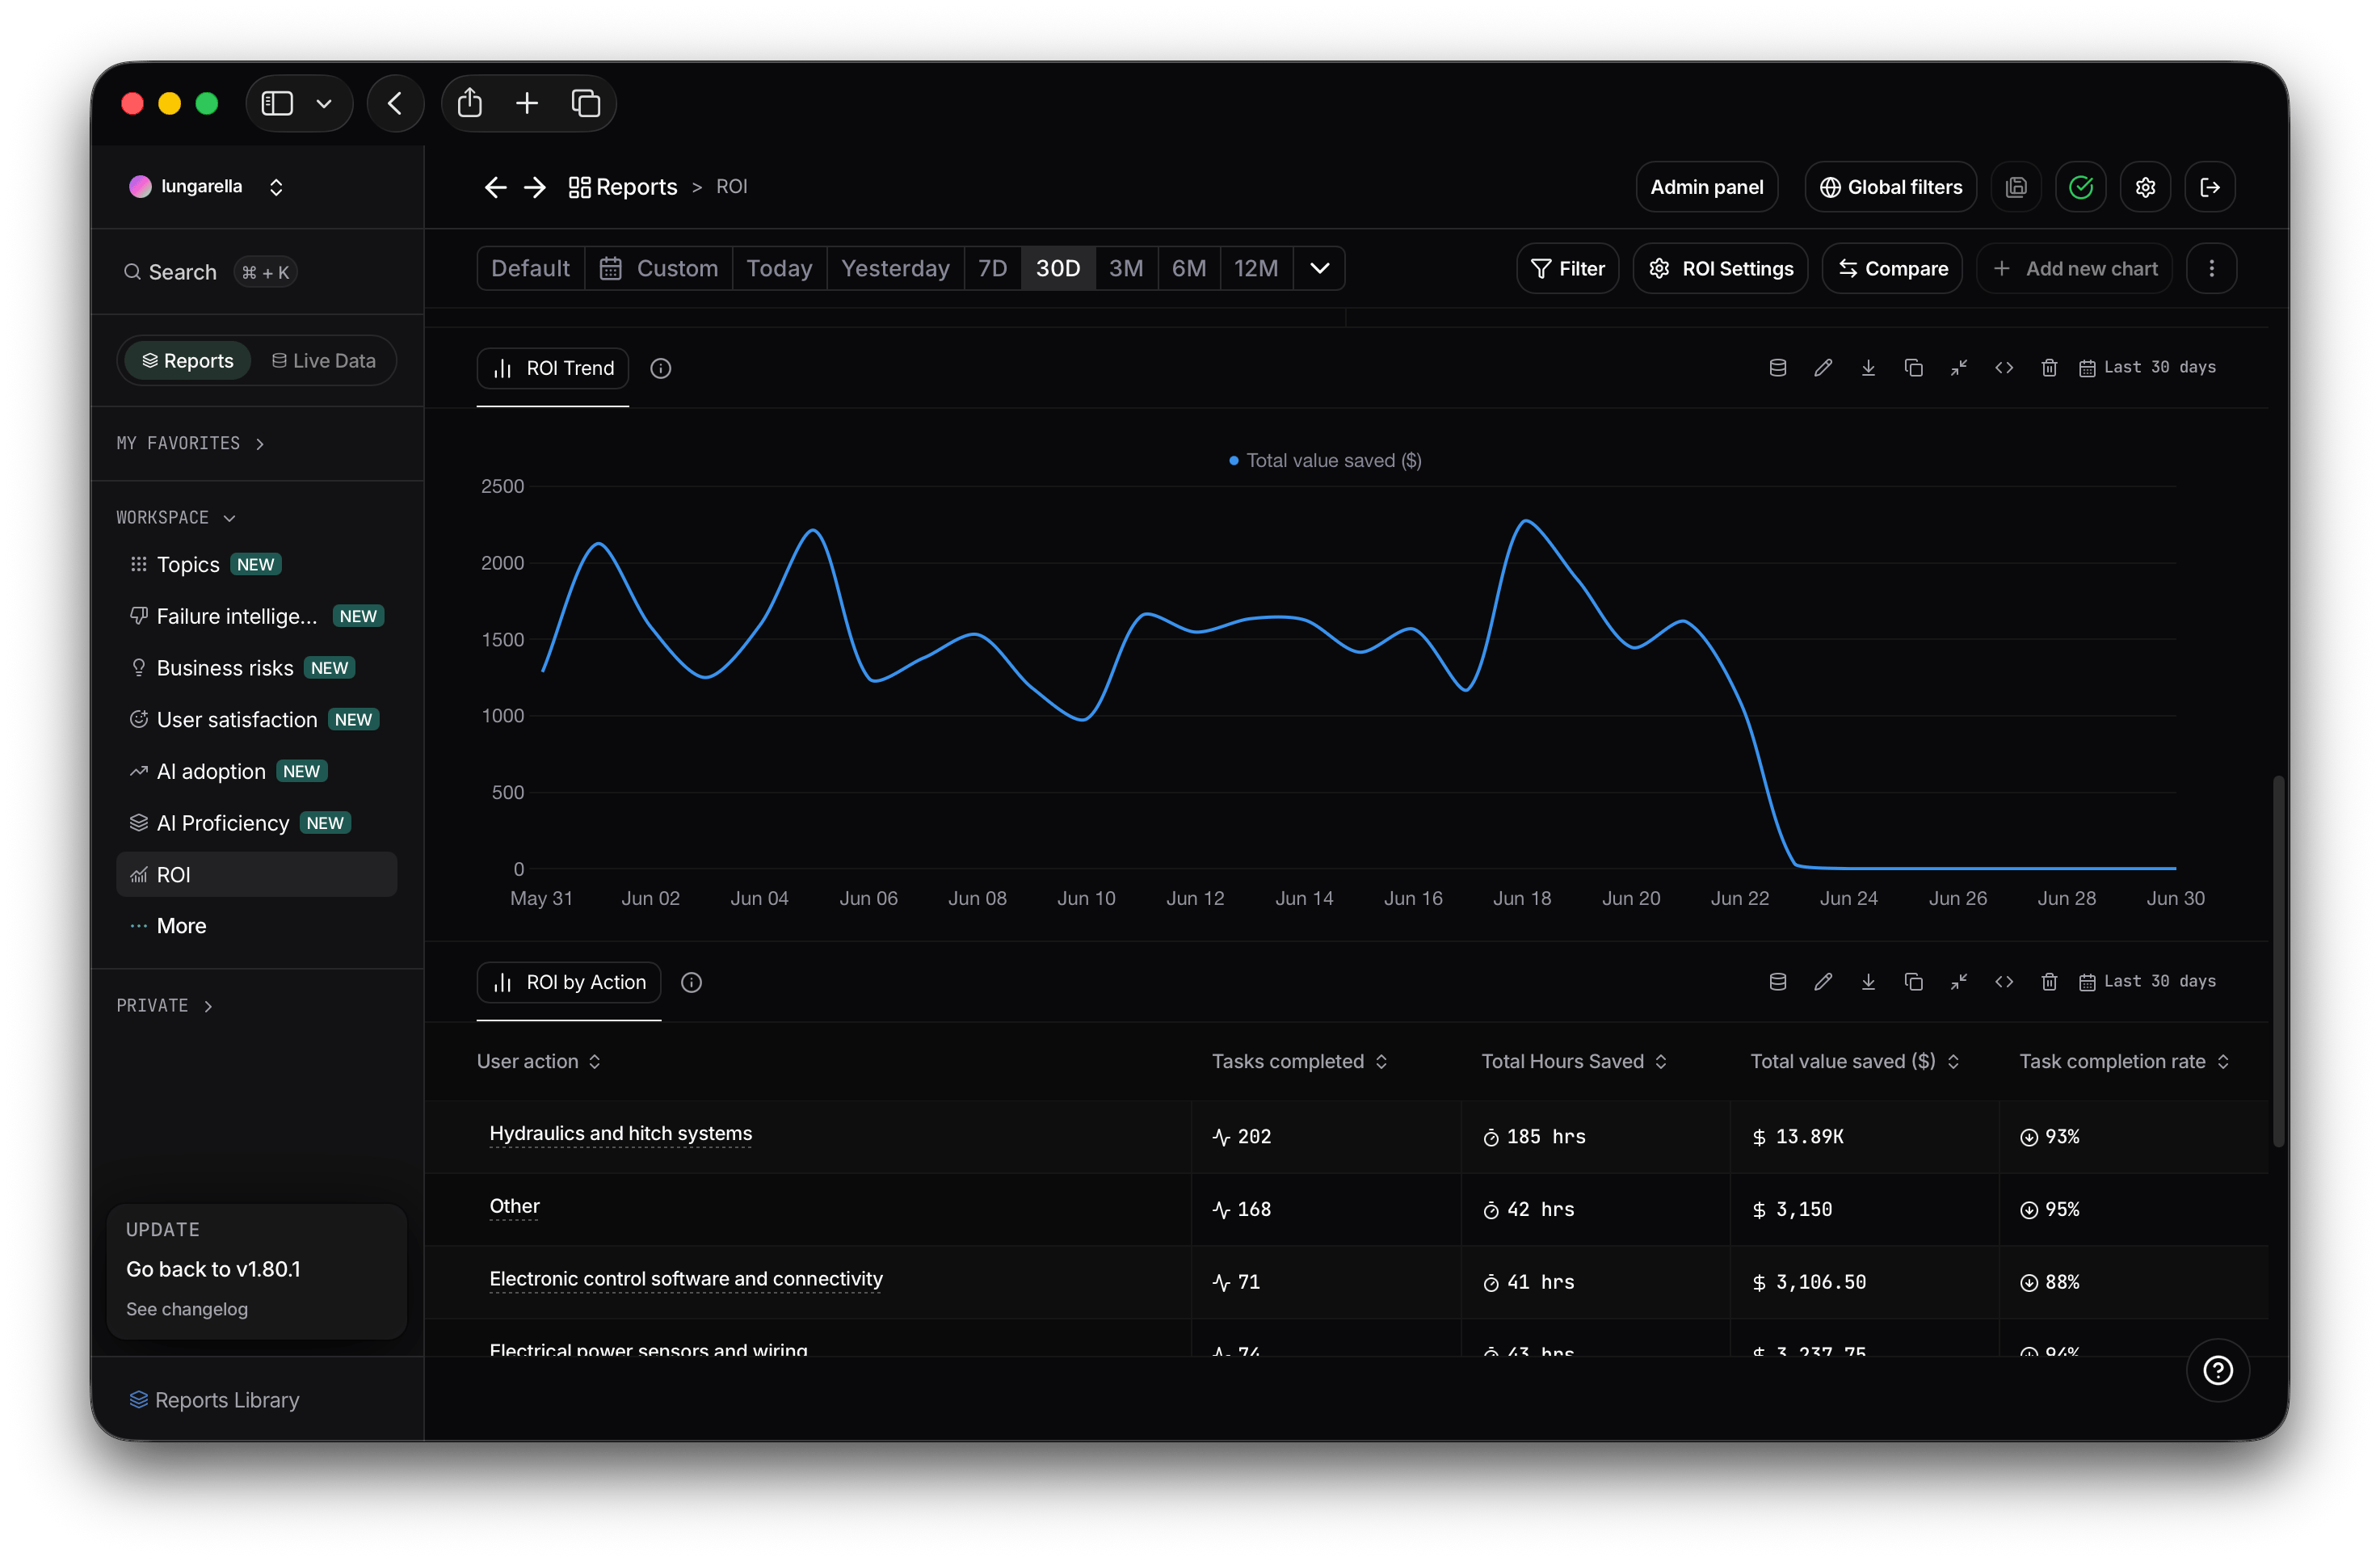
- ROI Trend & Breakdown
ROI Settings
Configure how ROI is calculated for your organization. Set employee hourly cost, adjust time estimates for individual actions, and choose which unsuccessful conversations to exclude. Changes are reflected immediately across all ROI reports.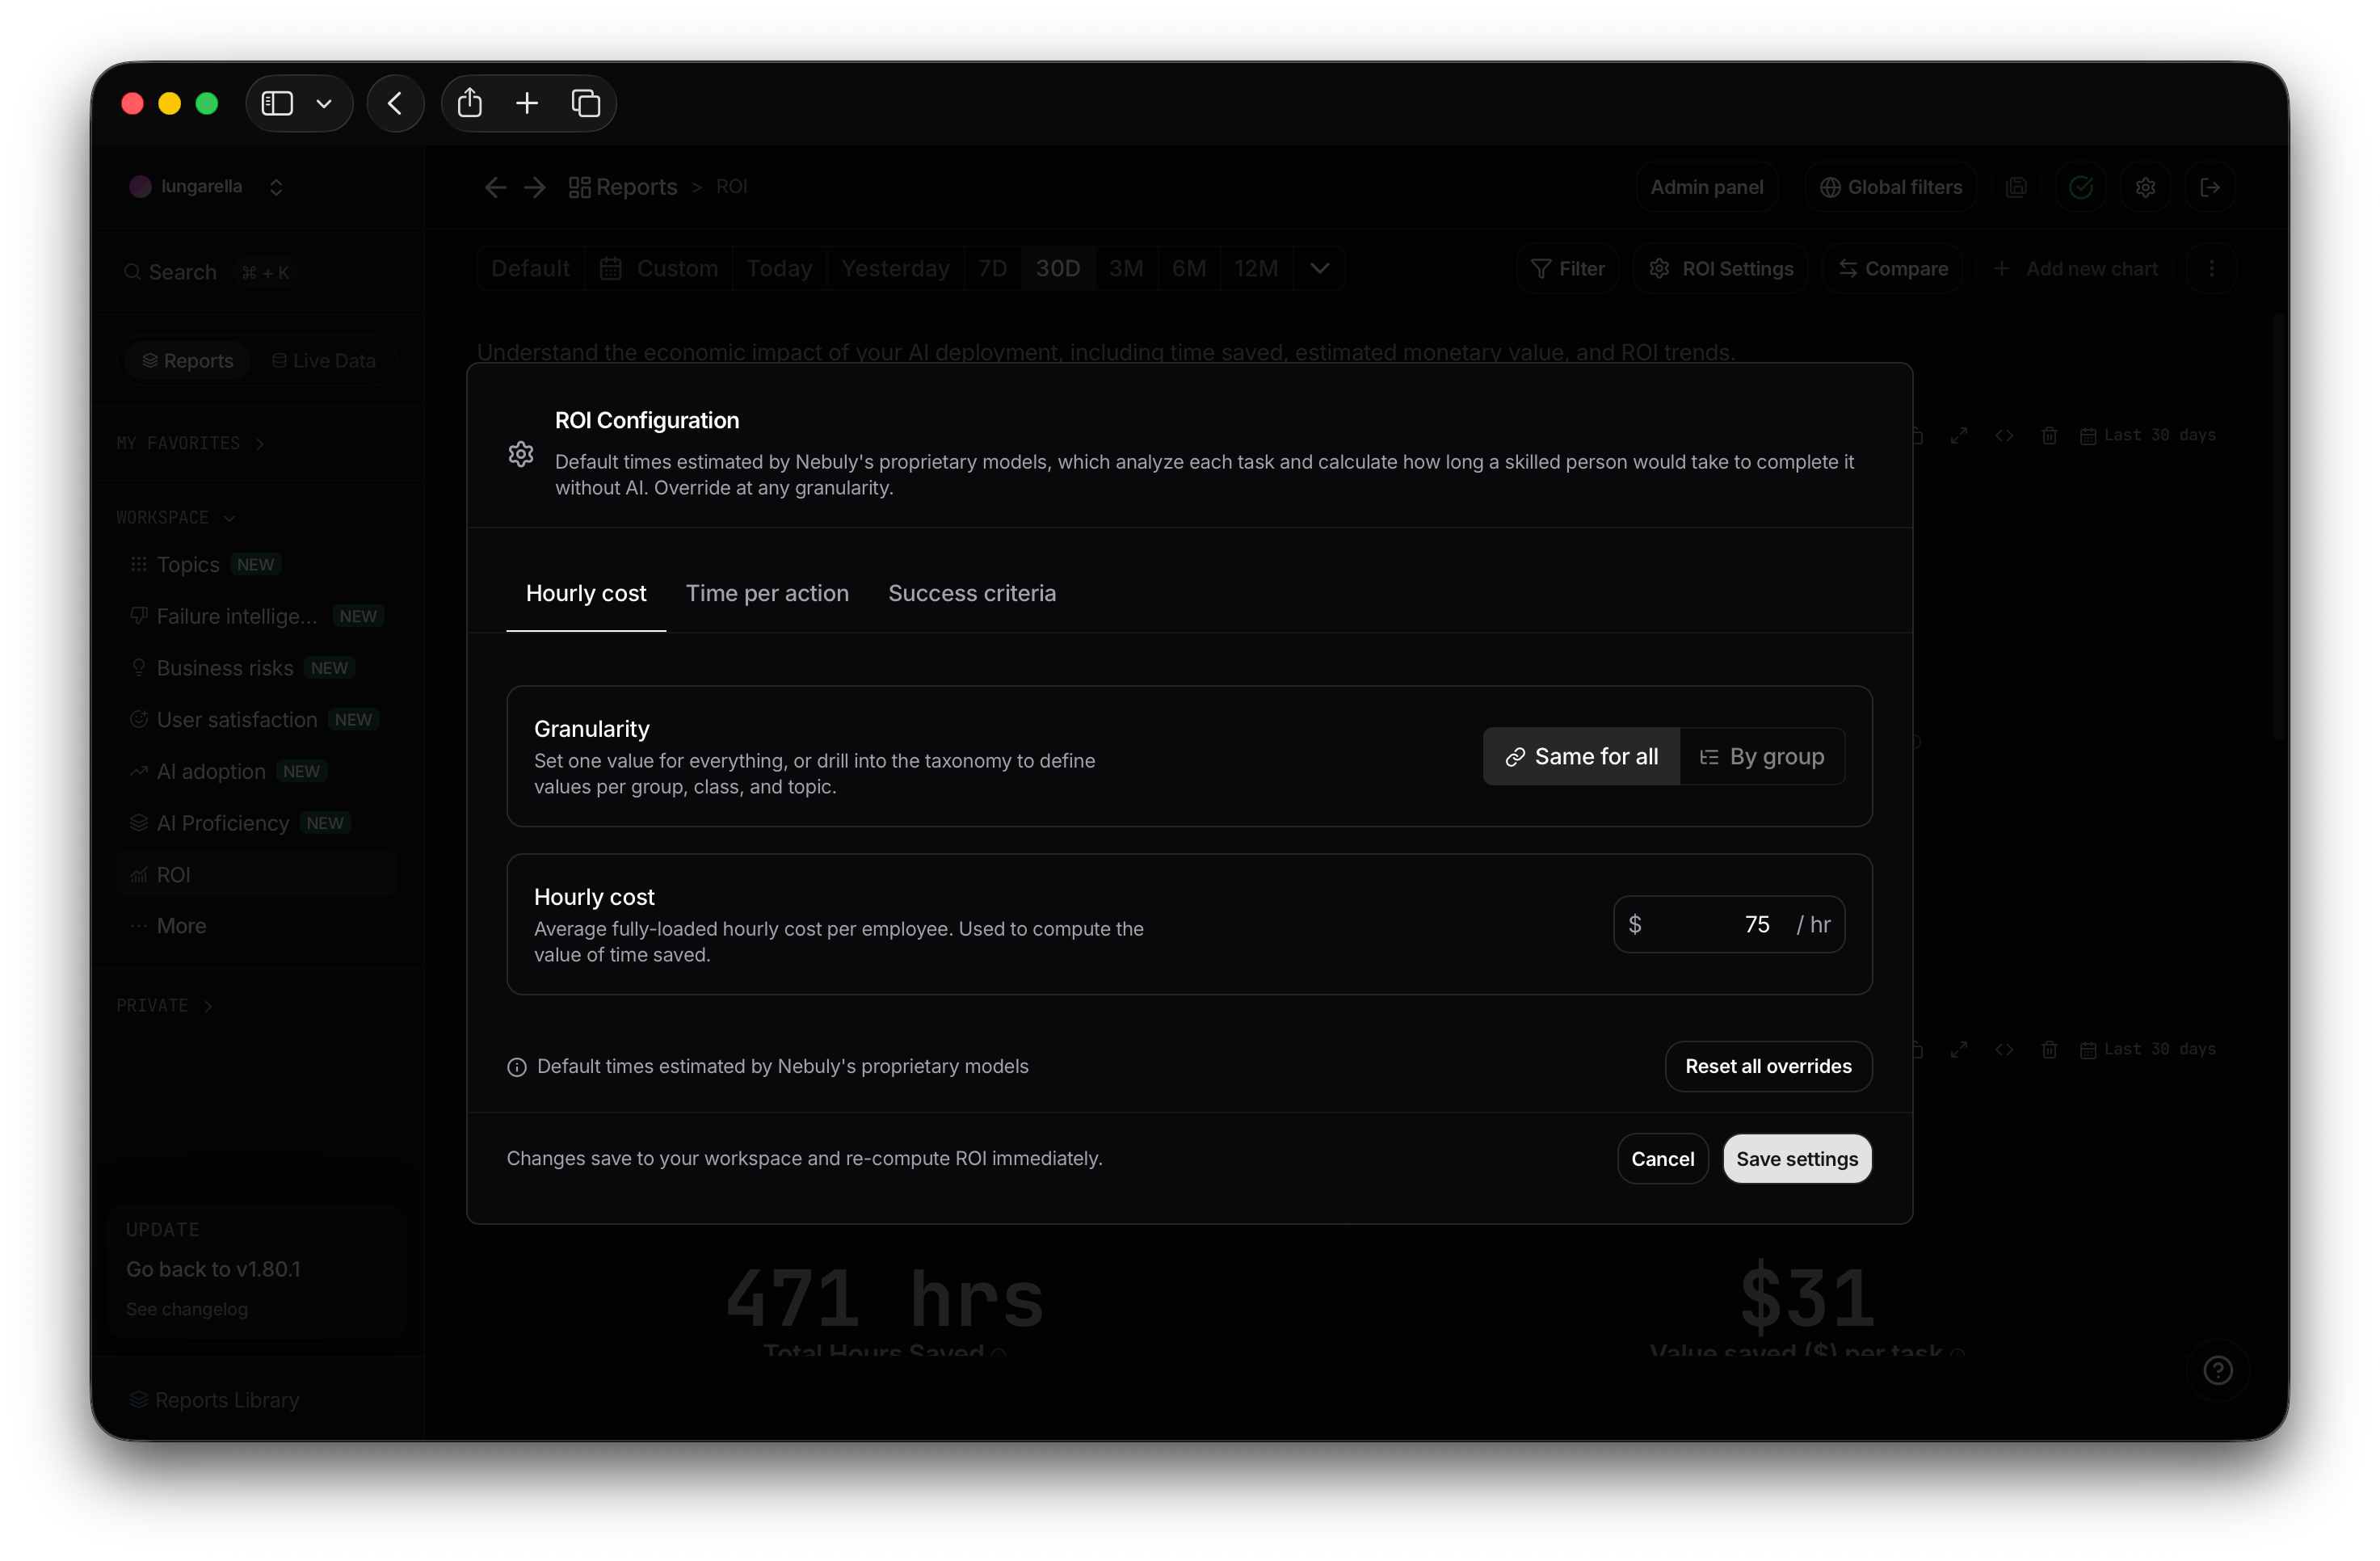
Nebuly 2.2.8 (Beta)
This release focuses on making reports faster to create, easier to organize, and simpler to explore across teams.New All reports workspace
We added a dedicated All reports page organized into three views: My favorites, Workspace, and Private. All reports — workspace and private — are pinned to the sidebar automatically. Star any report to add it to your Favorites section for quick access.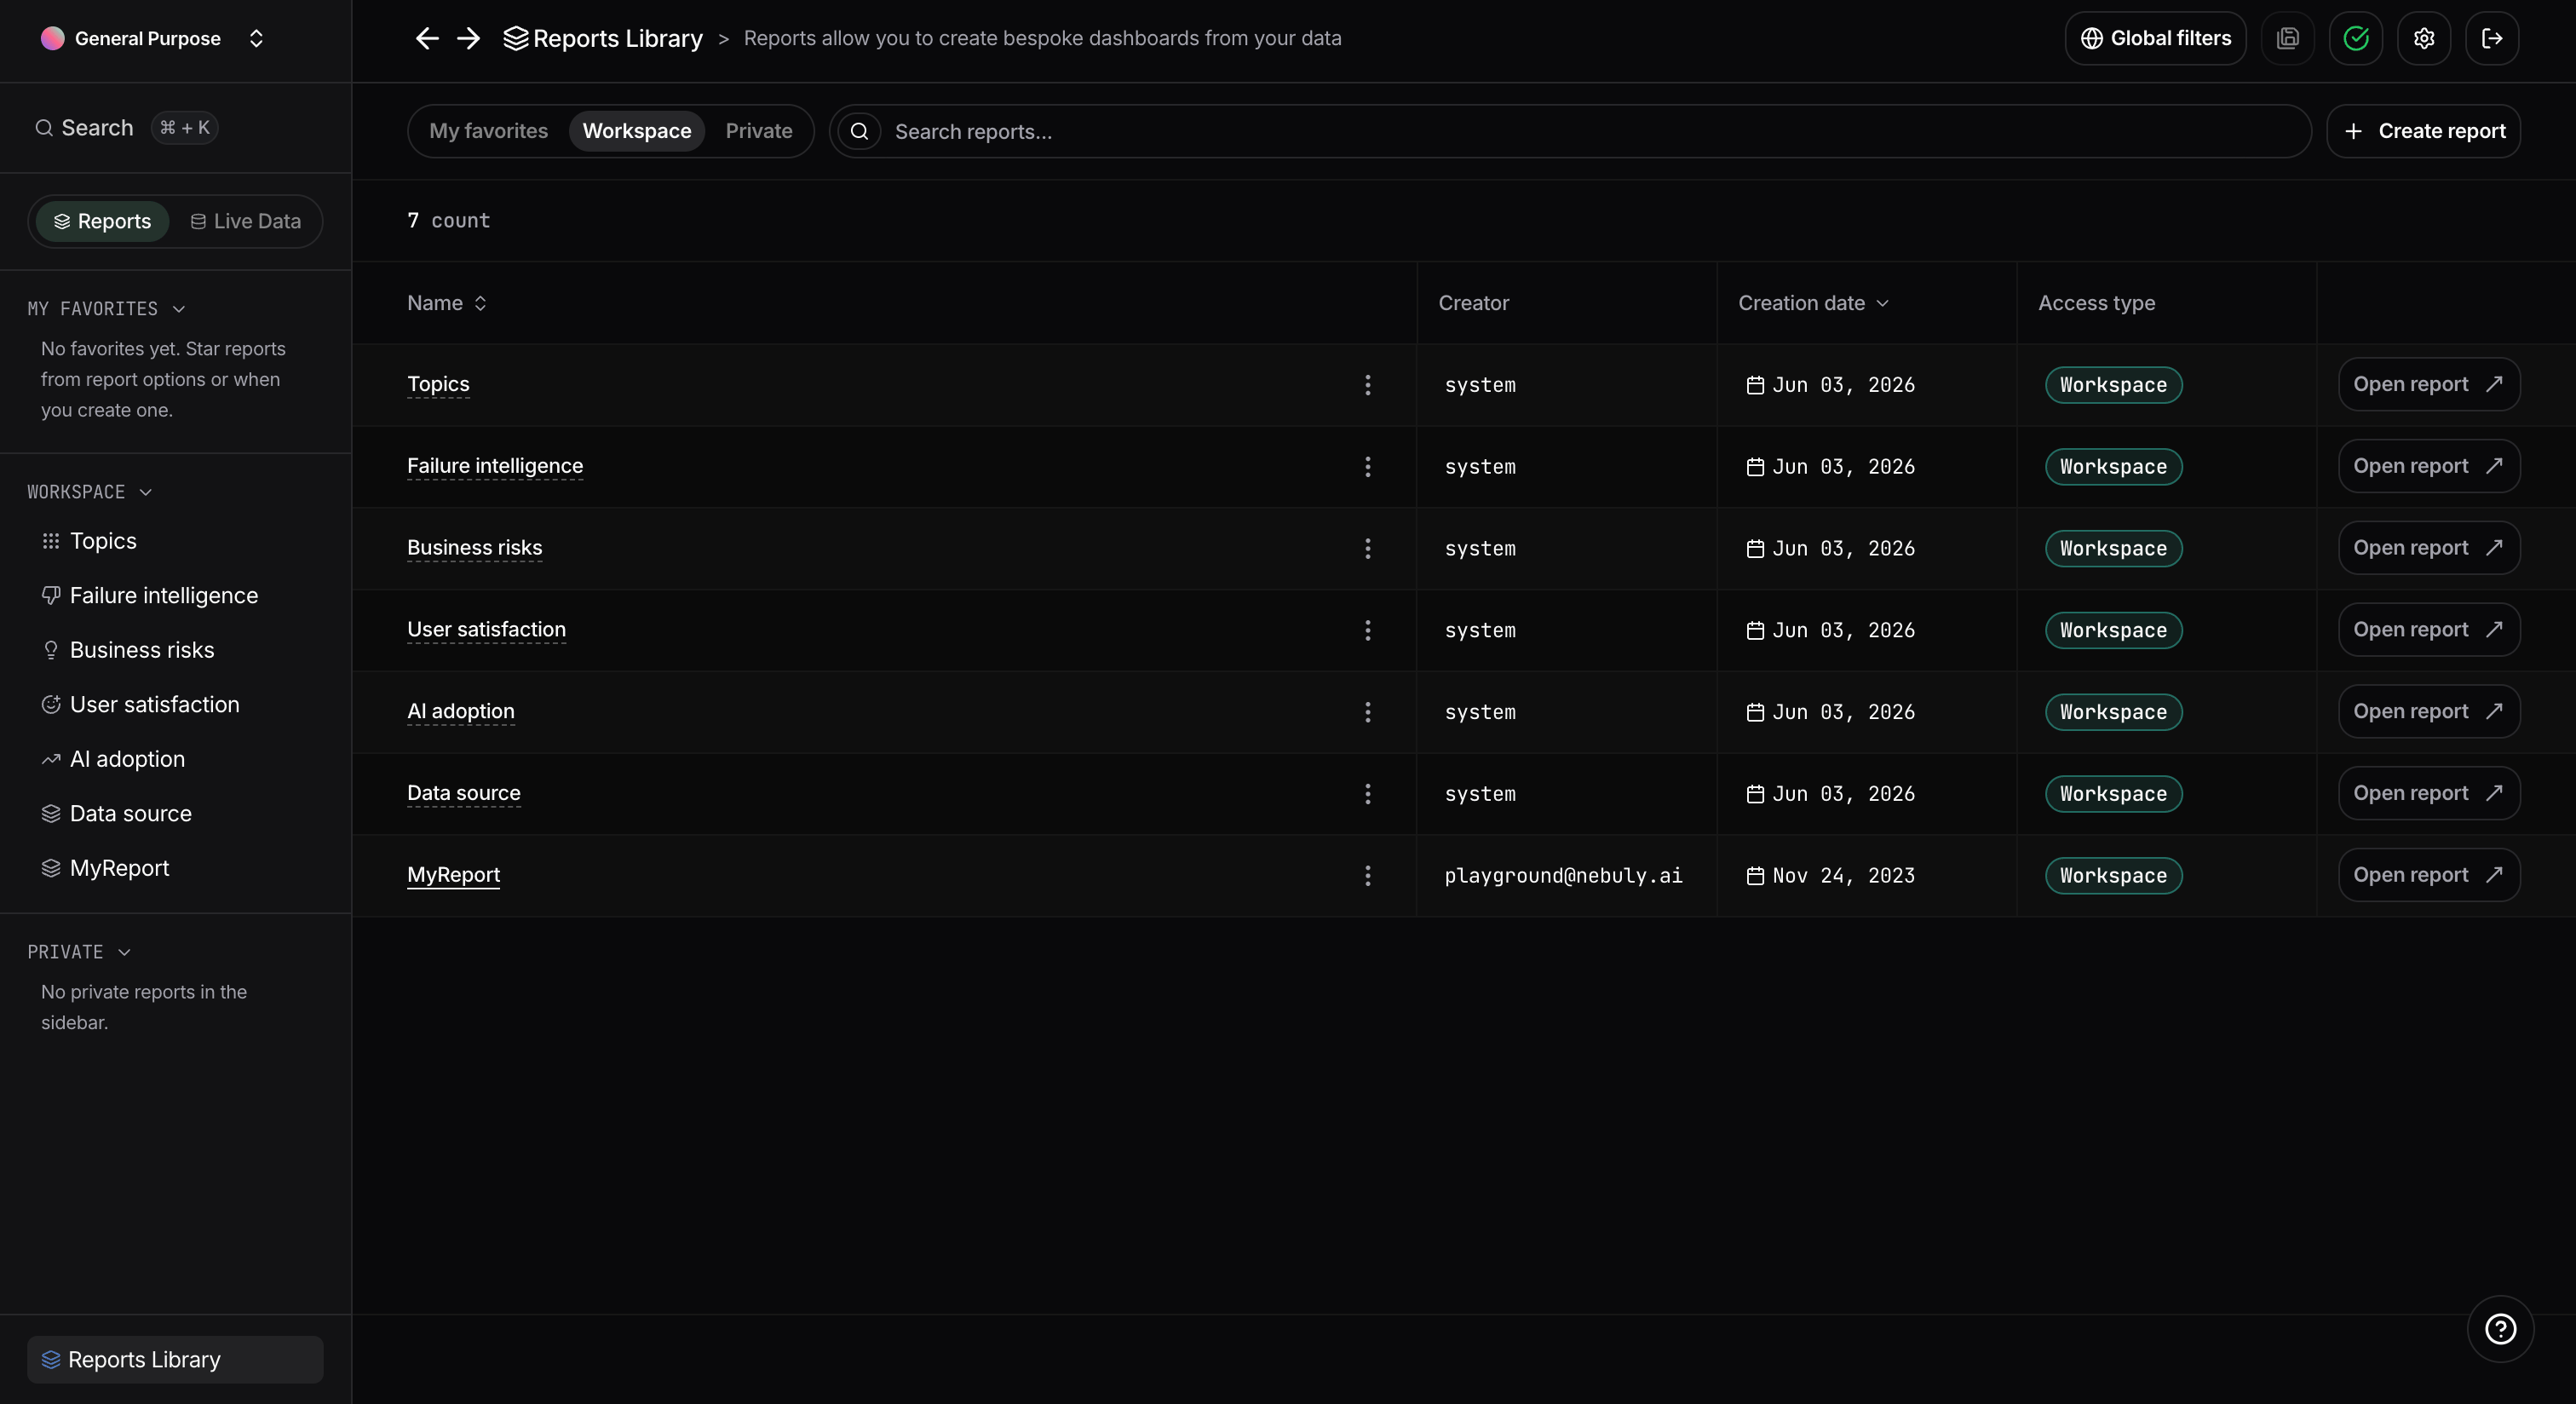
Sidebar redesigned around reports
The sidebar is now split into two tabs: Reports and Live Data.Under the Reports tab, reports are organized into three sections — Favorites (your starred shortcuts), Workspace (reports shared across the platform), and Private (reports only visible to you). The Reports Library at the bottom gives you a searchable view of all reports in one place.Switch to the Live Data tab to access Interactions, Conversations, Users, and User groups from one consolidated navigation surface.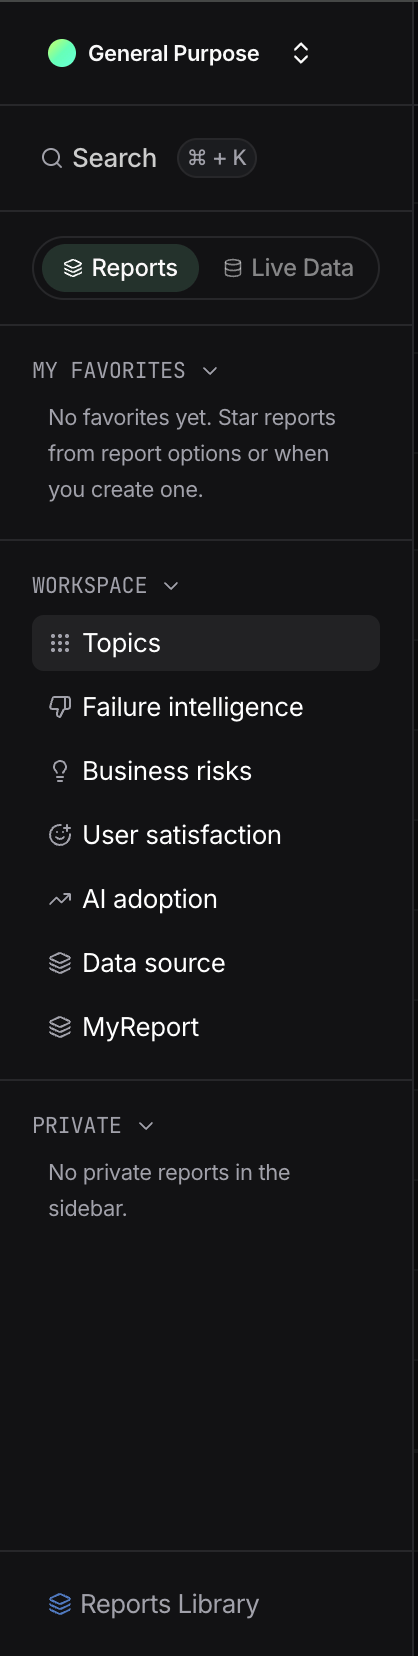
New report creation wizard
We replaced the previous single-step creation modal with a multi-step wizard. To create a new report, hover onto one of the three sections and click on the add icon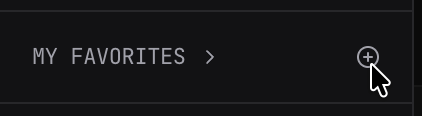
- Set visibility to Private (only you) or Workspace (everyone on the platform)
- Check Save to favorites to pin the report under your Favorites section immediately
- Start from an empty report or from a template
- Finalize name and description
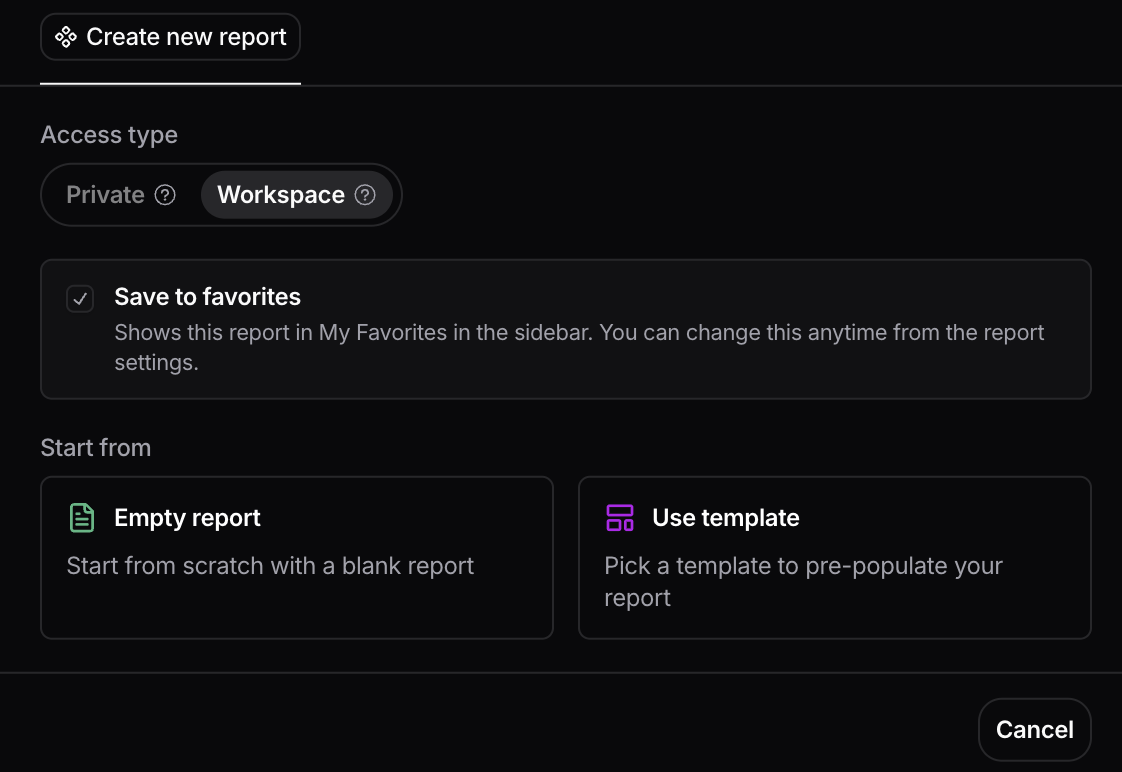
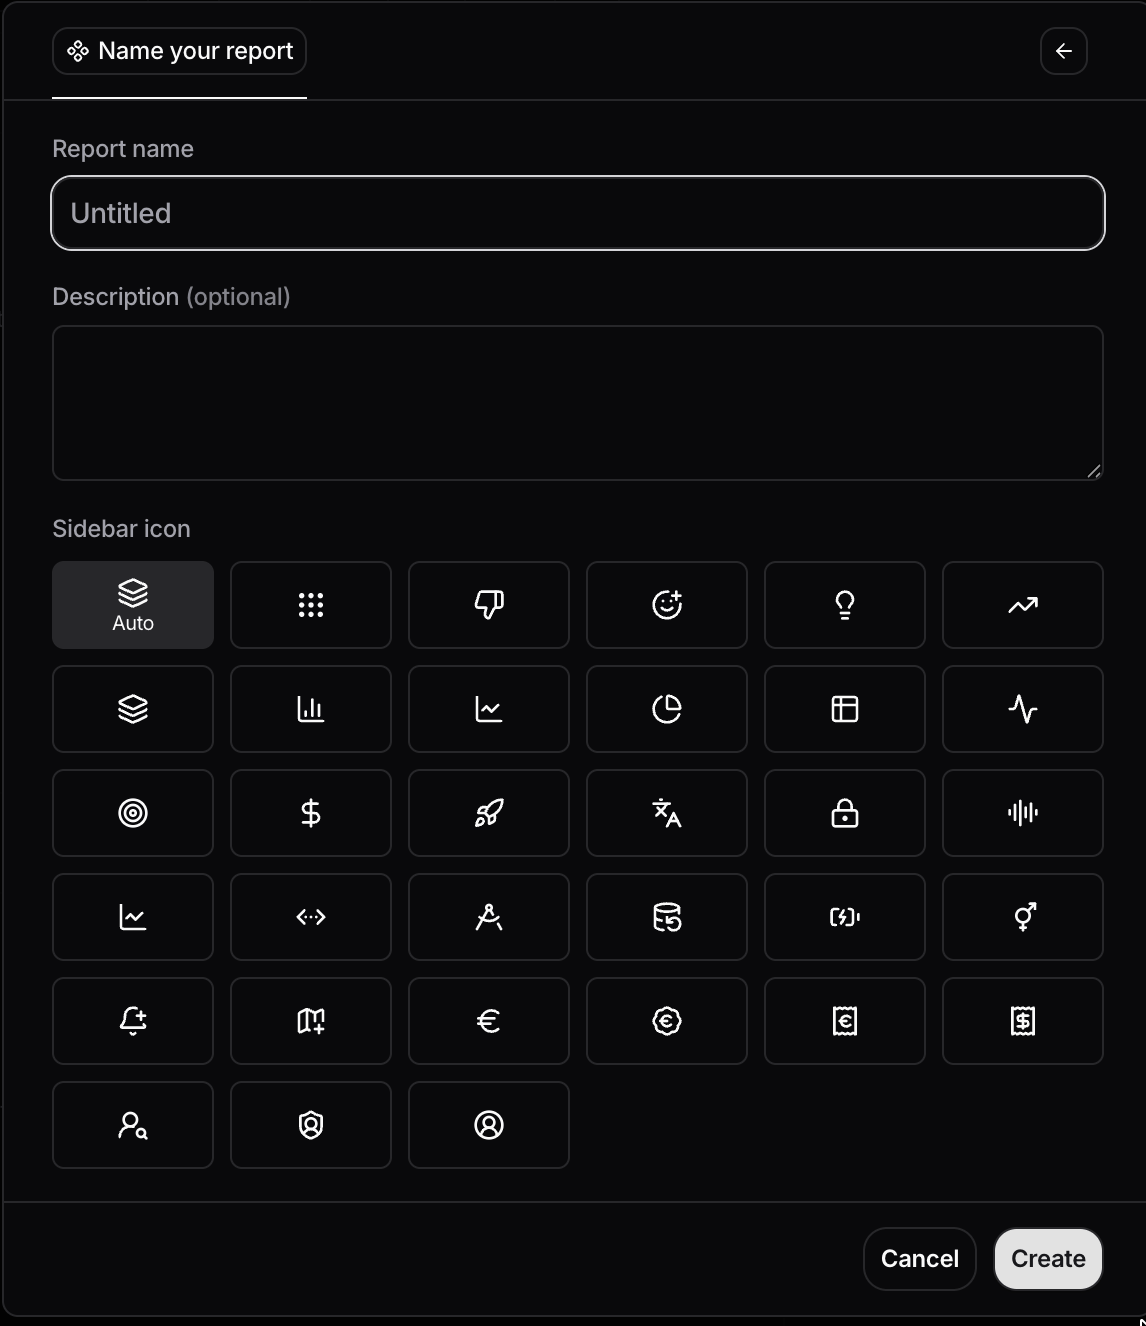
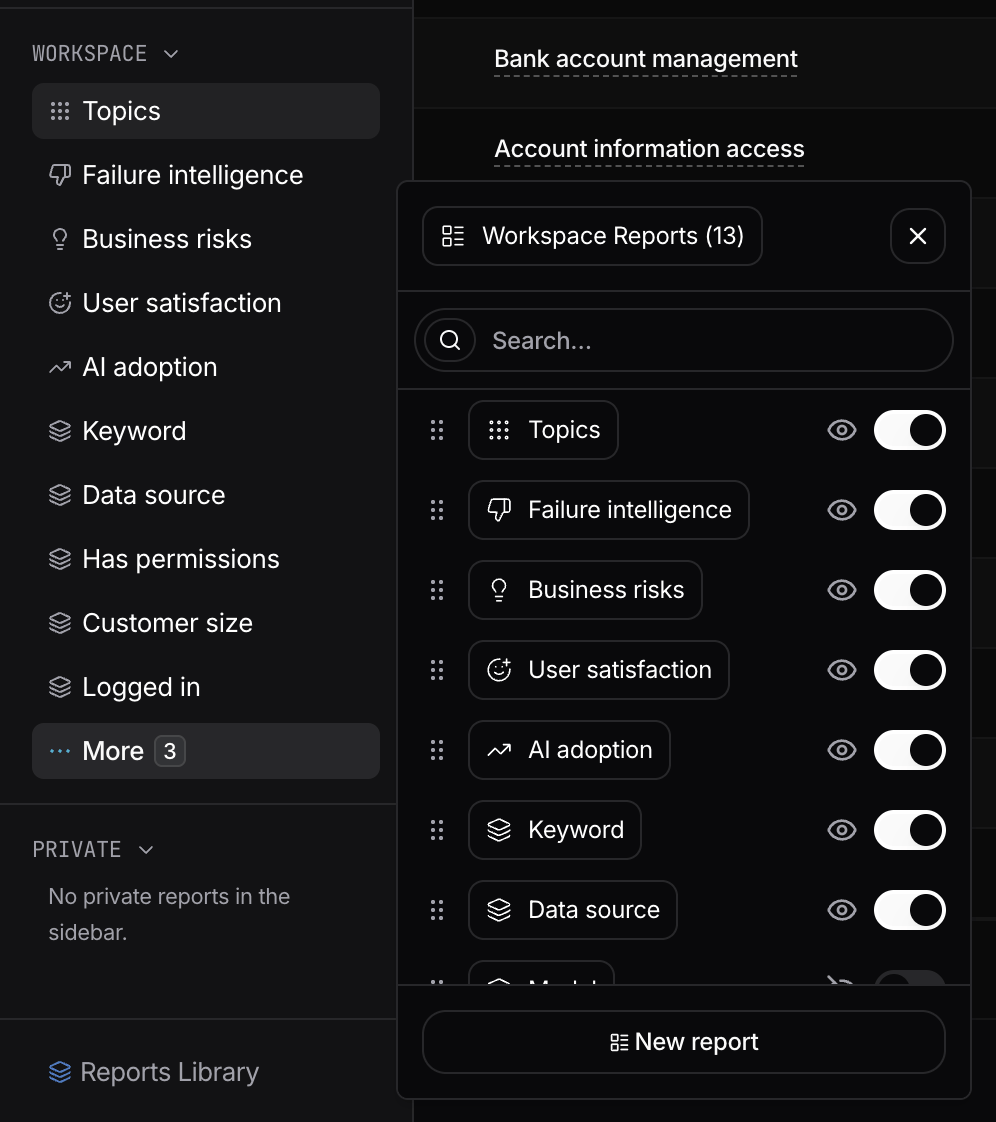
Faster chart-level actions in reports
Chart cards now expose hover-based quick actions for edit, data mode, export, duplicate, delete, and expand/compress chart size. Chart interactions are more direct, with fewer modal and menu hops.
Improved table drilldown workflow
Datatable rows now support richer shortcut actions on hover to jump directly to drilldown, conversations, users, and interactions. This reduces clicks when moving from aggregate insights into underlying activity.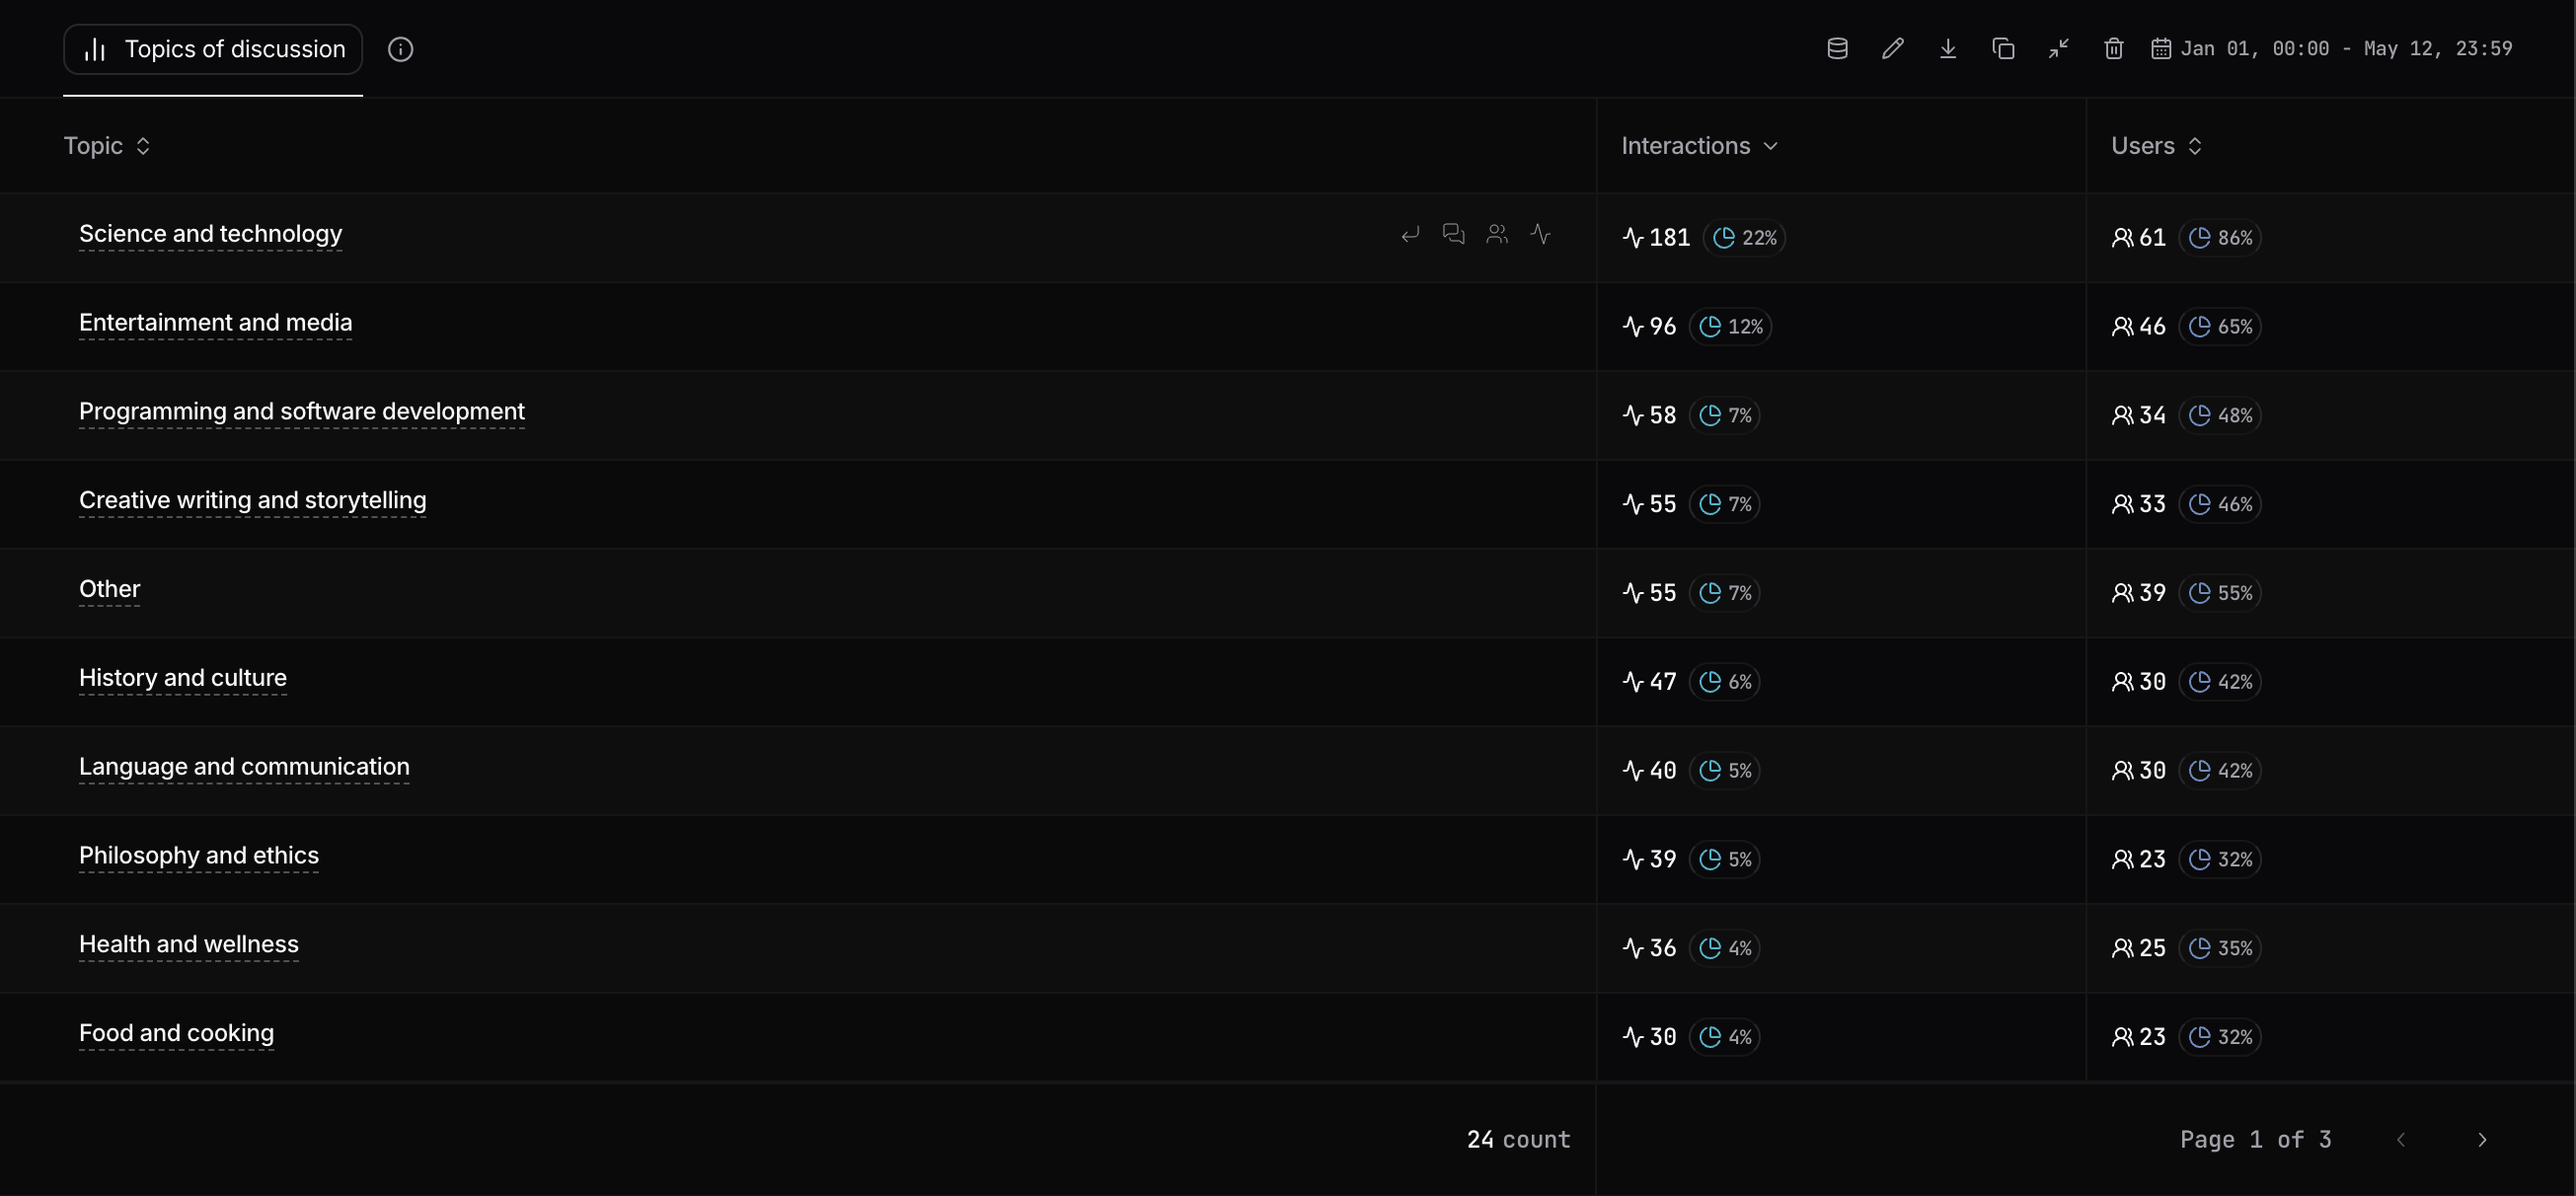
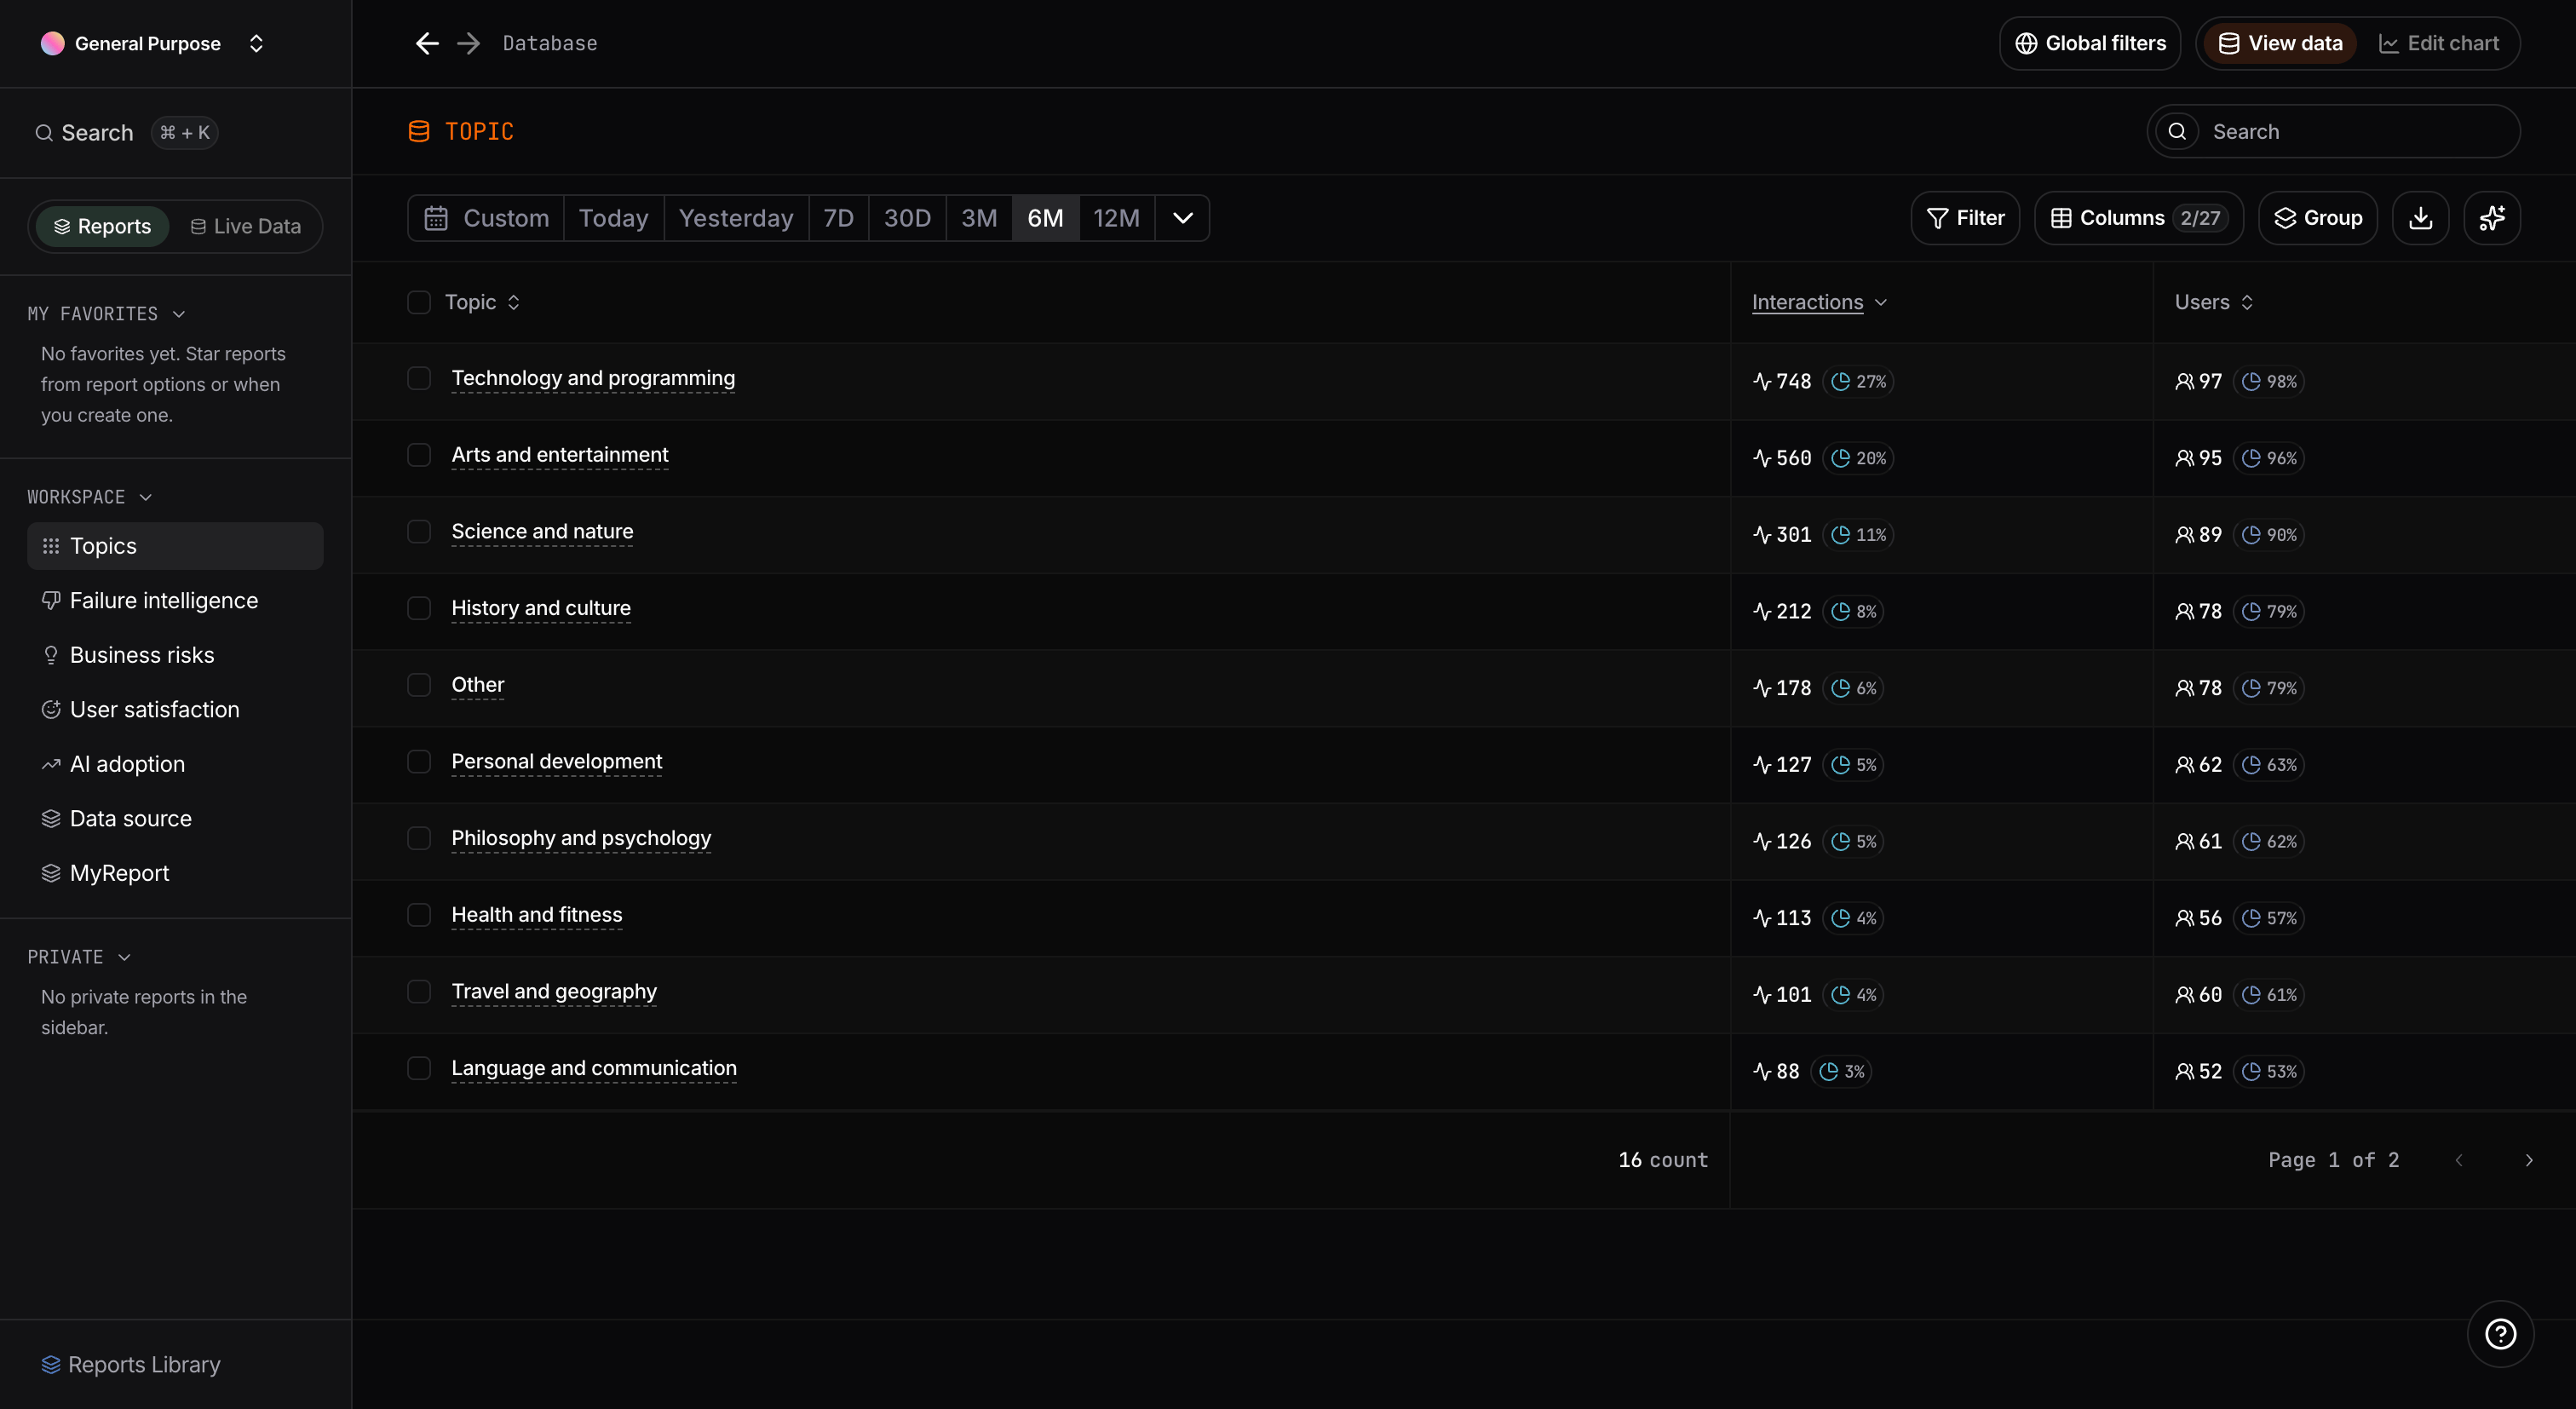
Explore Mode
Explore Mode is the fast path from a report chart to the raw evidence behind it.What you can do- Drill down from aggregated chart values into lower-level breakdowns.
- Move directly from a row to related users, interactions, and conversations.
- Keep slicing data with filters to answer follow-up questions without rebuilding charts.
- Open it from chart quick actions (data/explore icon) or directly from report table rows.
- It preserves report context (selected report/chart and active filters), so analysis continues from where you started.
- As you drill deeper, row shortcuts let you jump immediately to the exact entity list you need to inspect.
- It turns reports from static dashboards into interactive investigation workflows.
- It helps teams move from “a metric changed” to “which users or interactions caused it” in fewer steps.
Live Data
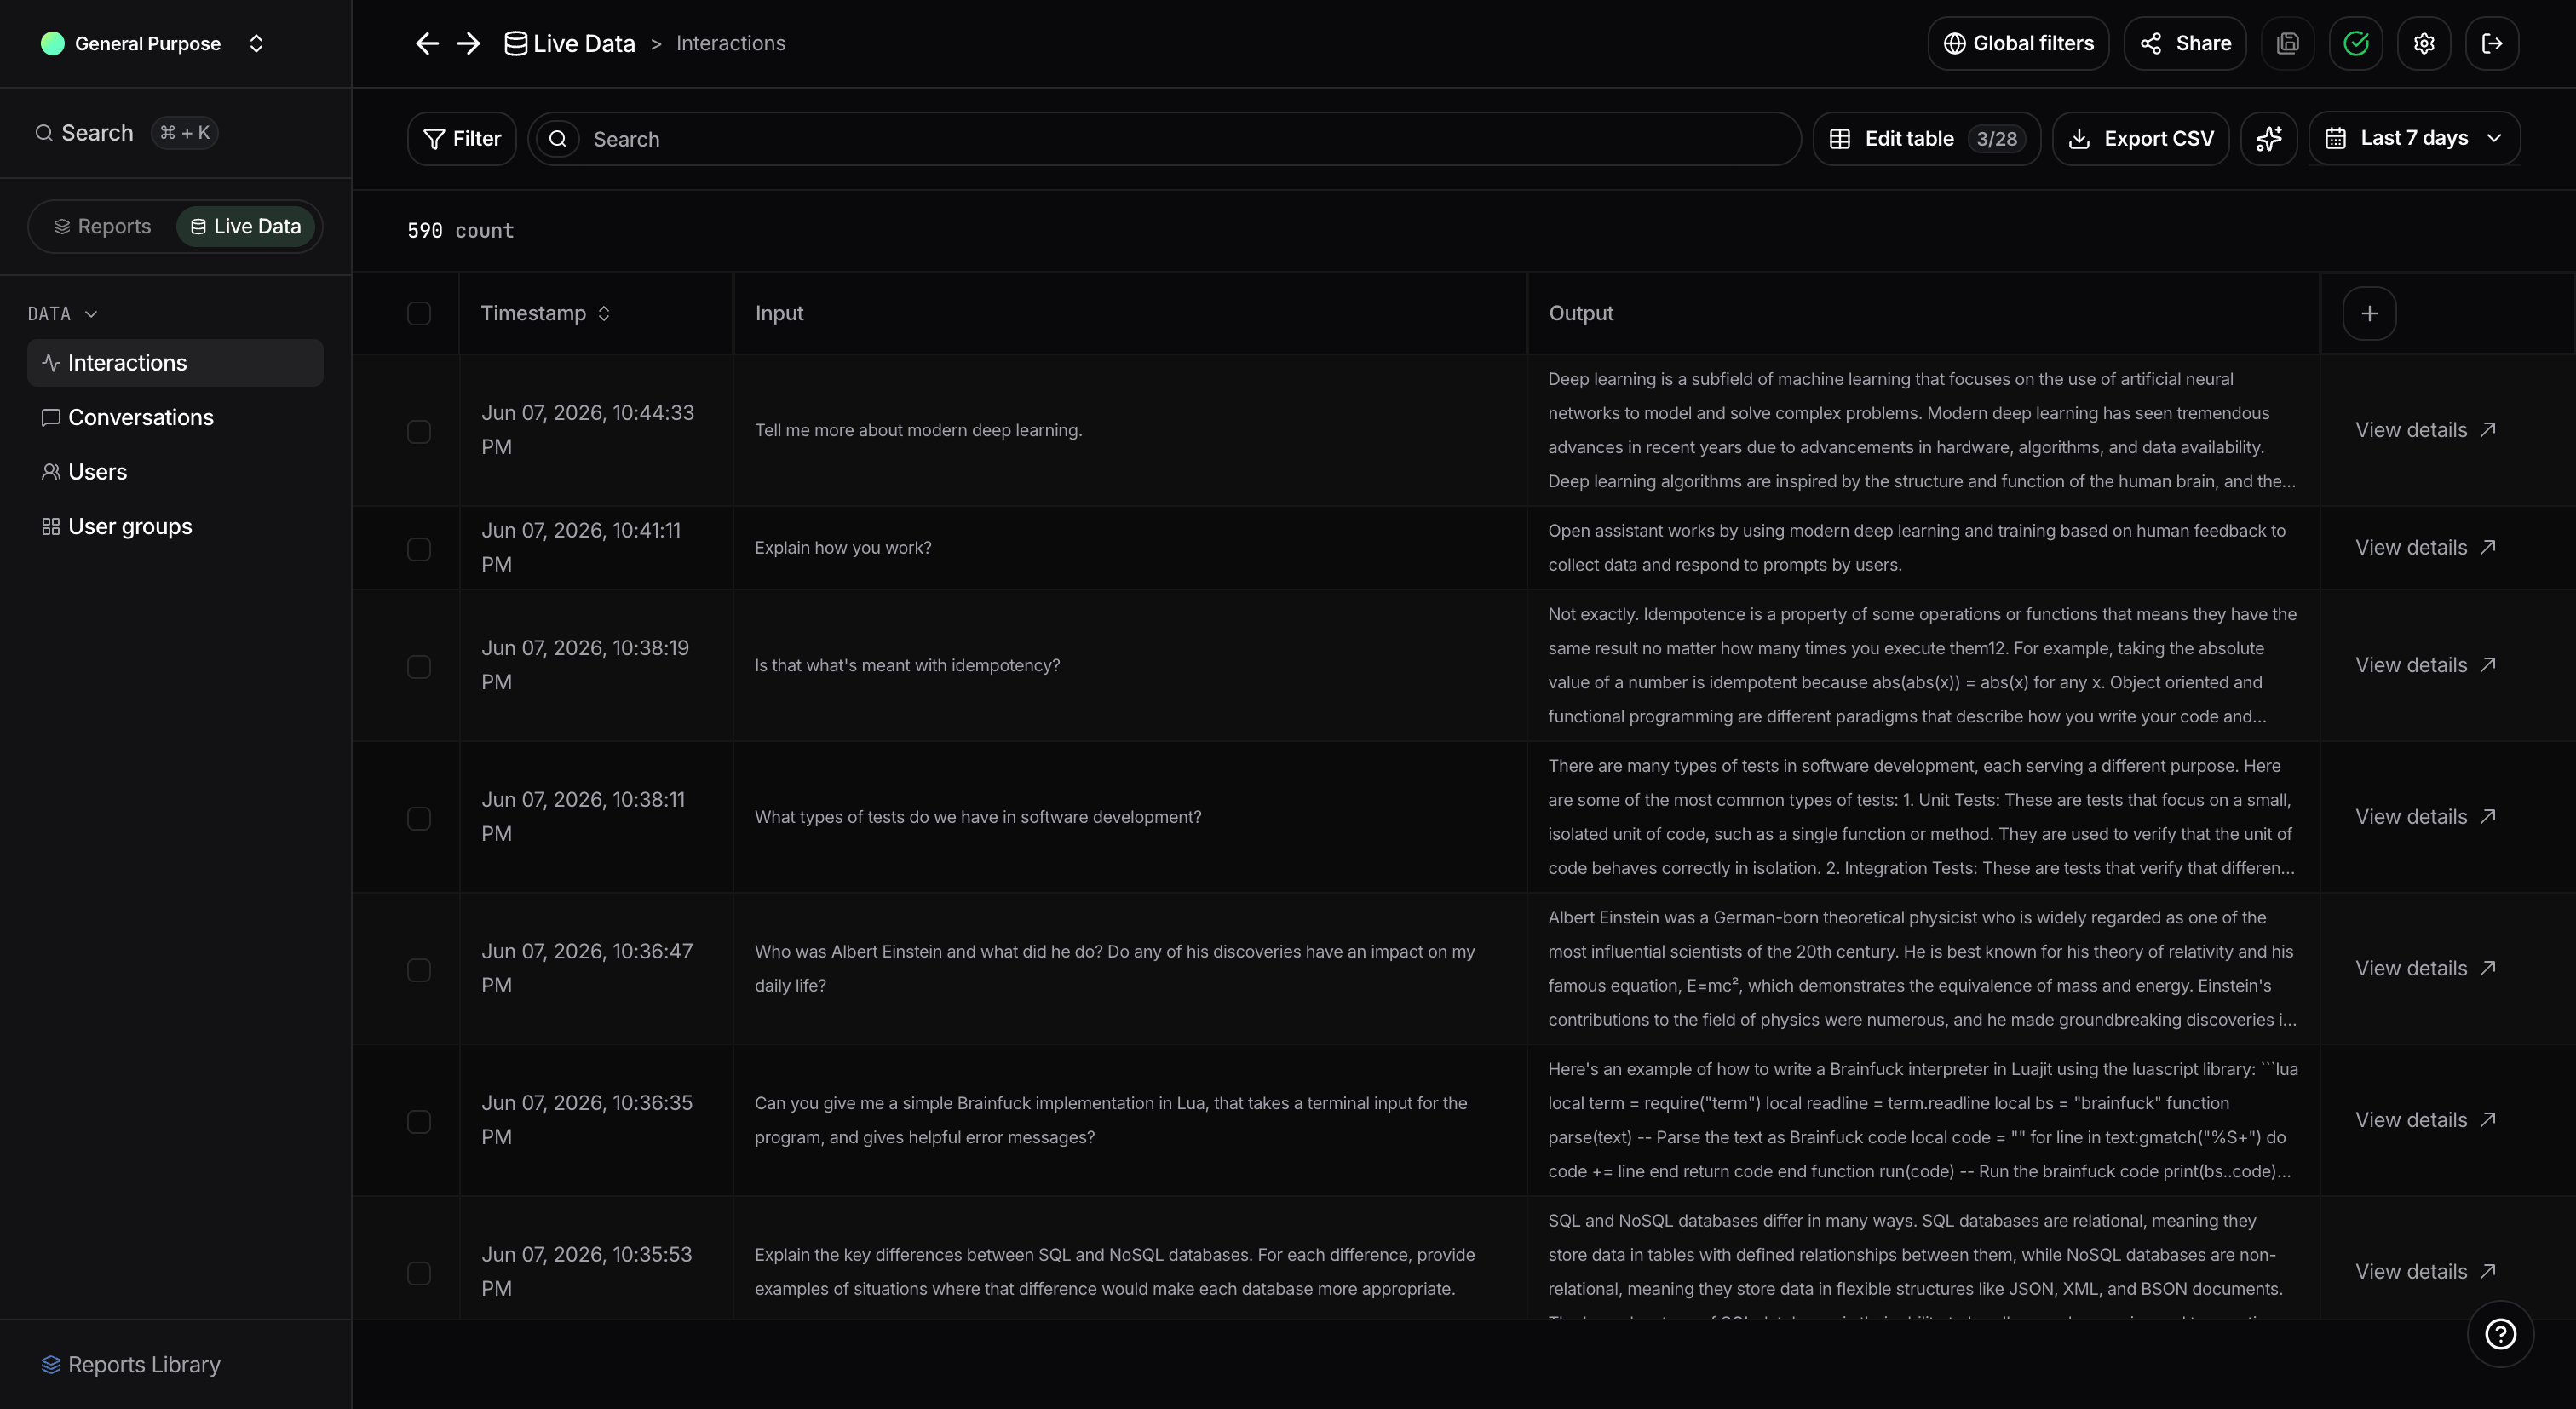
Live Data is the operational workspace that unifies previously separate navigation paths.Purpose- Merge the old Interactions, Conversations, Users, and User groups tabs into one coherent entry point.
- Remove context switching between multiple pages when analyzing real activity.
- A single place to inspect platform activity from interaction, conversation, user, and user group perspectives.
- Faster transitions between aggregate insights in reports and concrete activity records in Live Data.
- It reduces navigation friction and duplicated filtering work.
- It gives teams one consistent source-of-truth flow for day-to-day investigation and monitoring.
Guided adoption
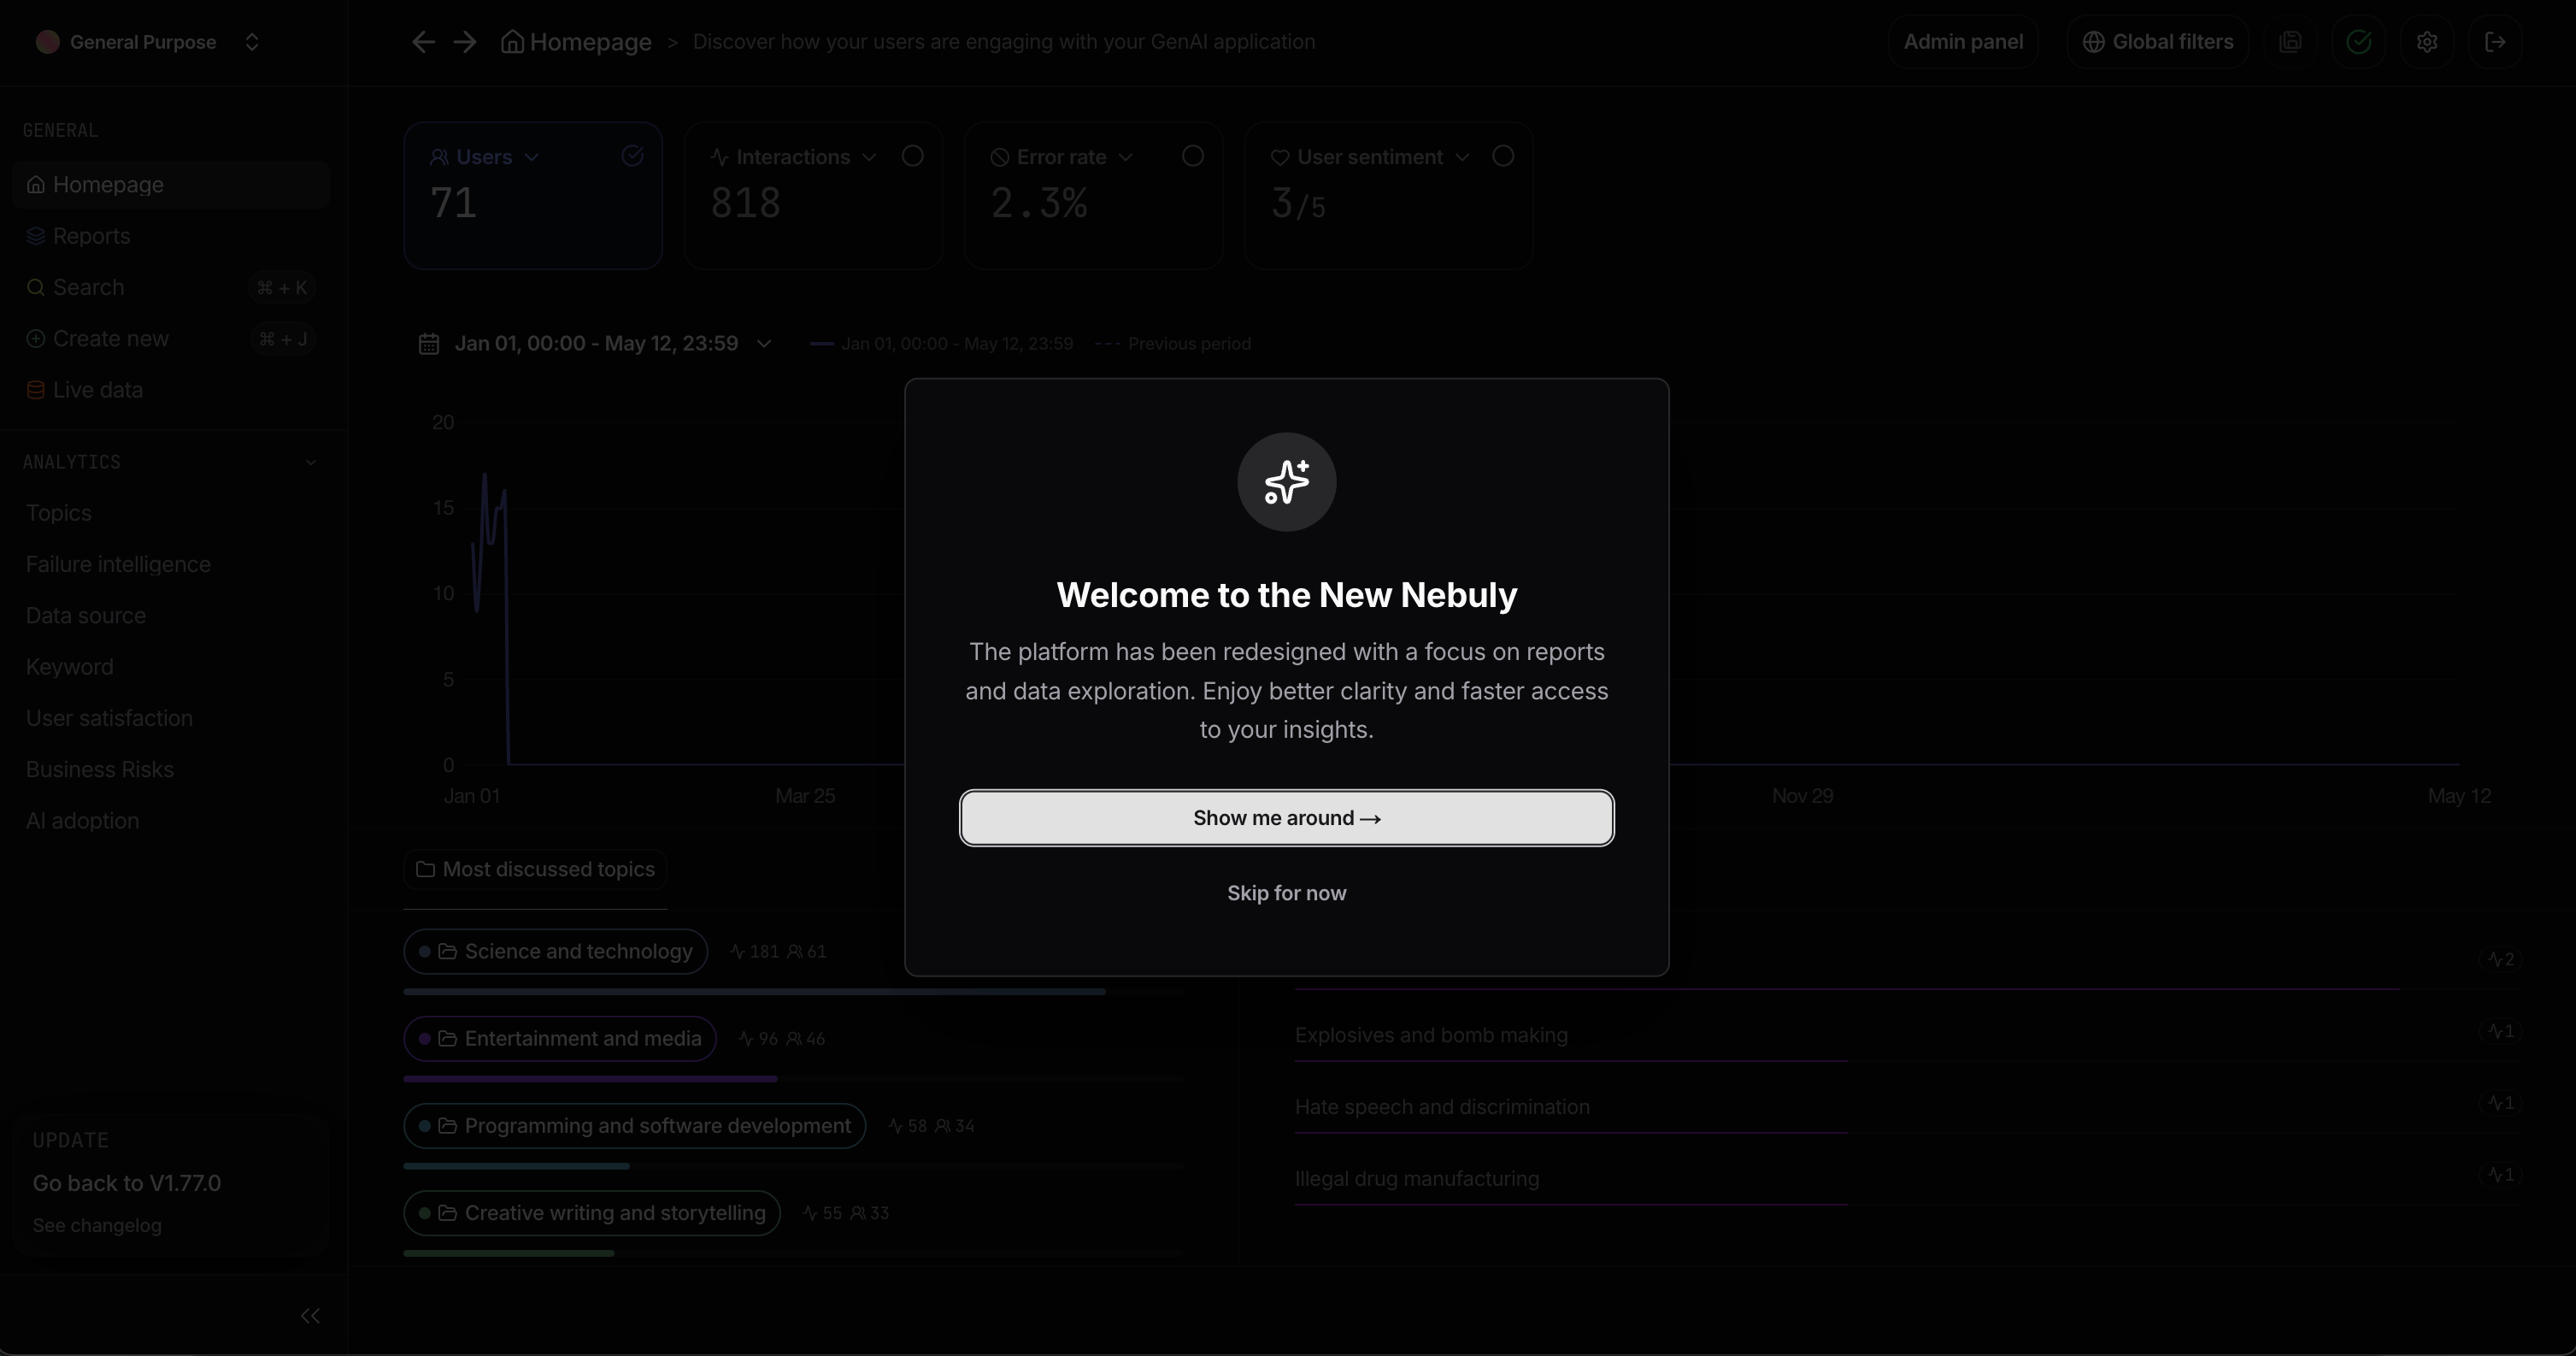
We introduced a new product tour for the reports experience. The step-by-step walkthrough covers:- Reports and Live Data sidebar tabs
- Favorites, Workspace, and Private report sections
- Reports Library
- Access control (Private vs Workspace visibility)
- Analytics pages as reports, and report menu options
- More button and panel for managing sidebar report lists
- Drill down and Explore Mode
- Chart quick actions (resize, edit, data mode)
- Report creation wizard and templates
- Live Data navigation
Control the number of bars in horizontal bar charts
Horizontal bar charts with a Group by now include a Number of bars field in the chart configuration panel. This lets you cap how many bars are rendered, which is especially useful when the chart is exported — a chart with dozens of bars can become unreadable as a PNG image.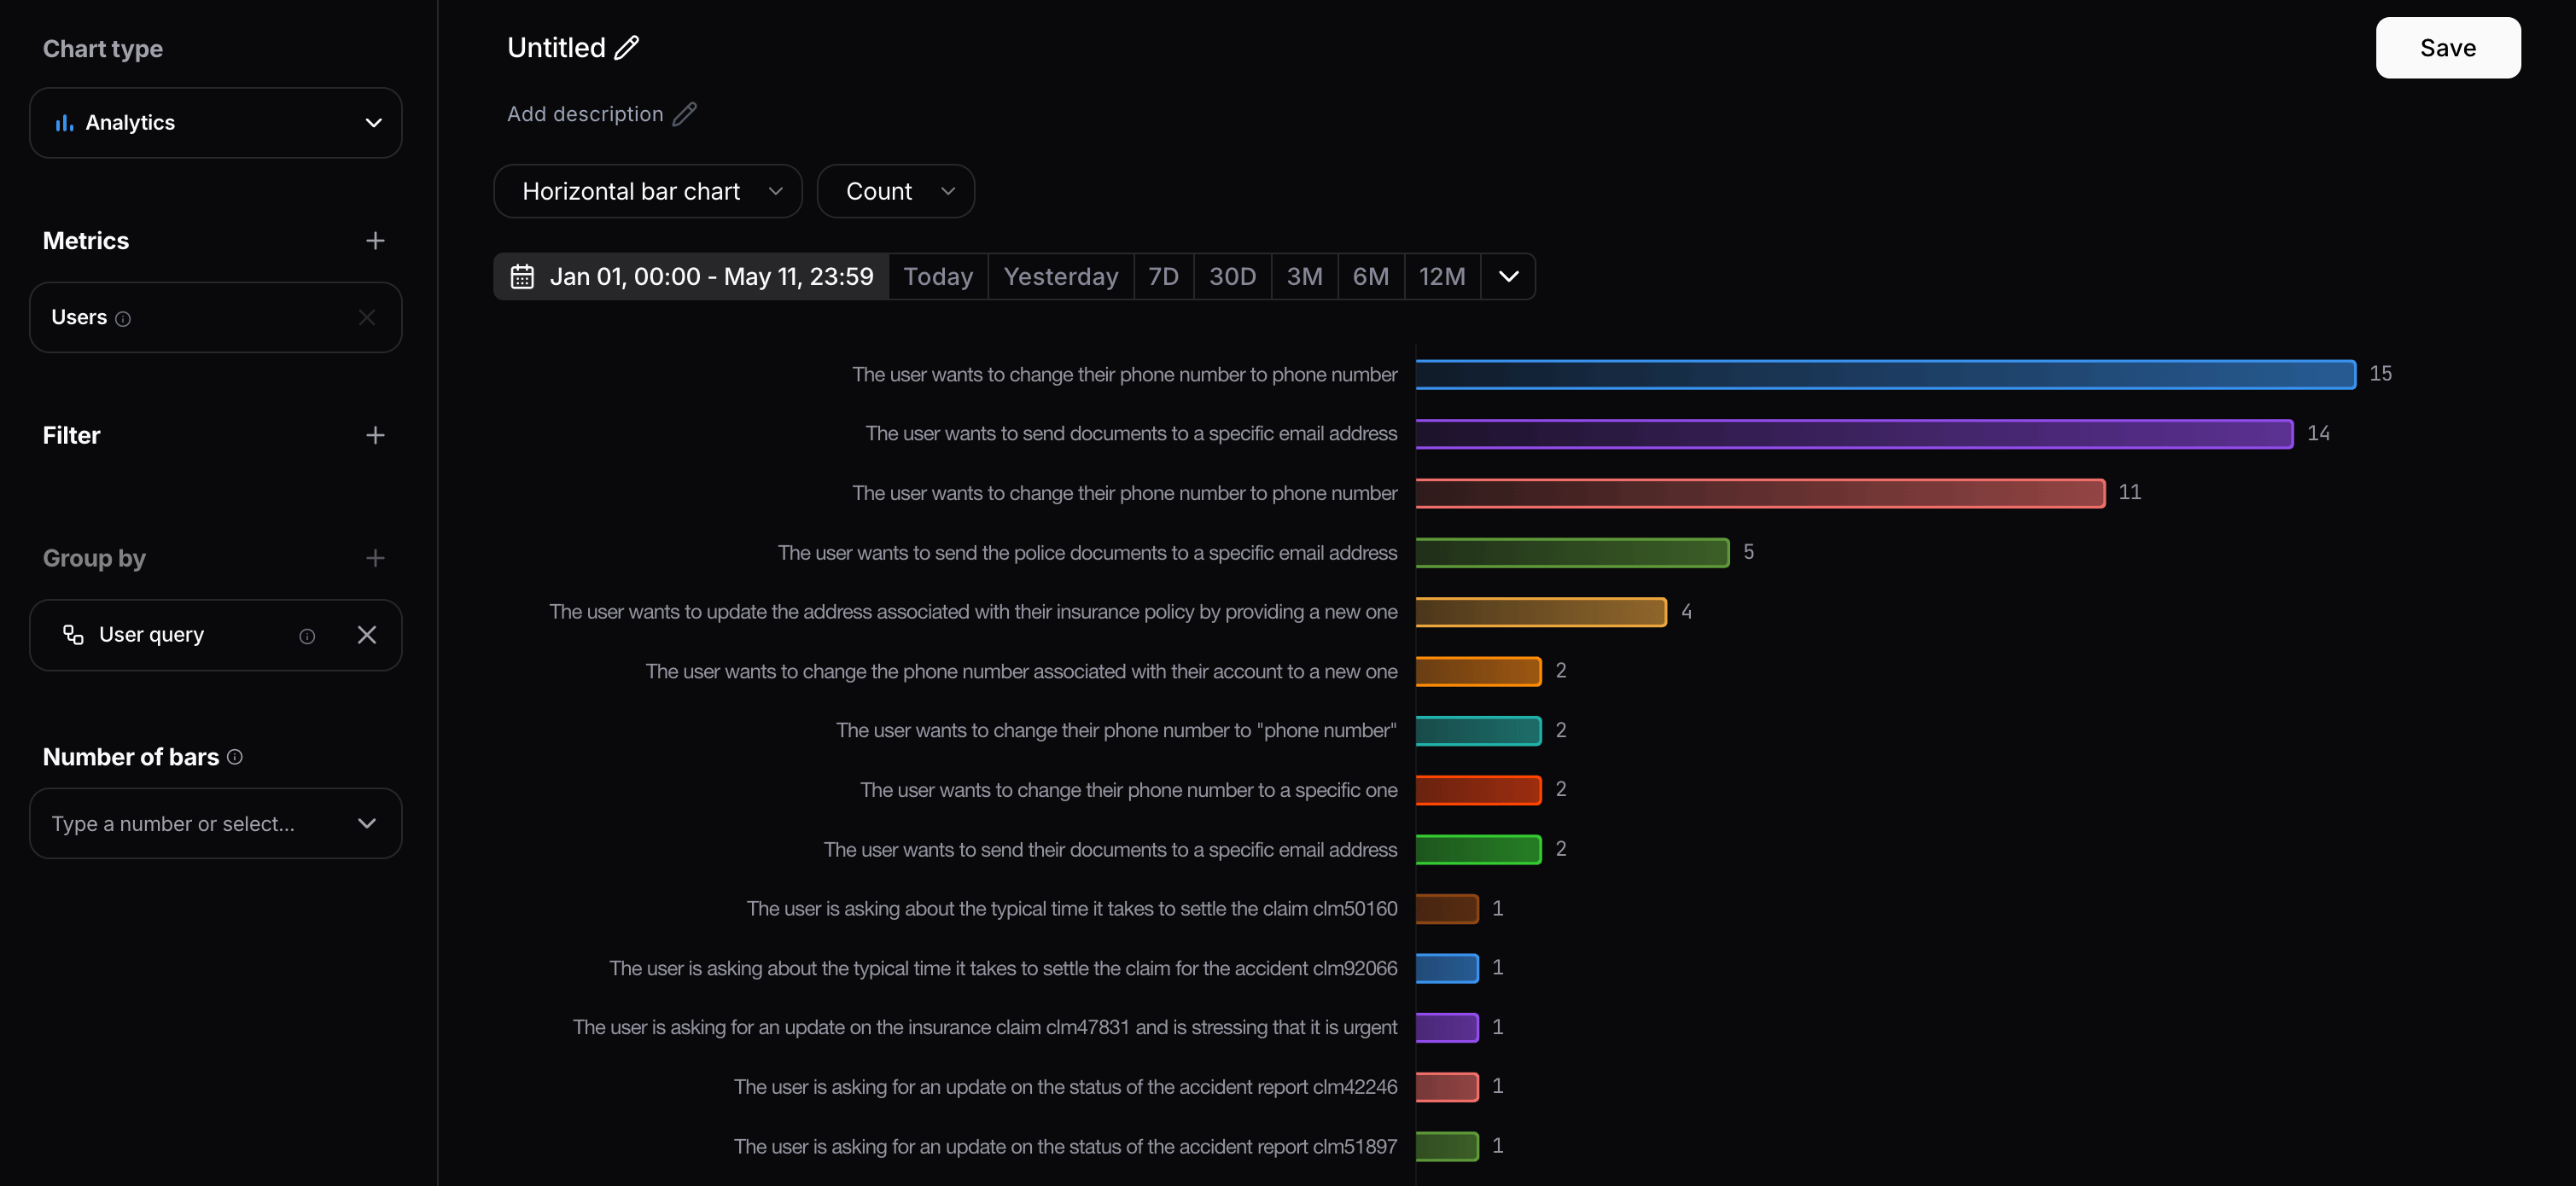
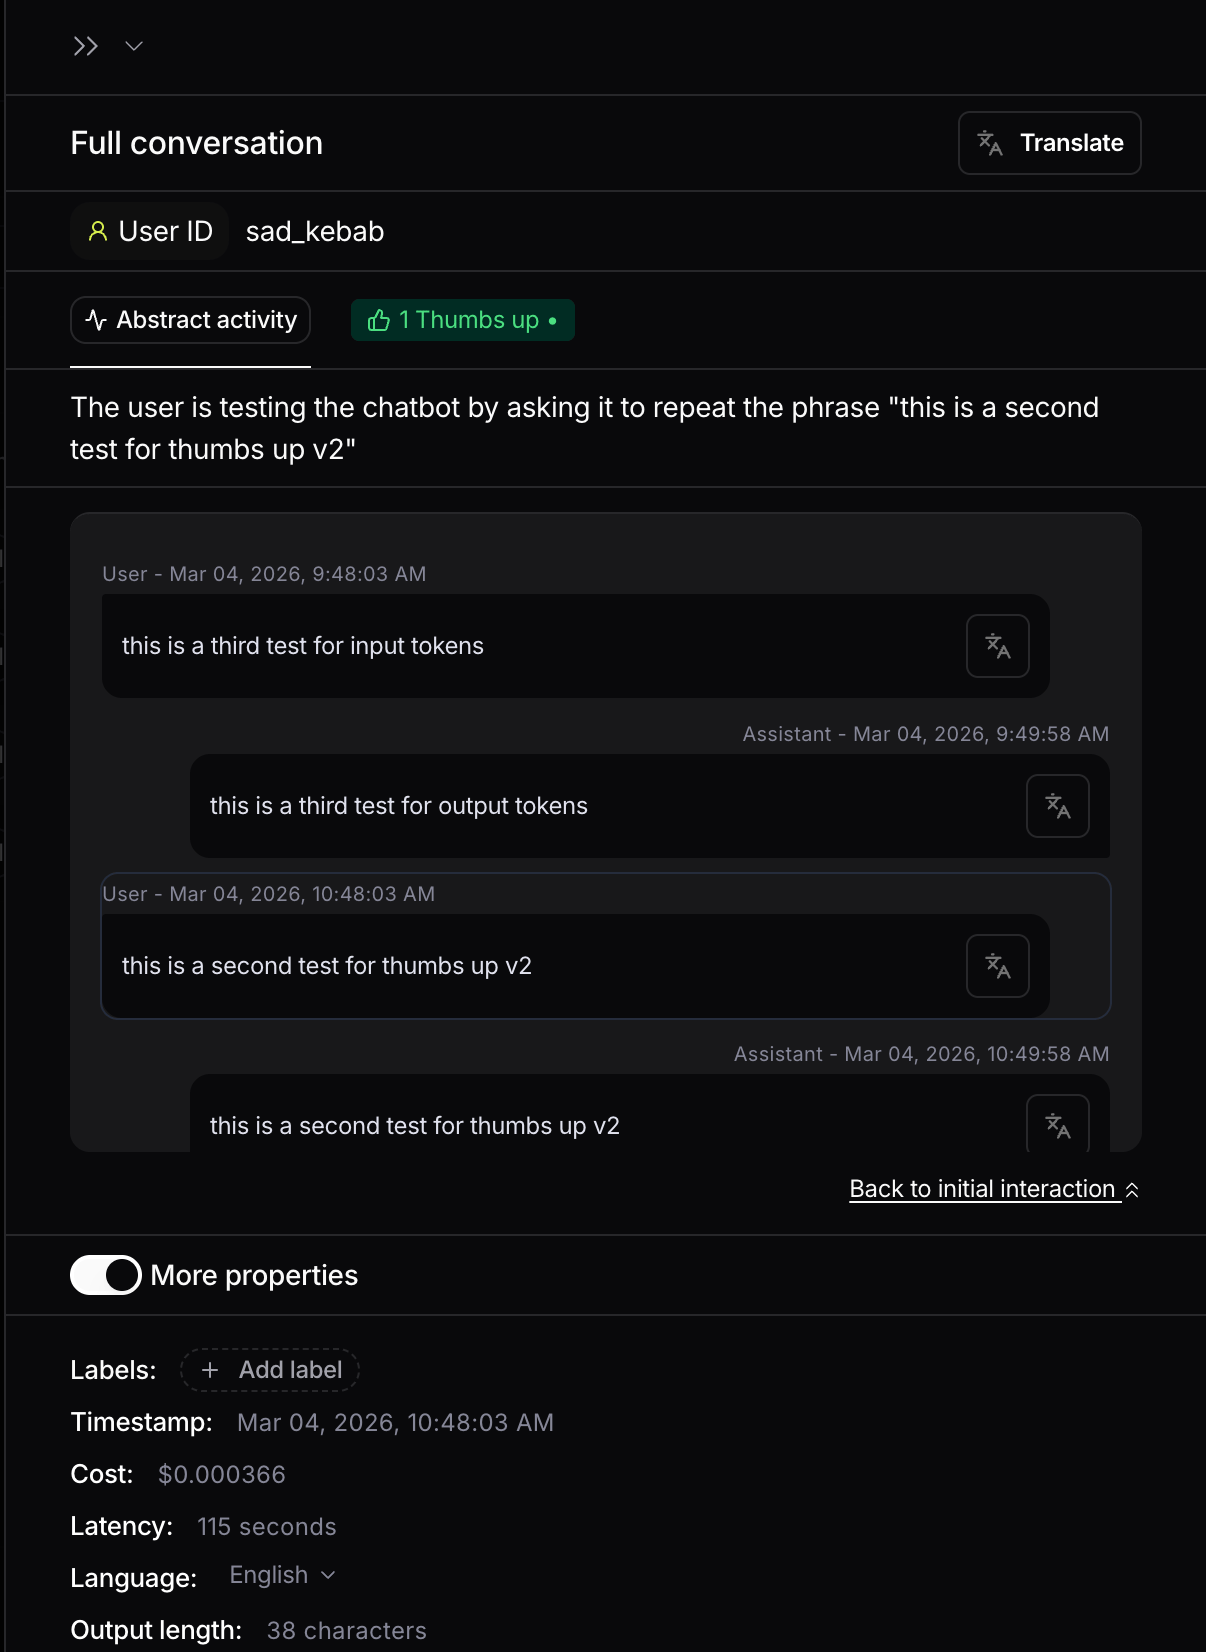
Navigate between interactions in the same conversation
From the Live Activity interactions table, you can open the details of an interaction by clicking View details in the last column of a row.
Frontend V2 filters: restyled UI and new Contains operator
We restyled filters in Frontend V2 and introduced a new Contains operator for text-based matching.The V2 filter row is now organized in three pills:- Filter kind
- Operator
- Value
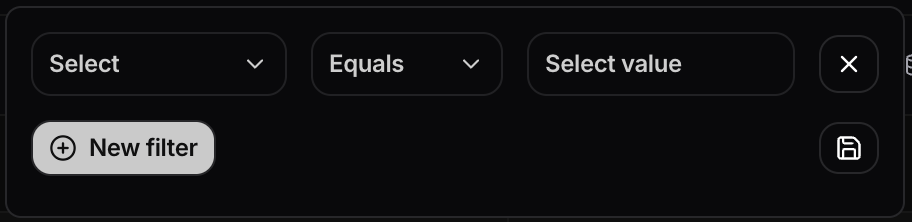
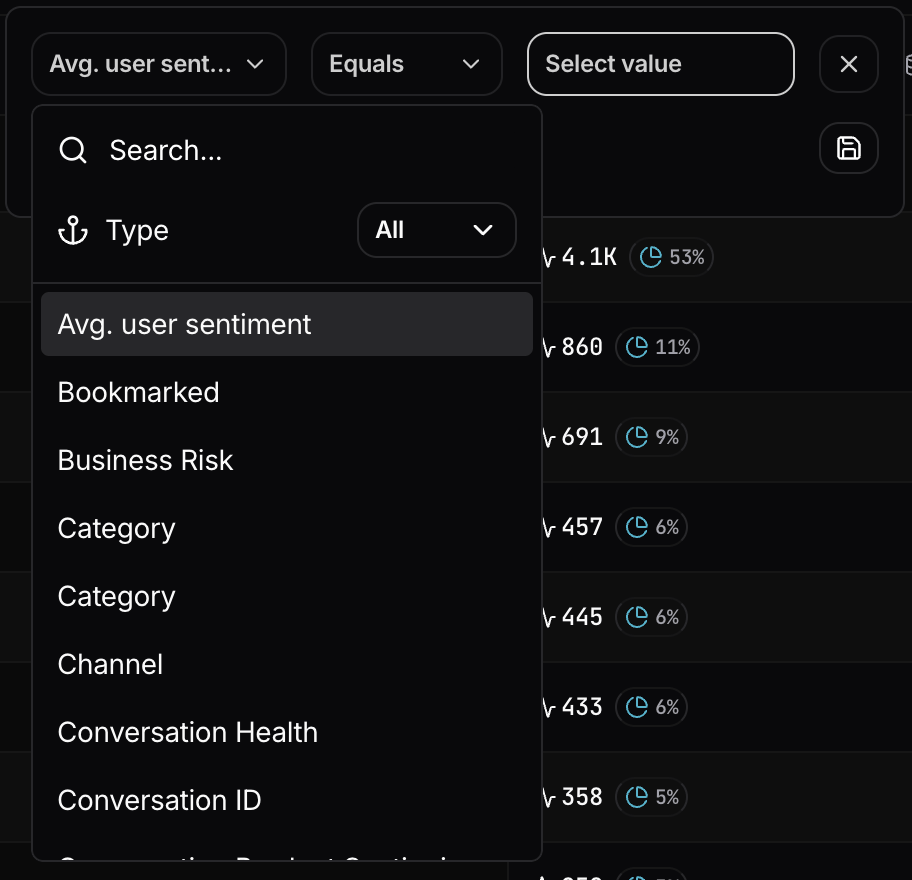
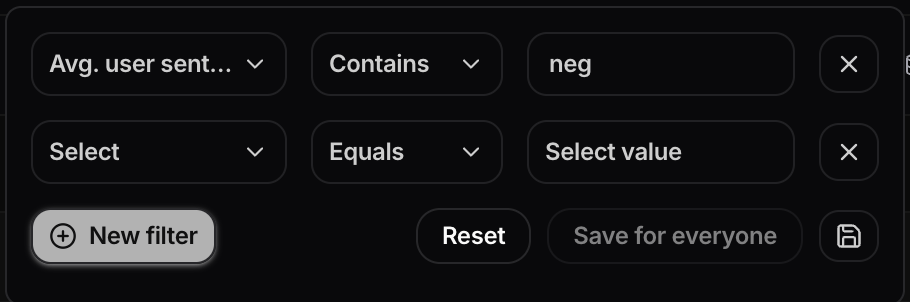
Equals, Is not, and Contains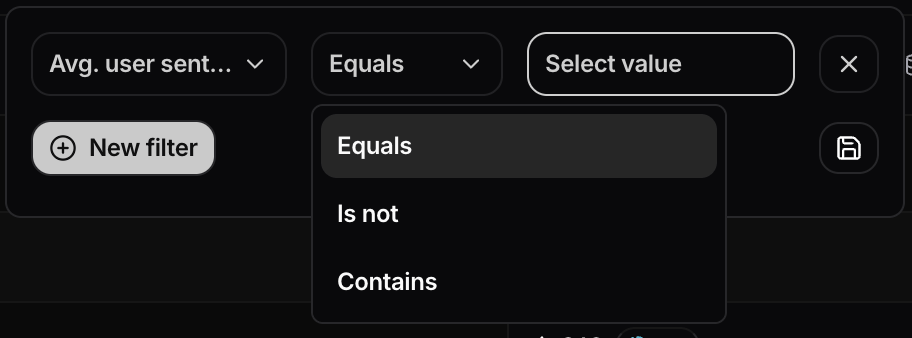
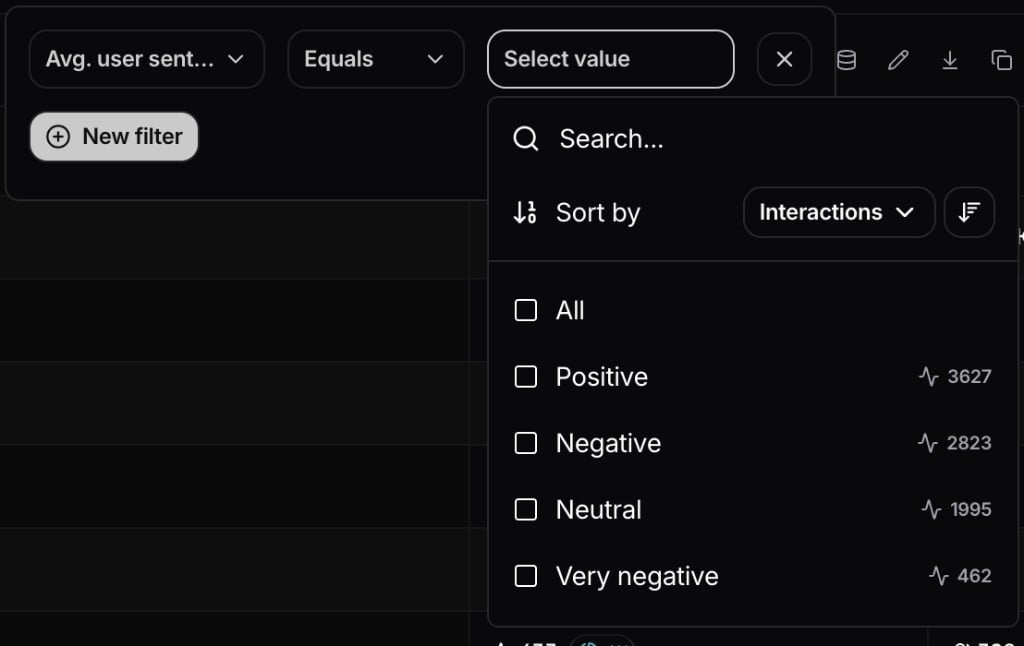
Contains operator accepts partial text and matches all values that include it.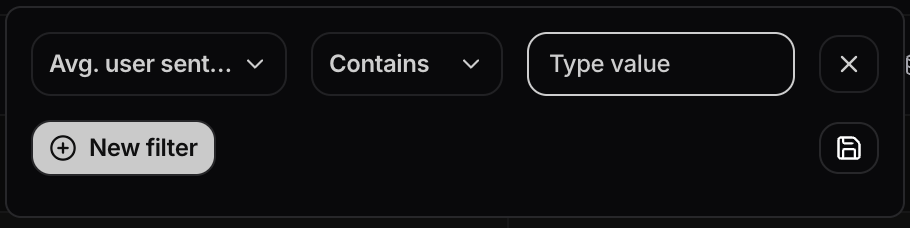
neg in Avg. user sentiment matches both Negative and Very negative.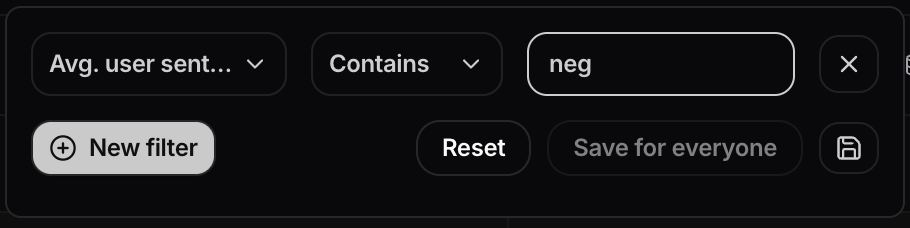
Gemini Enterprise integration
You can now sync Gemini Enterprise assistant interactions into Nebuly from Google Cloud.A self-hosted Python script reads end-user activity from Cloud Logging, enriches token counts from Cloud Trace, and ingests each prompt/response interaction into Nebuly. The sync is incremental and safe to re-run, supports an optional BigQuery log source, and offers date-range filtering and a dry-run preview before ingesting data.See the Gemini Enterprise integration guide to get started.Alerts: new metrics and interaction filters
Alerts have been expanded with new metrics and more granular filtering:- Interactions count and Users count are now available as alert metrics
- Business risk variance has been removed
- Alerts can now be configured with interaction filters, letting you control which interactions are included in alert evaluation
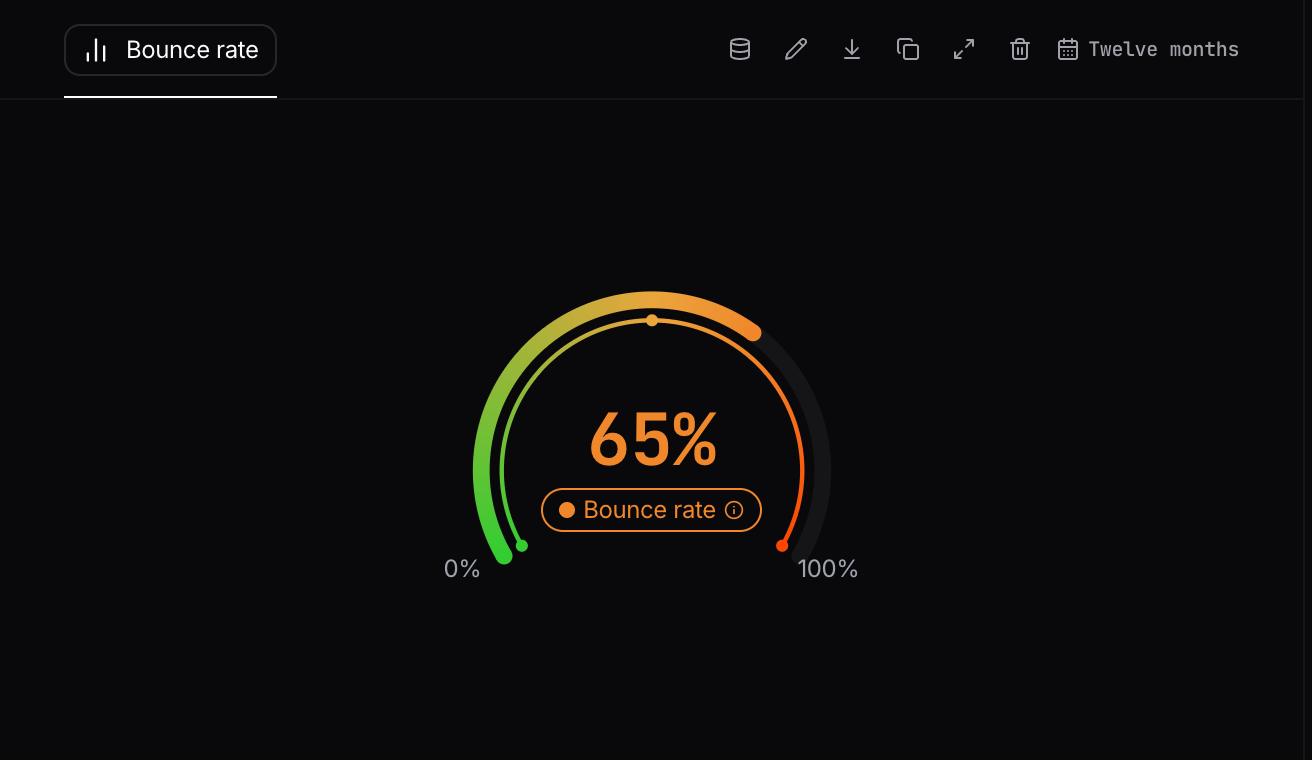
Gauge chart
You can now add a Gauge chart to analytics reports to display a single KPI on a color-coded semicircular scale, with a configurable visible range and threshold bands.- Choose Gauge from the chart type menu when editing an analytics chart.
- Configure the visible range and colored threshold bands via Scale settings next to the chart type.
- Drag thresholds or enter values in absolute or percentage mode; customize colors per band.
- Ideal for metrics with target zones (e.g. error rate, bounce rate, custom percentage KPIs).
How to customize the scale
Open Scale to set the start and end values for the arc, then add up to six threshold stops to split the scale into colored bands. Drag threshold markers on the rail or type exact values, and switch between percentage and absolute value modes as needed.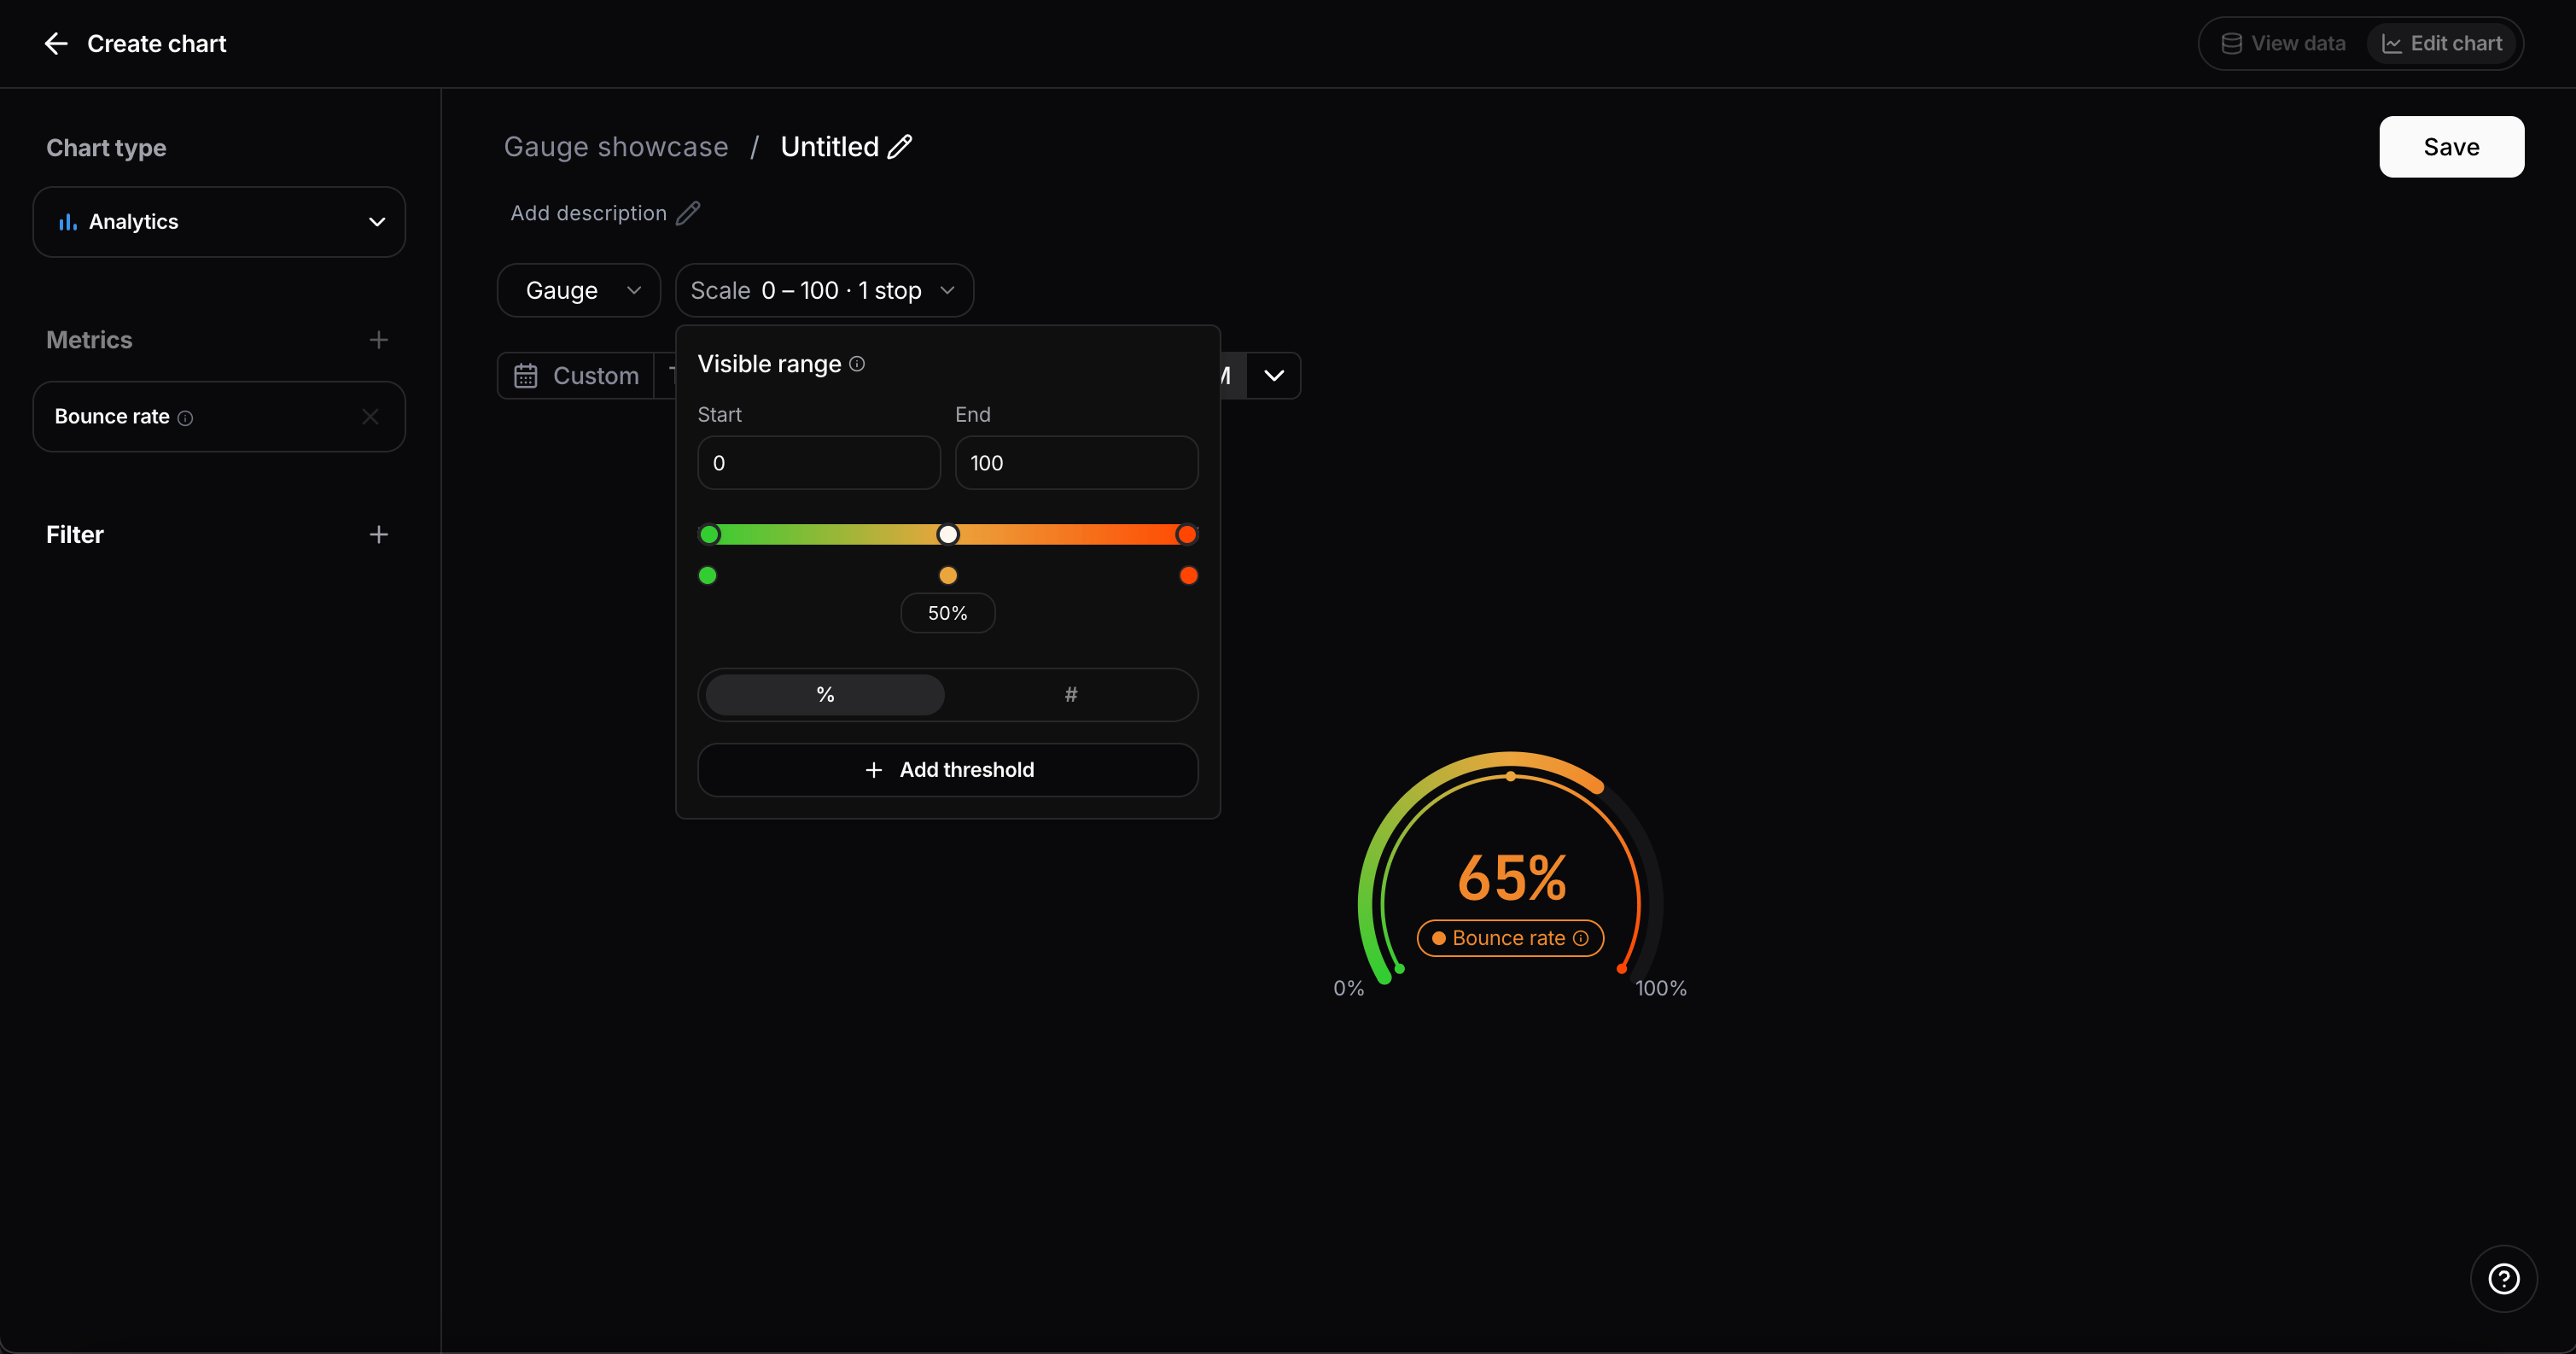
MCP Server: reports and charts
The Nebuly MCP Server can now create and update reports and charts.You can ask your assistant to:- Create and update reports, including their name, description, and favorite status
- Retrieve the content of a report
- Add analytics and table charts to a report
AI Fluency Index (AIFI)
The AI Fluency Index (AIFI) is now available as a 0-100 score that helps you measure how effectively people interact with AI in real workflows.AIFI is designed to make AI usage quality measurable and actionable so teams can:- Track prompting quality improvements over time
- Identify users and groups that need enablement
- Measure the impact of coaching and process changes
- Report on proficiency, not just activity volume
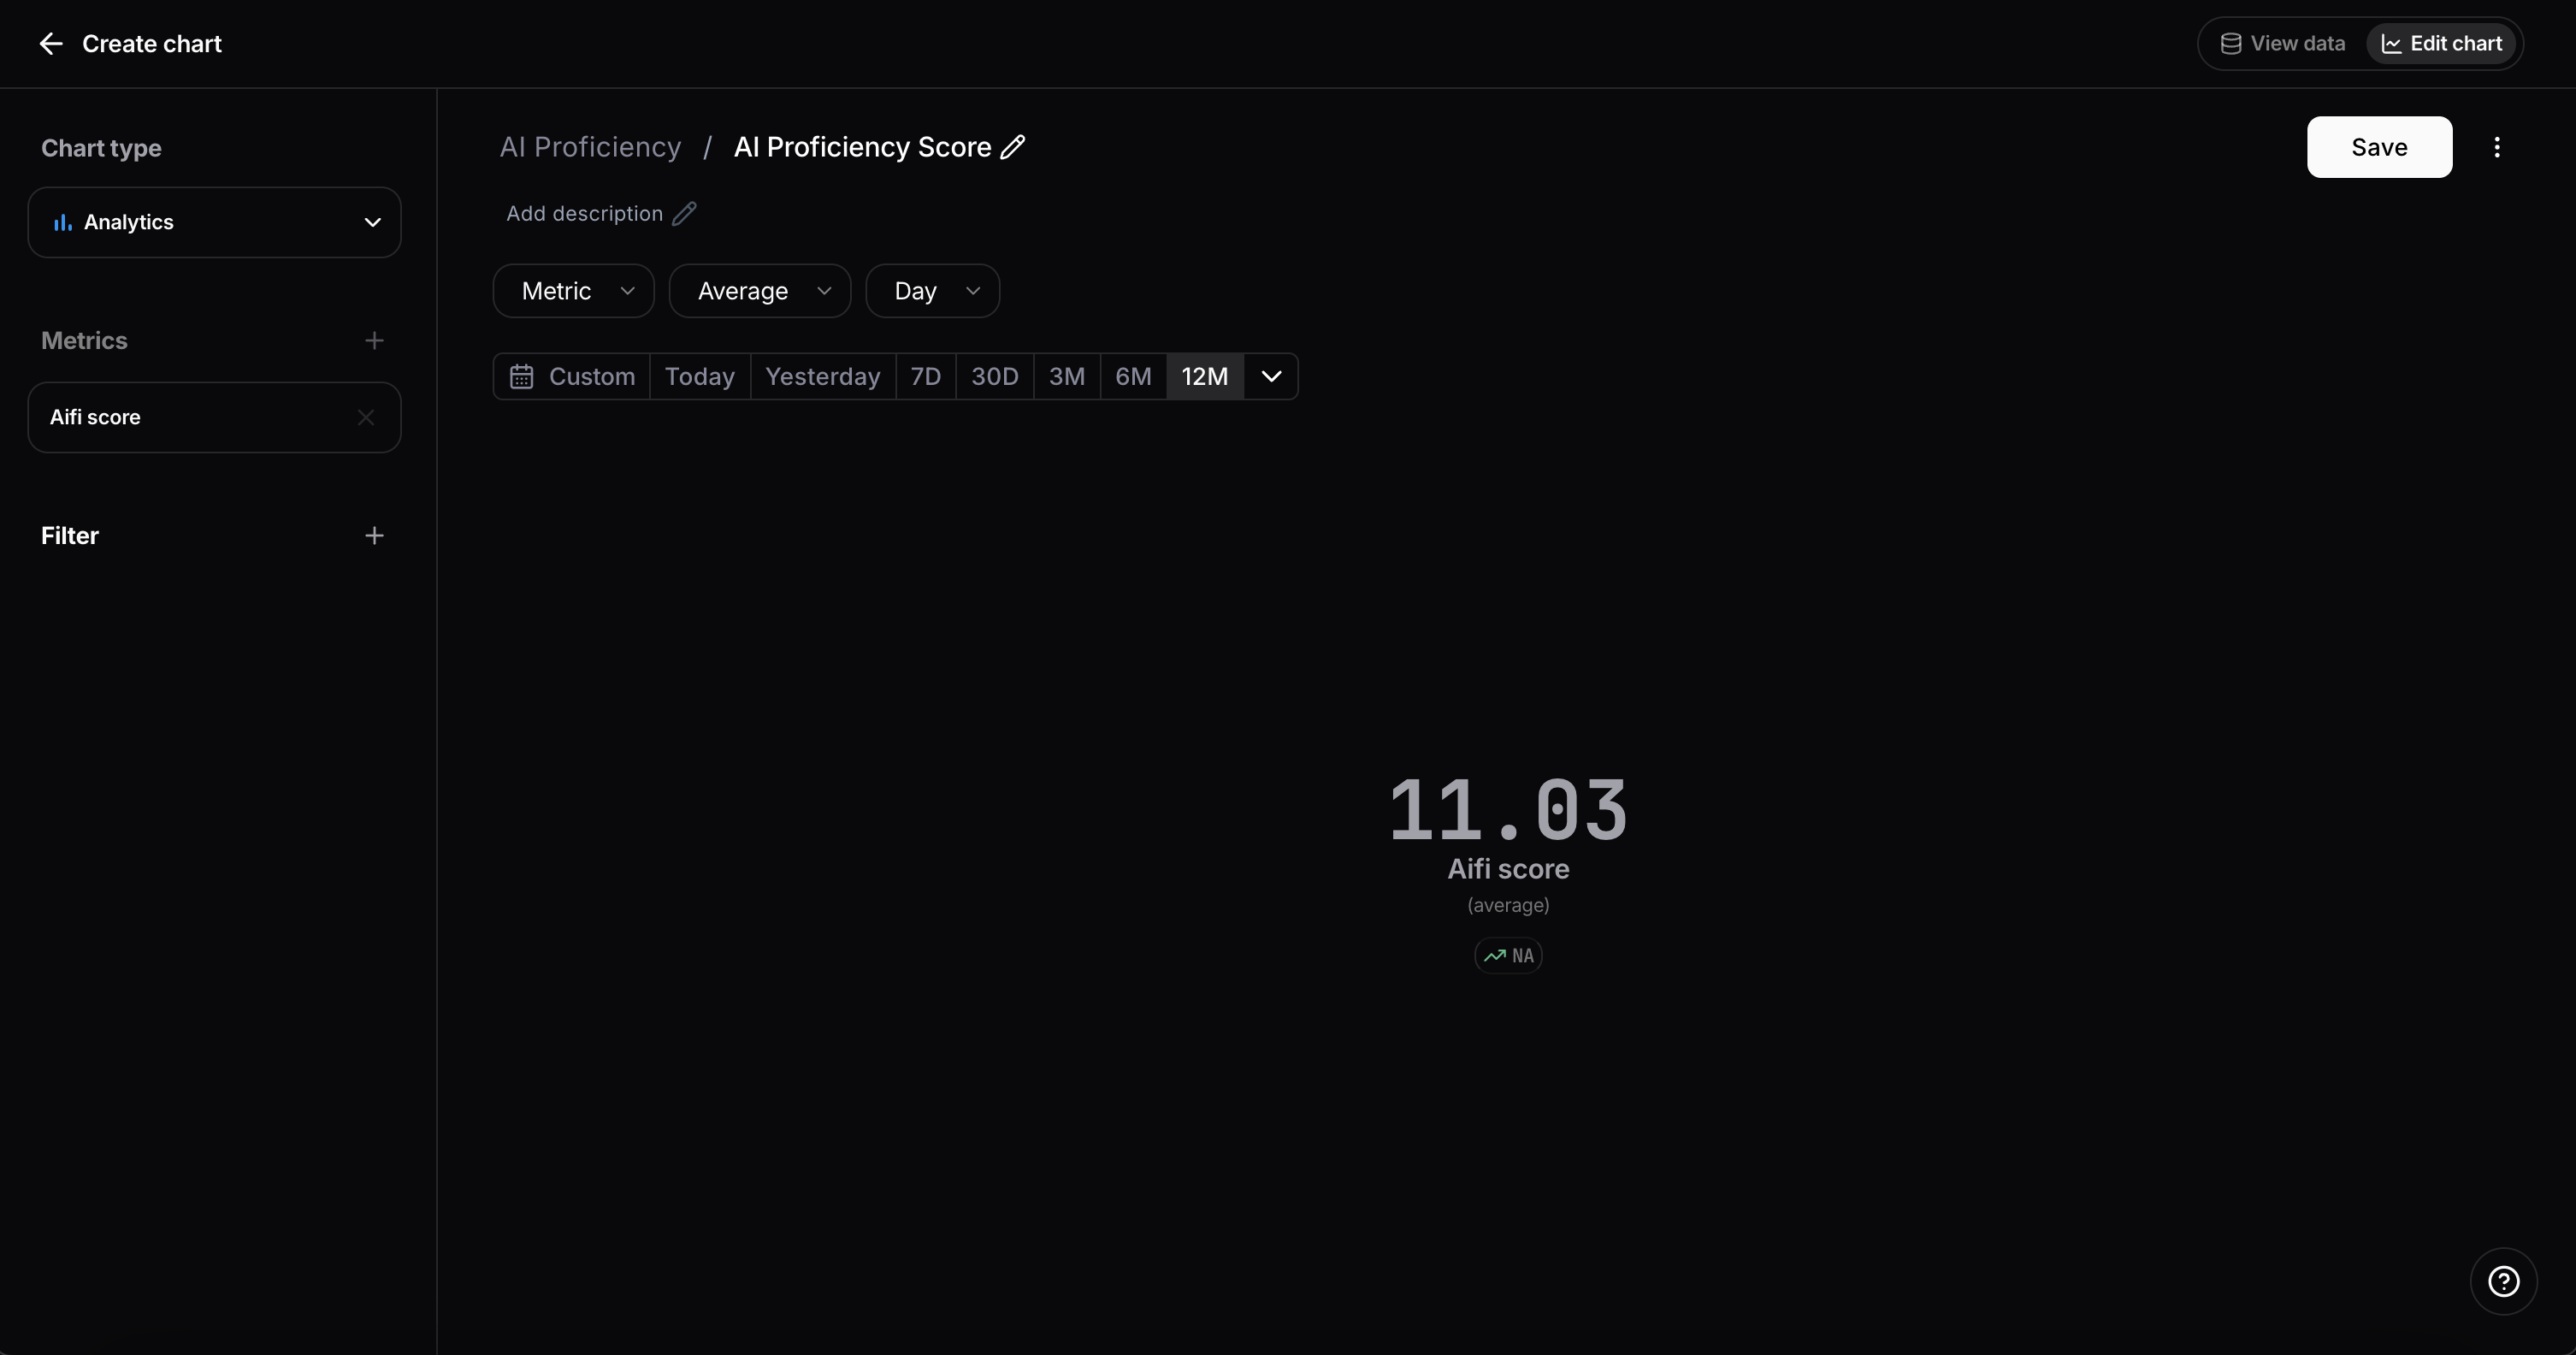
System cohorts
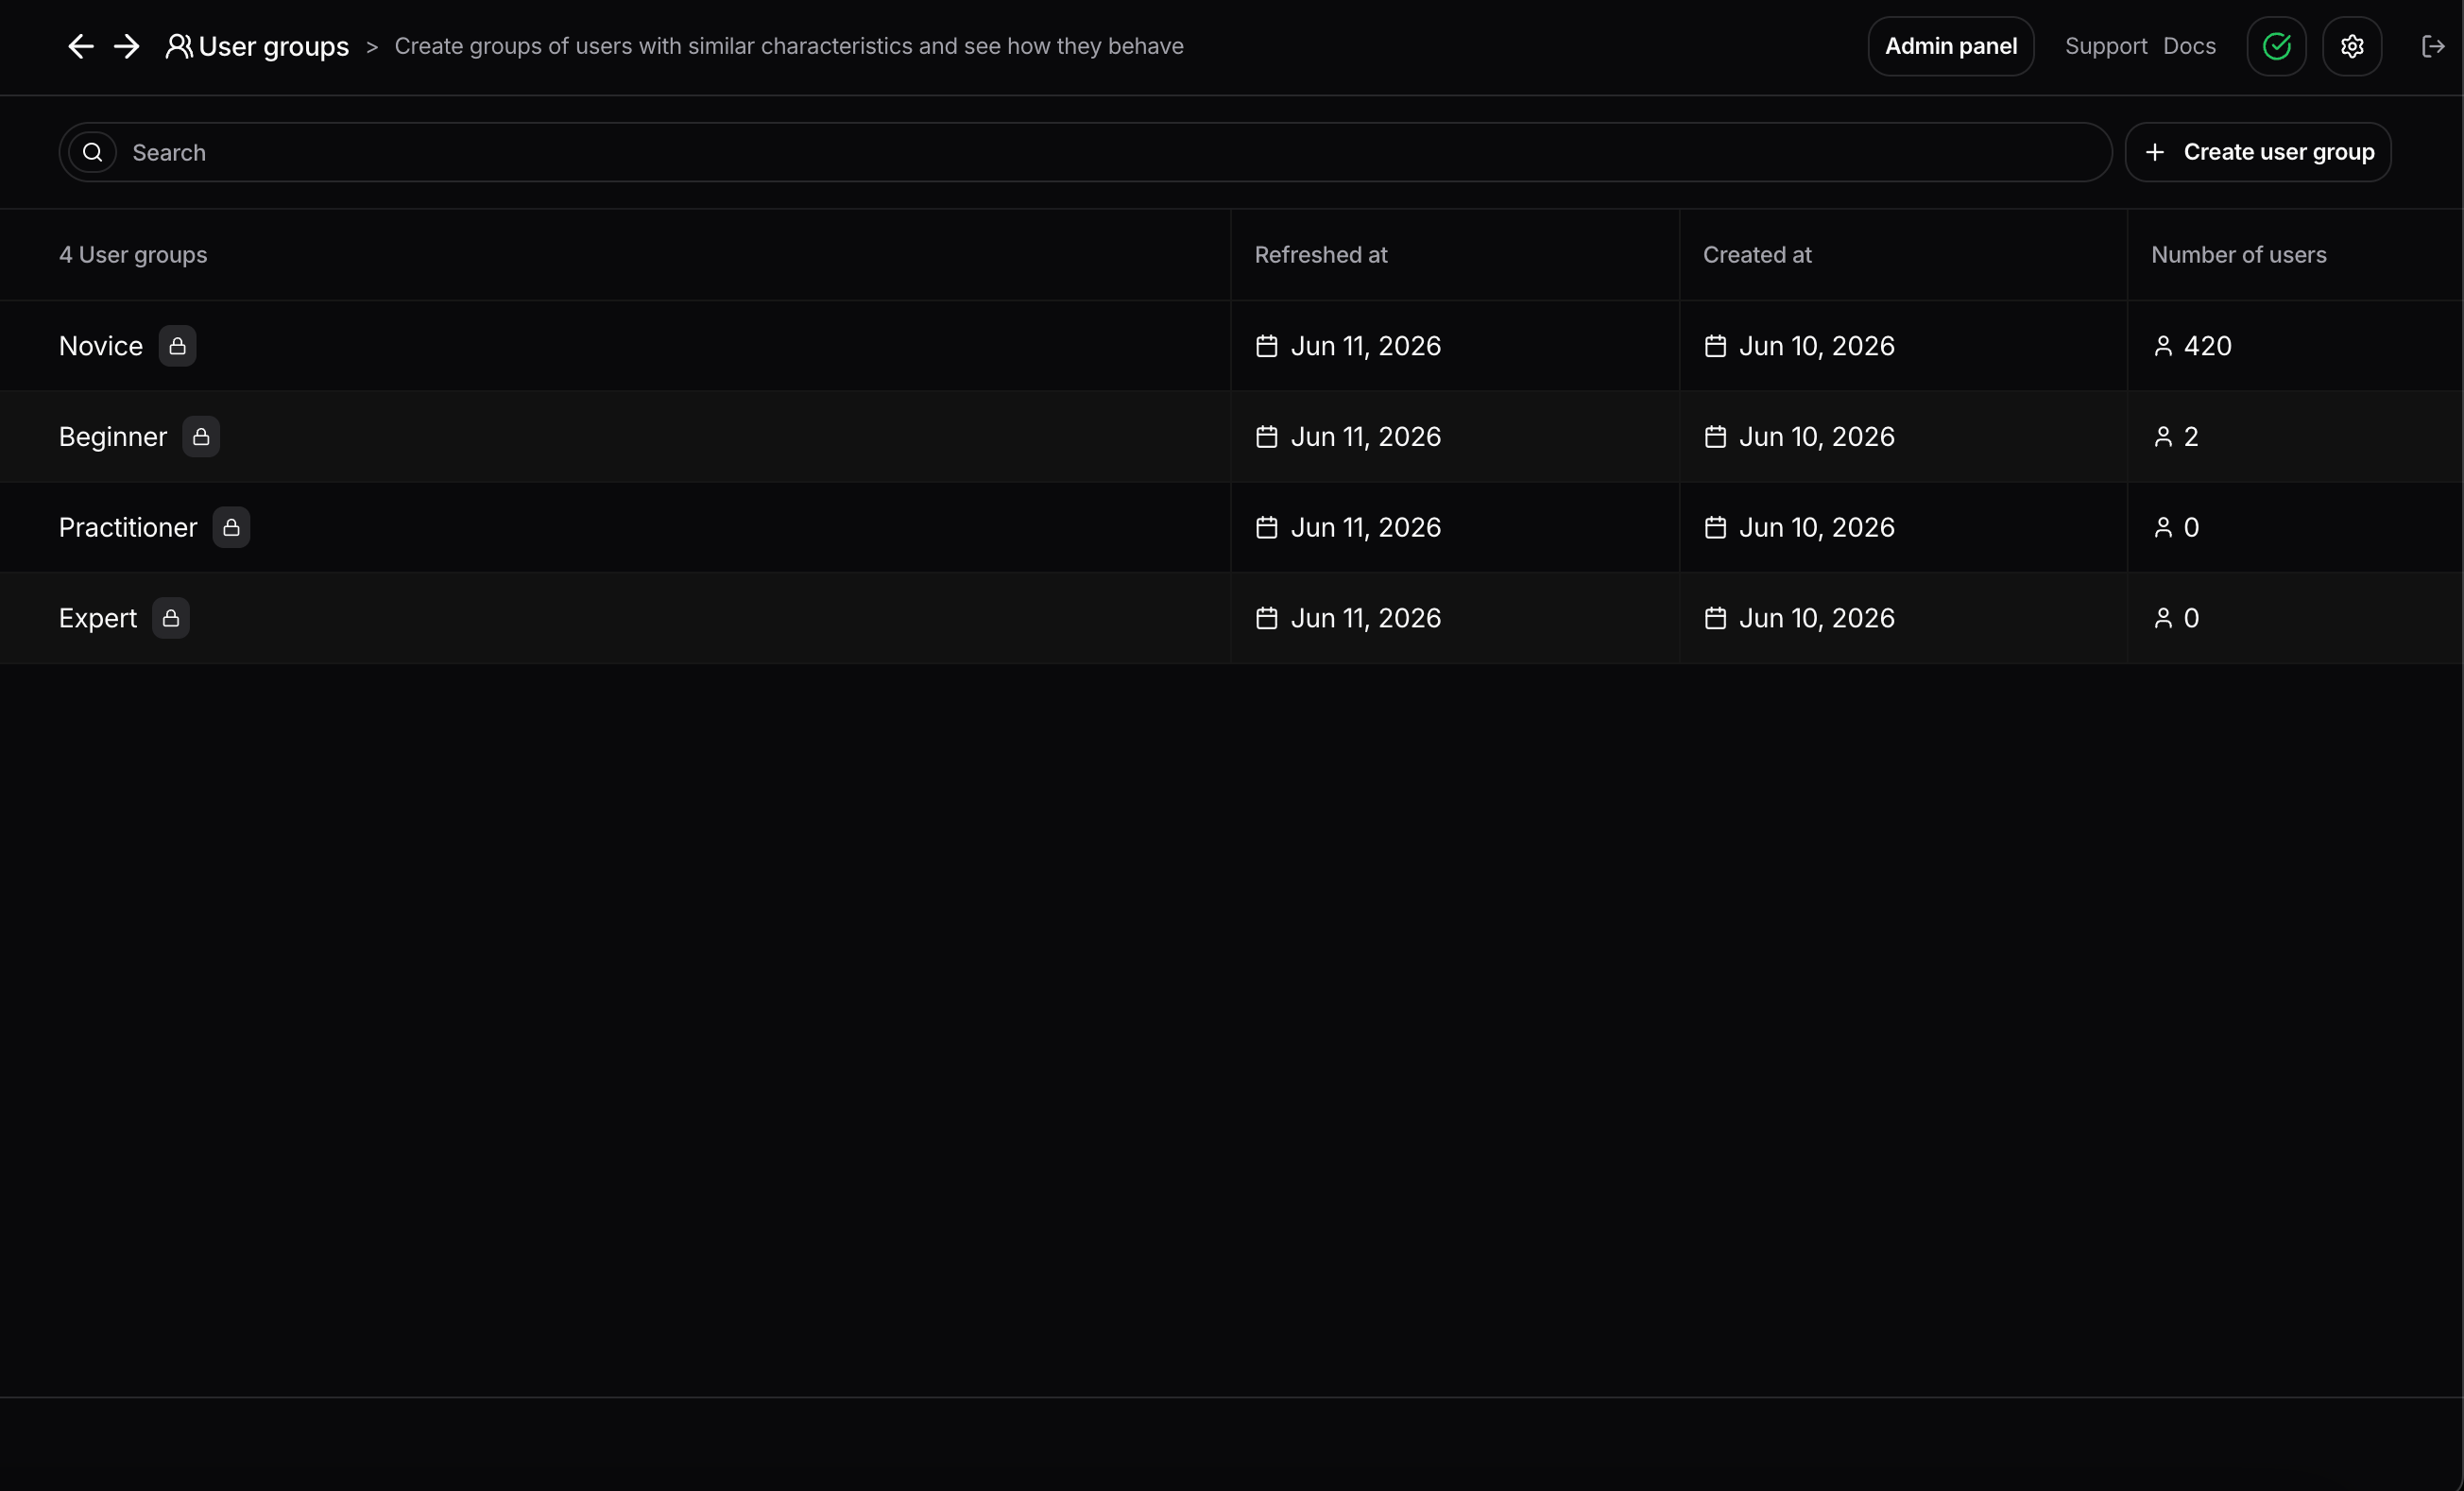
We introduced platform-managed system cohorts for AI proficiency segmentation. These cohorts are created and maintained automatically per project, so they stay consistent and always up to date.Proficiency levels:- Expert
- Practitioner
- Beginner
- Novice
- 85 and above: Expert
- 65 to 84: Practitioner
- 40 to 64: Beginner
- Below 40: Novice
Claude Compliance integration
You can now sync Claude conversation data from Anthropic’s Claude Compliance API directly into Nebuly.A self-hosted Python script pulls conversations from your Claude Enterprise organization and converts them into Nebuly Interactions, so Claude usage shows up alongside the rest of your analytics. The sync:- Pulls conversation data via the Claude Compliance API
- Converts each user/assistant message pair into a Nebuly Interaction
- Tracks already-synced data locally to avoid duplicates, so it is incremental and safe to re-run
- Supports filtering by date range and a dry-run mode to preview before ingesting
Microsoft 365 Copilot integration
You can now sync Microsoft 365 Copilot Enterprise interactions from Microsoft Graph into Nebuly.A self-hosted Python script reads licensed users and their Copilot interactions, converts prompt/response pairs into Nebuly Interactions, and tracks synced coverage locally so the sync is incremental and safe to re-run. The integration supports date-range filtering and dry-run previews before ingesting data.See the Microsoft 365 Copilot integration guide to get started.Alerts
You can now configure alerts directly from Settings > Alerts. Here you can see all the organization alerts: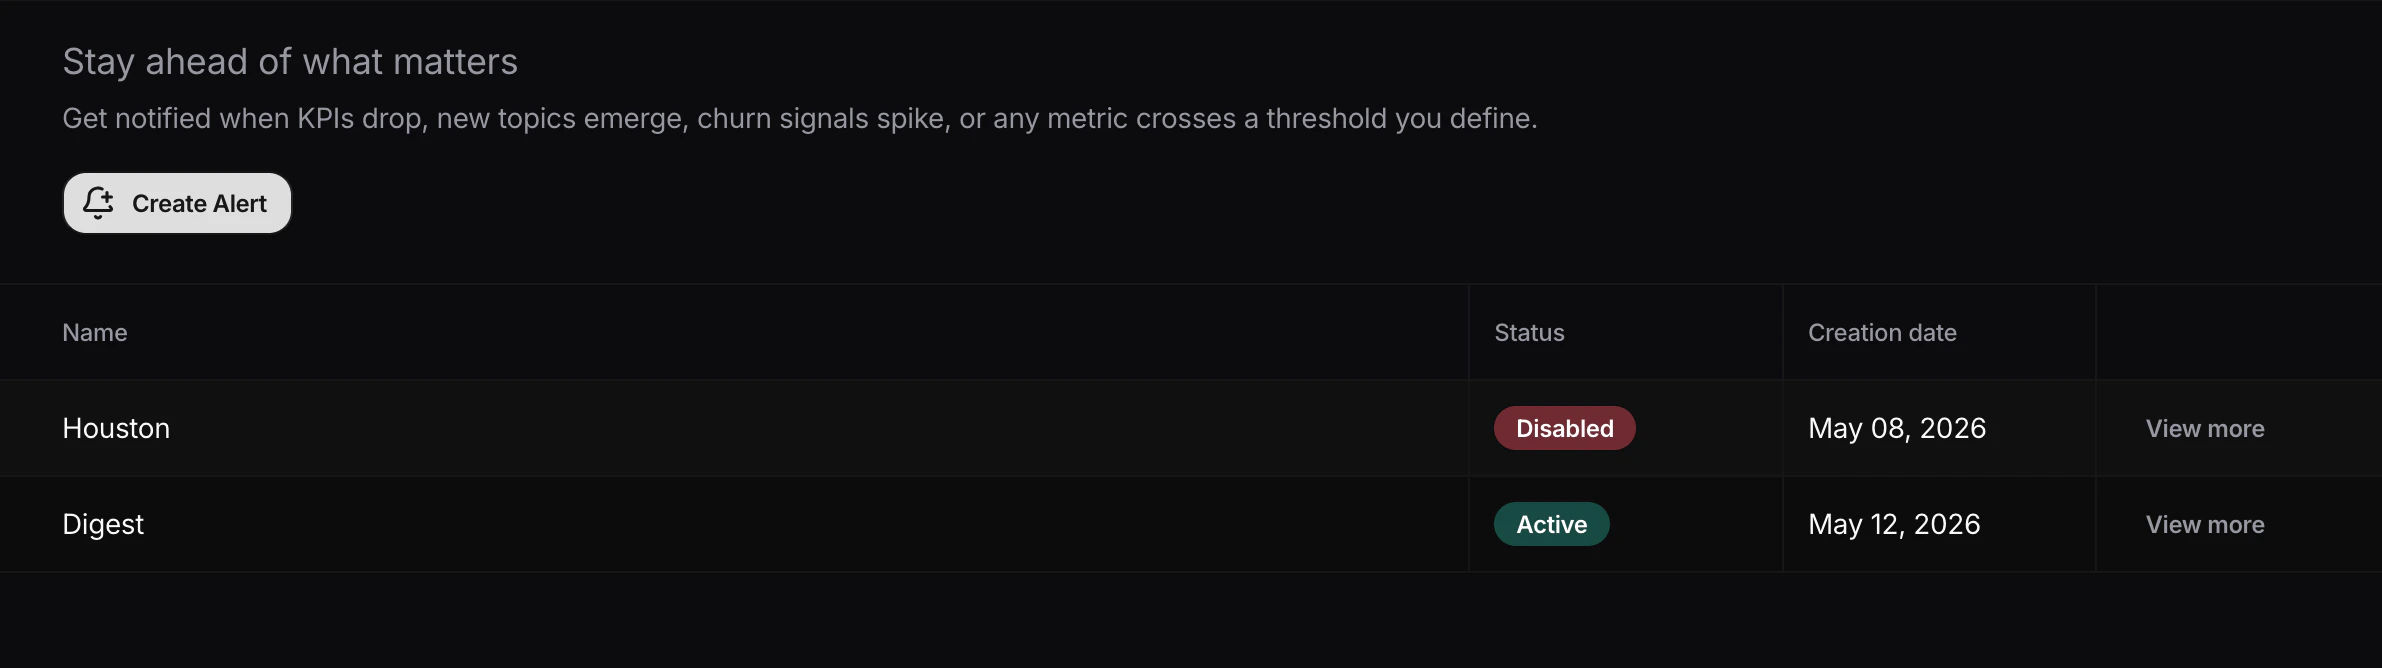
Threshold alerts
Trigger a notification when a metric crosses a value you define. The current available metrics are Error Rate, Business Risk and Topics.For each threshold alert you configure:- Condition: greater than / less than
- Threshold: 1–100%
- Time window: last 24 hours, 7 days, 30 days
- Topics to monitor (for topic alerts)
Recurring summaries
Receive a periodic digest of a project activity on a daily or weekly schedule, starting from a date and time you choose.
RBAC improvements in Settings
We revamped the Members page in Settings to improve role and access management across large workspaces.What’s new:- Pagination support in the members table
- Role-based filtering to quickly find users by permission level
- Ability to update user roles directly from settings
- Ability to update each user’s project access from settings
- Ability to invite new users with a specific role from the invite flow
MCP Server (Beta)
The Nebuly MCP Server is now available in beta. It allows you to connect Claude and other MCP-compatible AI assistants directly to your Nebuly data, enabling natural language queries over your interactions, conversations, and analytics.Get started at MCP ServerCompare reports across time ranges
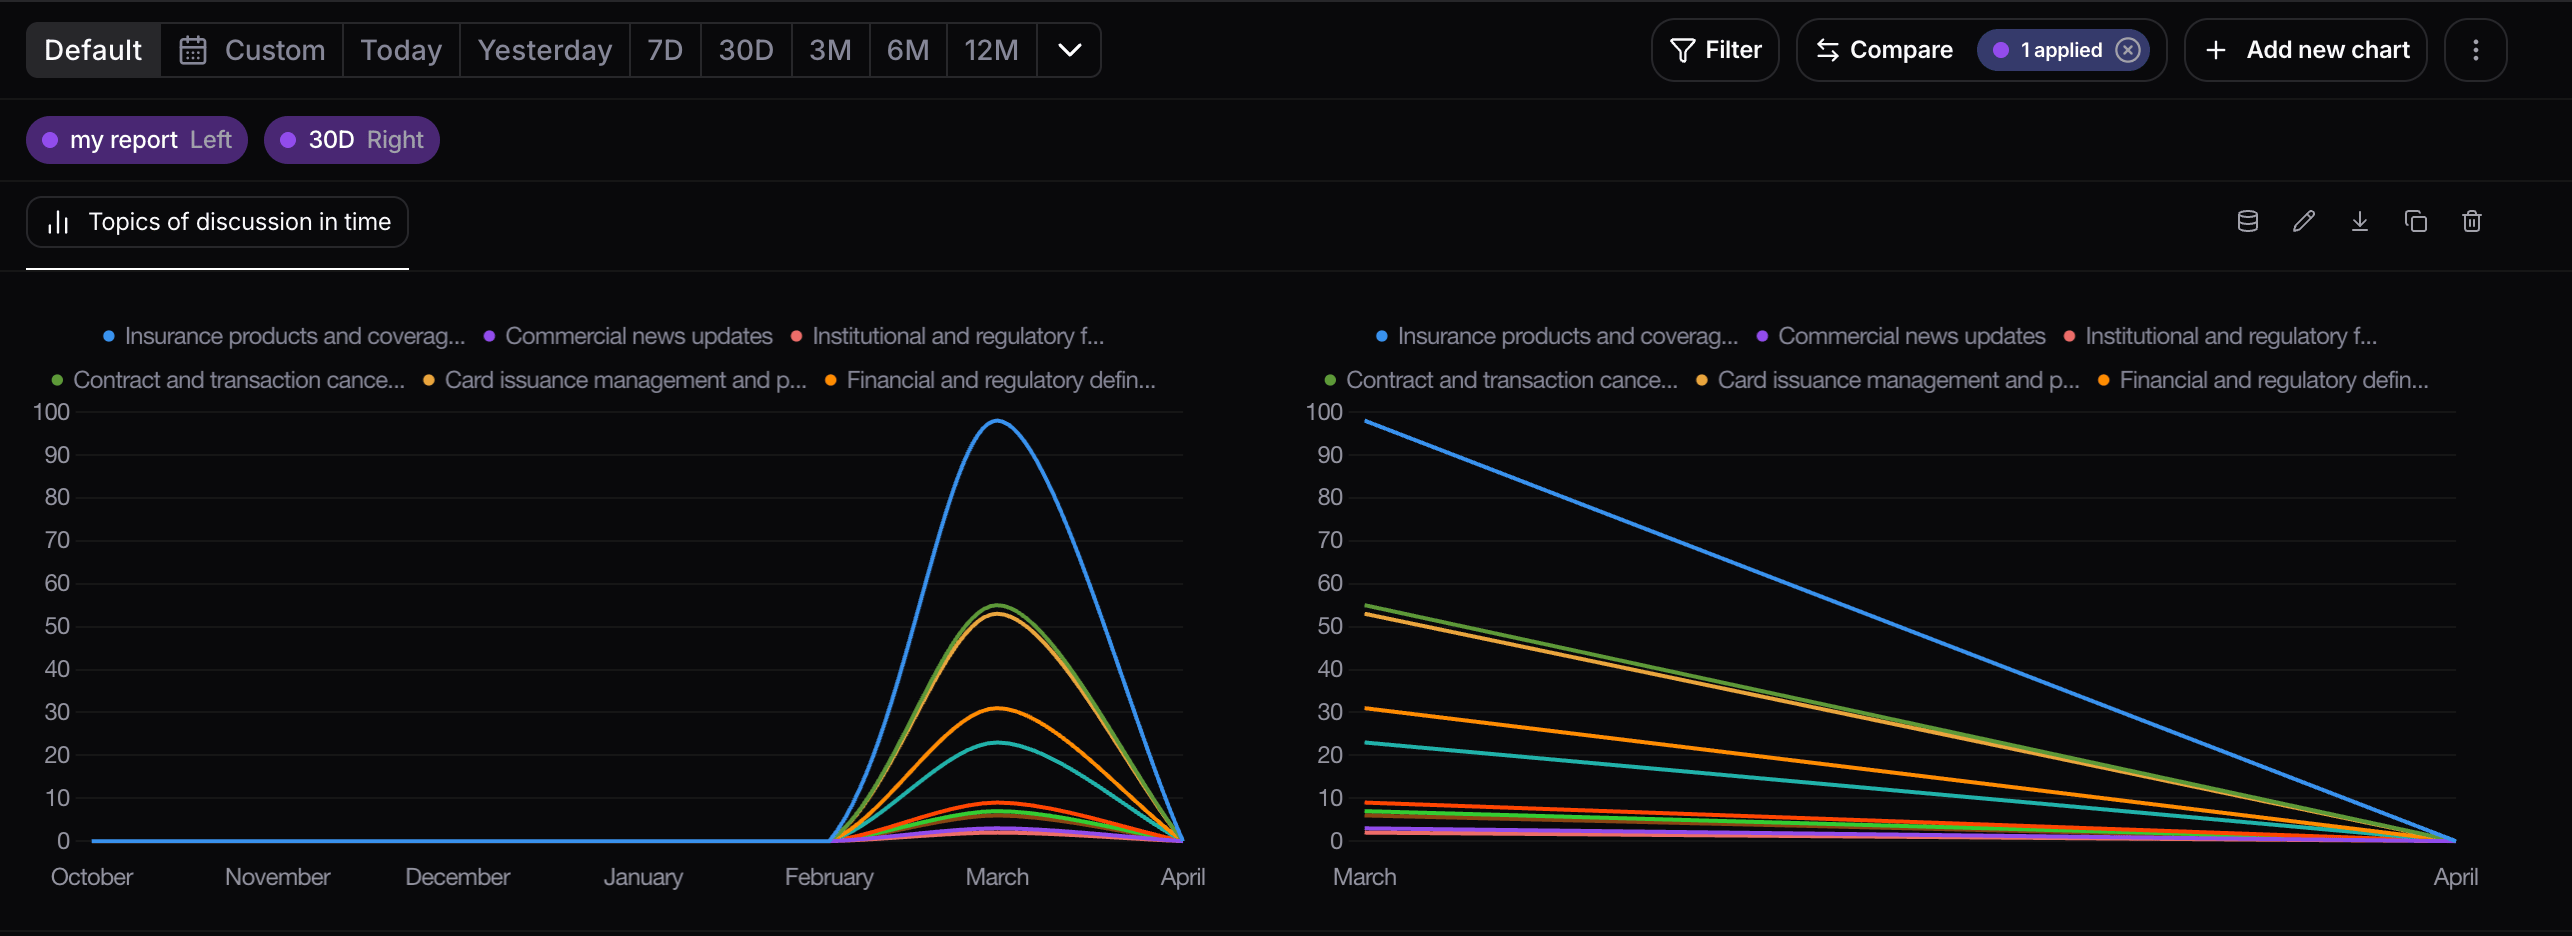
You can now use the comparison feature in reports to compare two distinct time ranges side by side. This makes it easier to measure changes across custom periods and spot differences in key metrics at a glance.To get started, open a report and click Compare in the top-right corner. In the comparison panel, you can now choose Time range as the comparison type.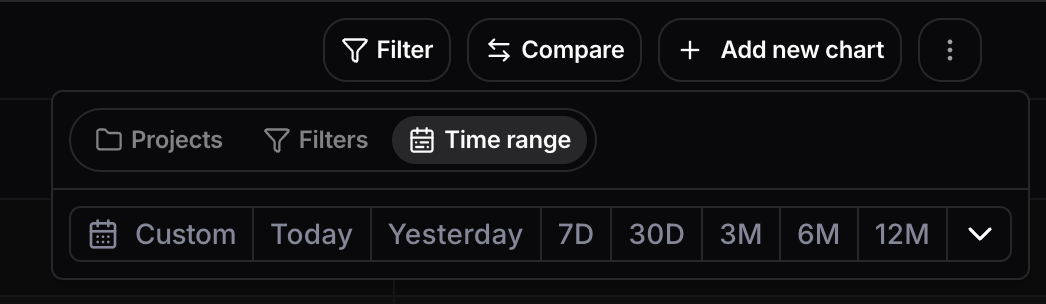
Manual labels for interactions and conversations
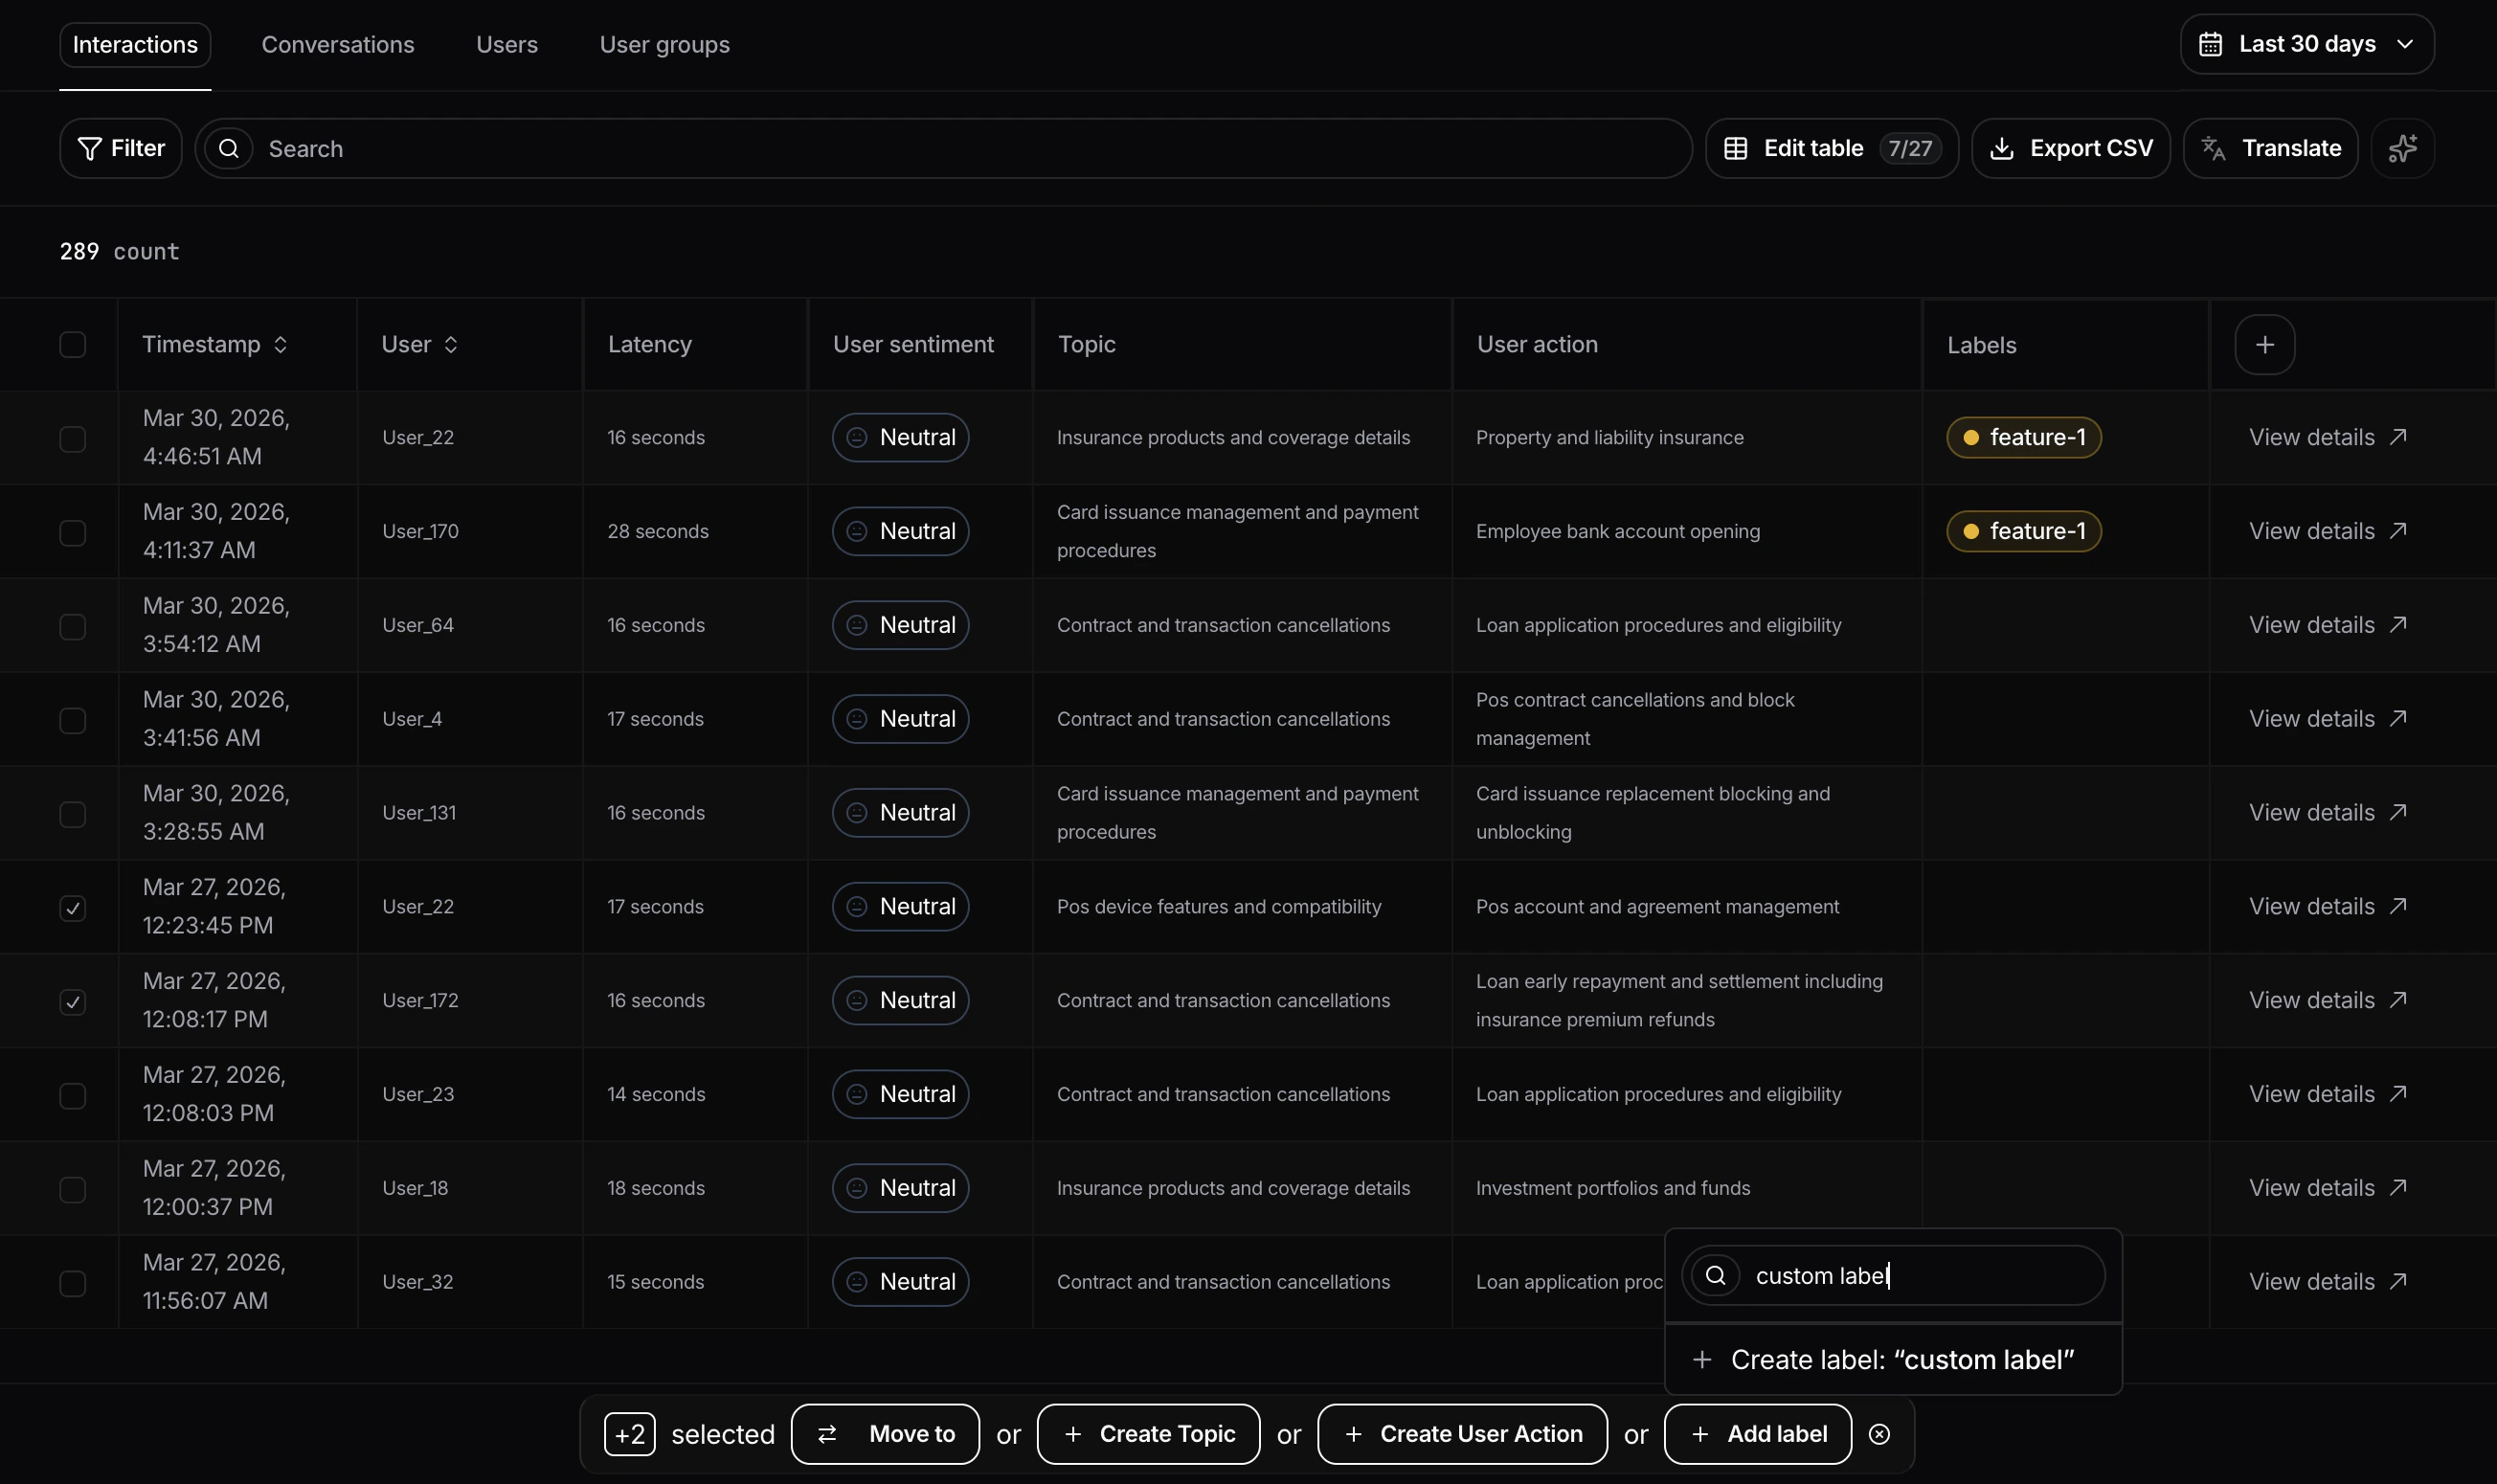
You can now manually label interactions and conversations directly in the UI. These labels can then be exported.Labels are project-specific, and interaction labels are separate from conversation labels, so the two do not share the same label assignments.There are two ways to add, remove, or create labels.The first is from the details view of an interaction or conversation: scroll down to More properties, click Add label, then type to search for an existing label or create a new one.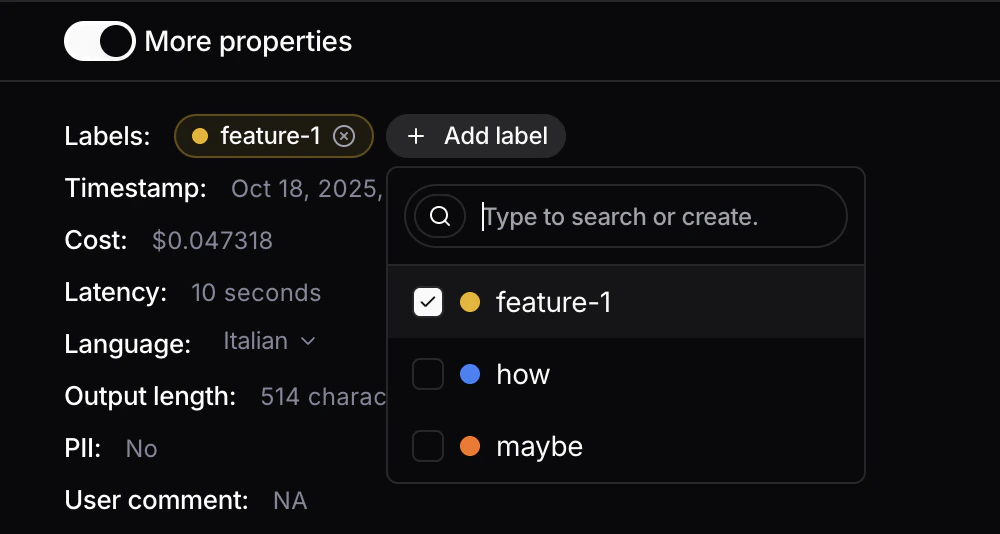
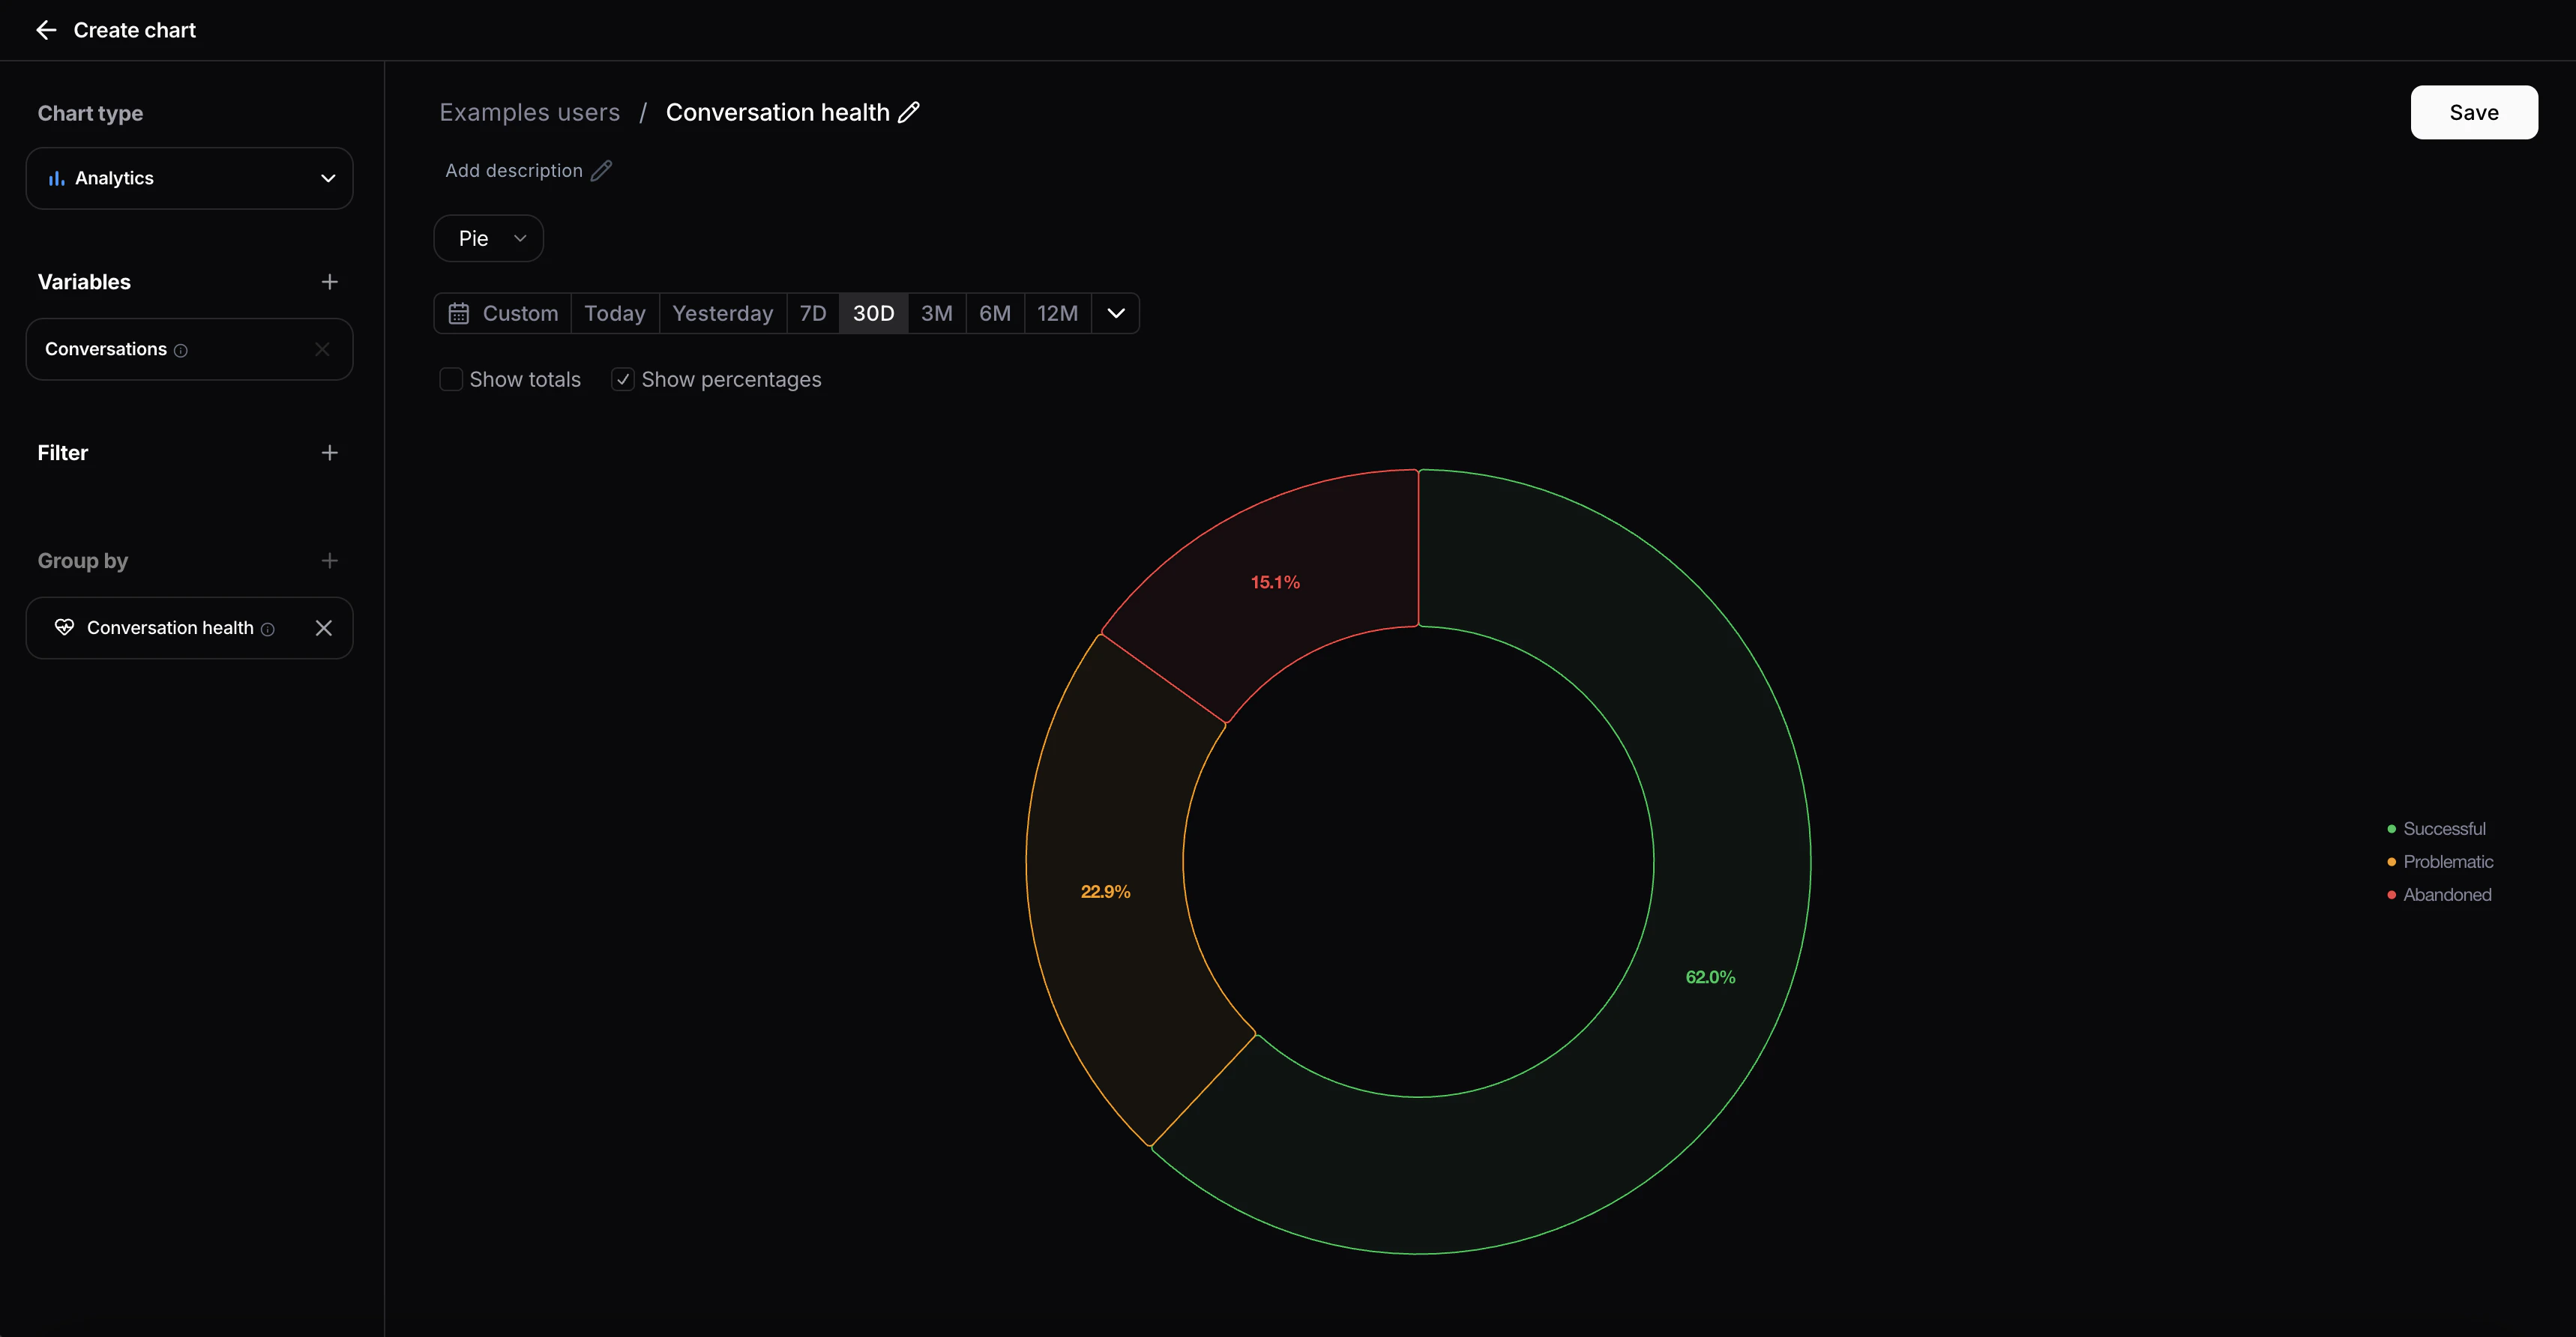
Conversation health
We introduced a new entity to track agent performance at the conversation level. Built on top of the existing error rate metric, Conversation Health classifies each conversation into one of three statuses:- Successful — No errors detected during the conversation
- Problematic — One or more errors occurred within the conversation
- Abandoned — The user dropped off following an agent error
Interaction events on homepage charts
You can now view interaction events directly on homepage charts, just like in reports charts. This includes events already available in your project, and events can be added or removed directly from the chart.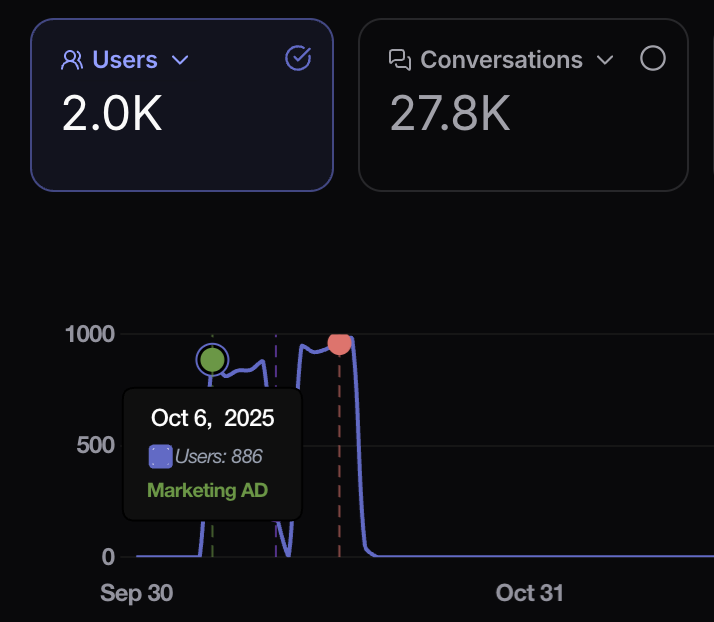
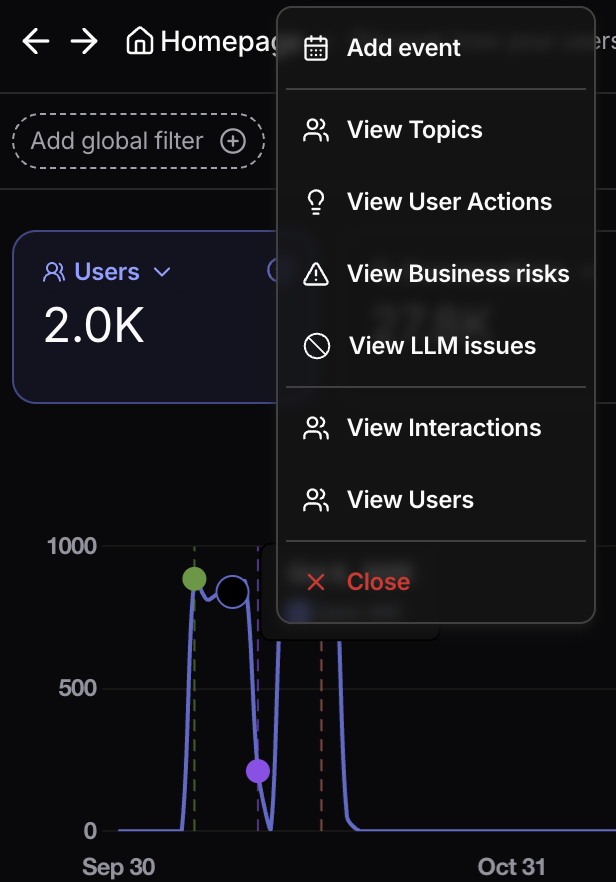
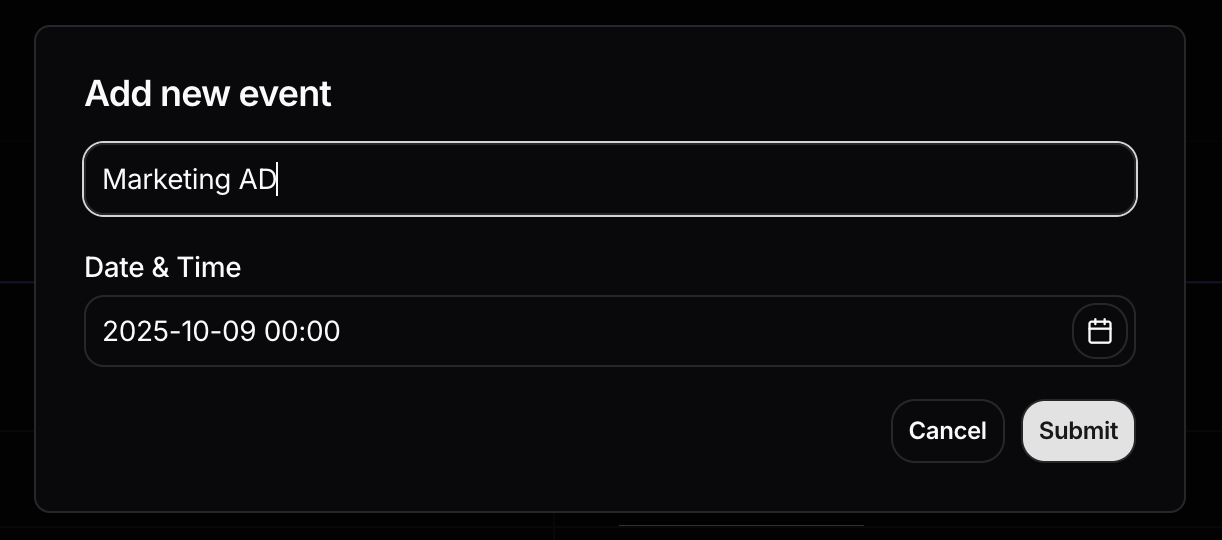
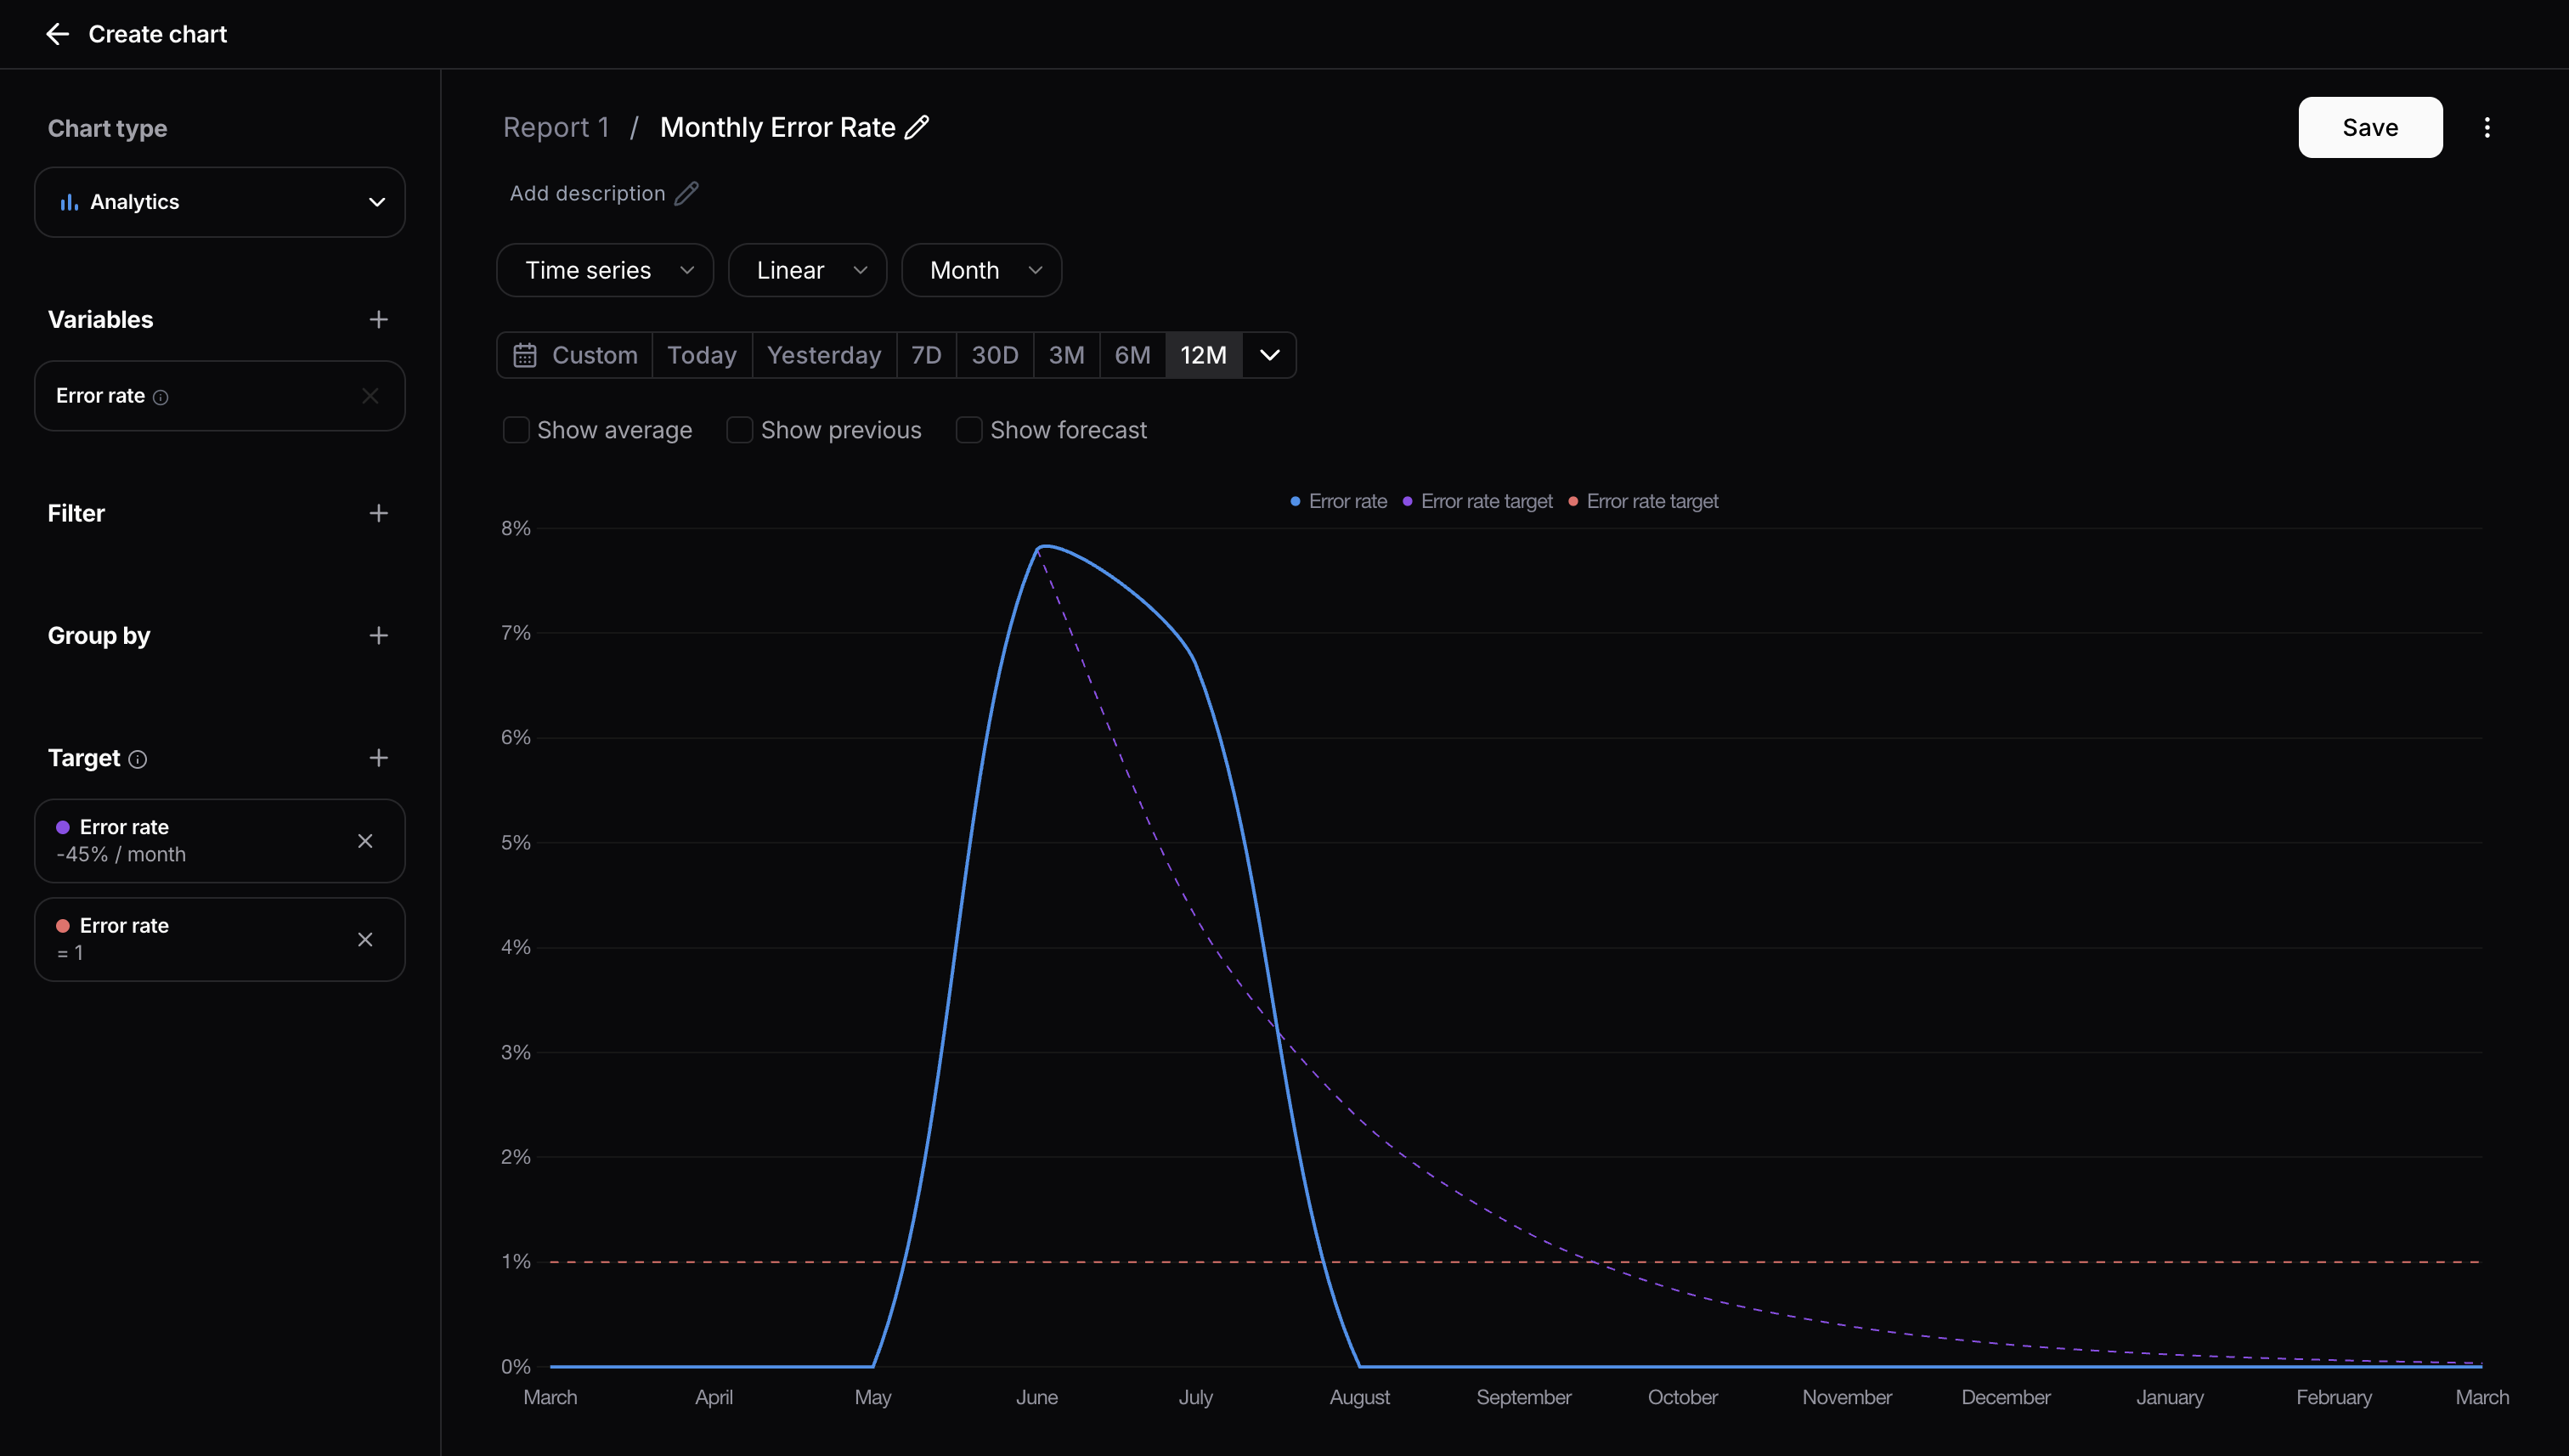
Chart Targets
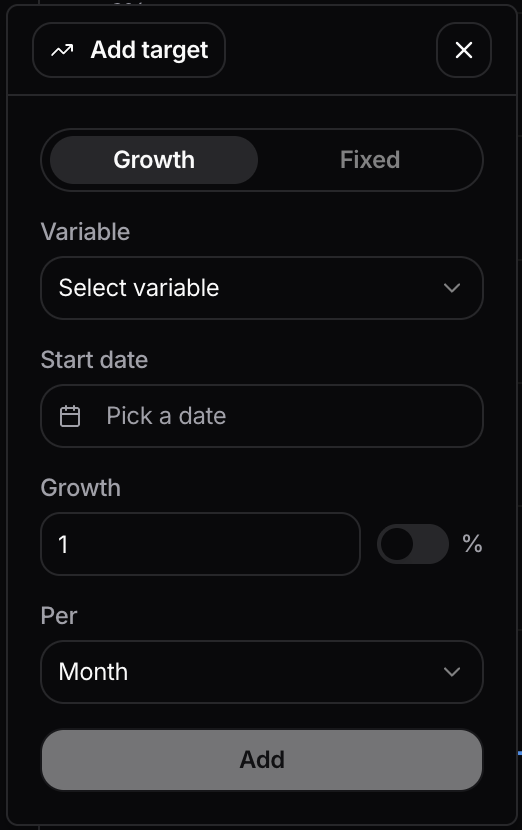
You can now overlay goal lines on line charts using the new Target section in the chart sidebar. Up to 5 targets can be added simultaneously, each displayed with a distinct color matching its line on the chart.Two target types are supported:- Growth target — projects a trend line starting from a chosen date, based on a growth rate (absolute or percentage) applied per a configurable time granularity (minute / hour / day / week / month / year).
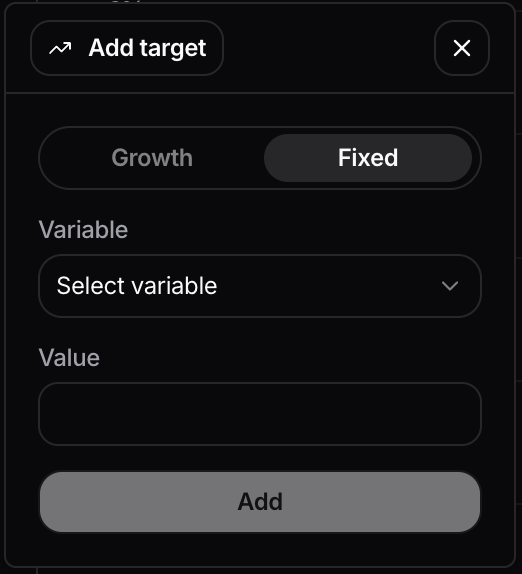
- Fixed target — draws a constant horizontal reference line at a specified value across the entire chart.
Group by time in table charts
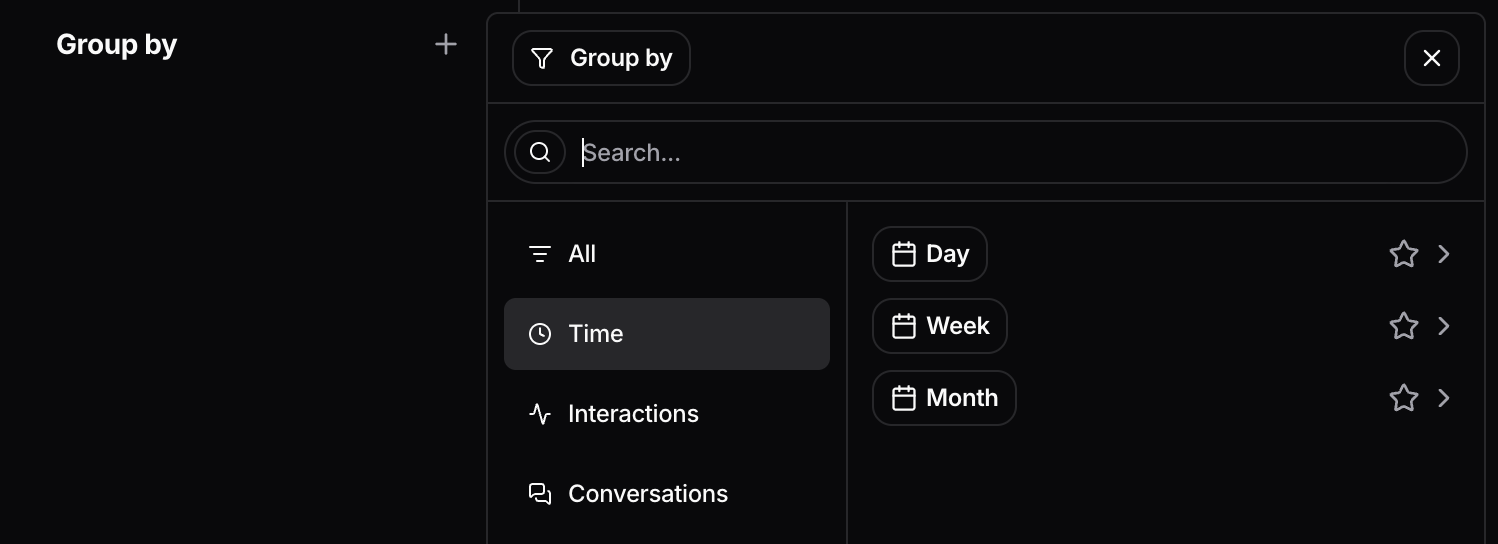
You can now aggregate table data by time granularity, enabling time-series data to be visualized in tabular format. This allows you to track how multiple variables change over time across different time intervals:- Month-over-month
- Week-over-week
- Day-over-day
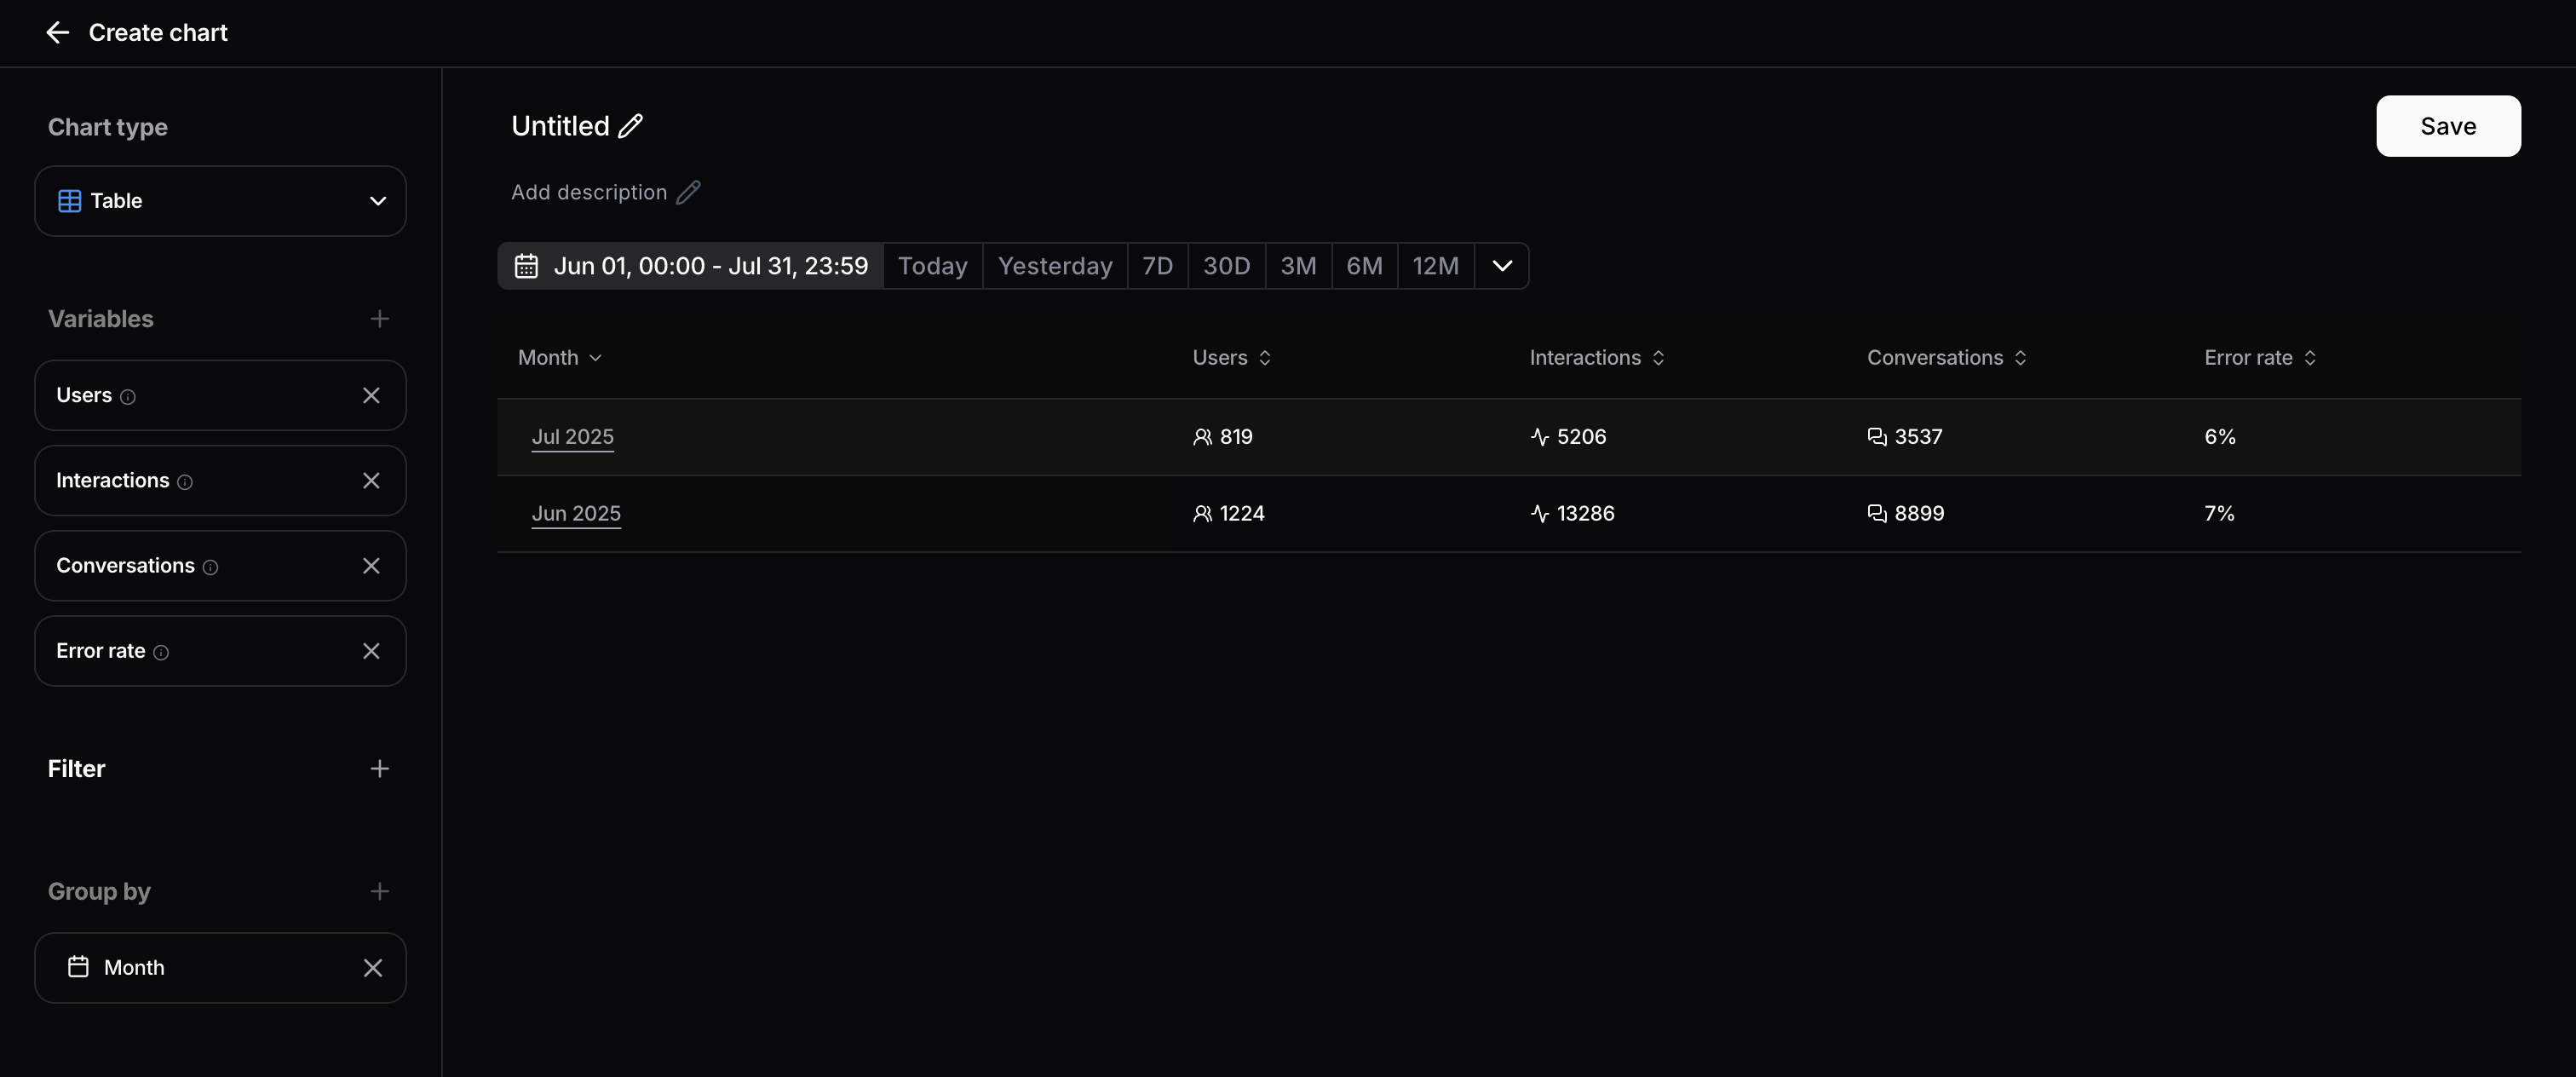
Input and Output Token Variables
You can now track input and output token consumption directly in the report section and interaction table. Add the “Input Token” and “Output Token” variables to your charts to monitor LLM trace data. Note: these values come from what’s passed through the Interaction API, so if they aren’t provided there, they’ll appear as 0.Output Length Metric to Chart Variables
A new chart variable is now available to measure output length in characters, allowing users to track how verbose model responses are over time.New Failure Category: Thumbs Down
A new failure category has been added that automatically groups all interactions receiving a thumbs down into a dedicated category for easier analysis and reporting.Custom Variables for Analytics and Table Charts
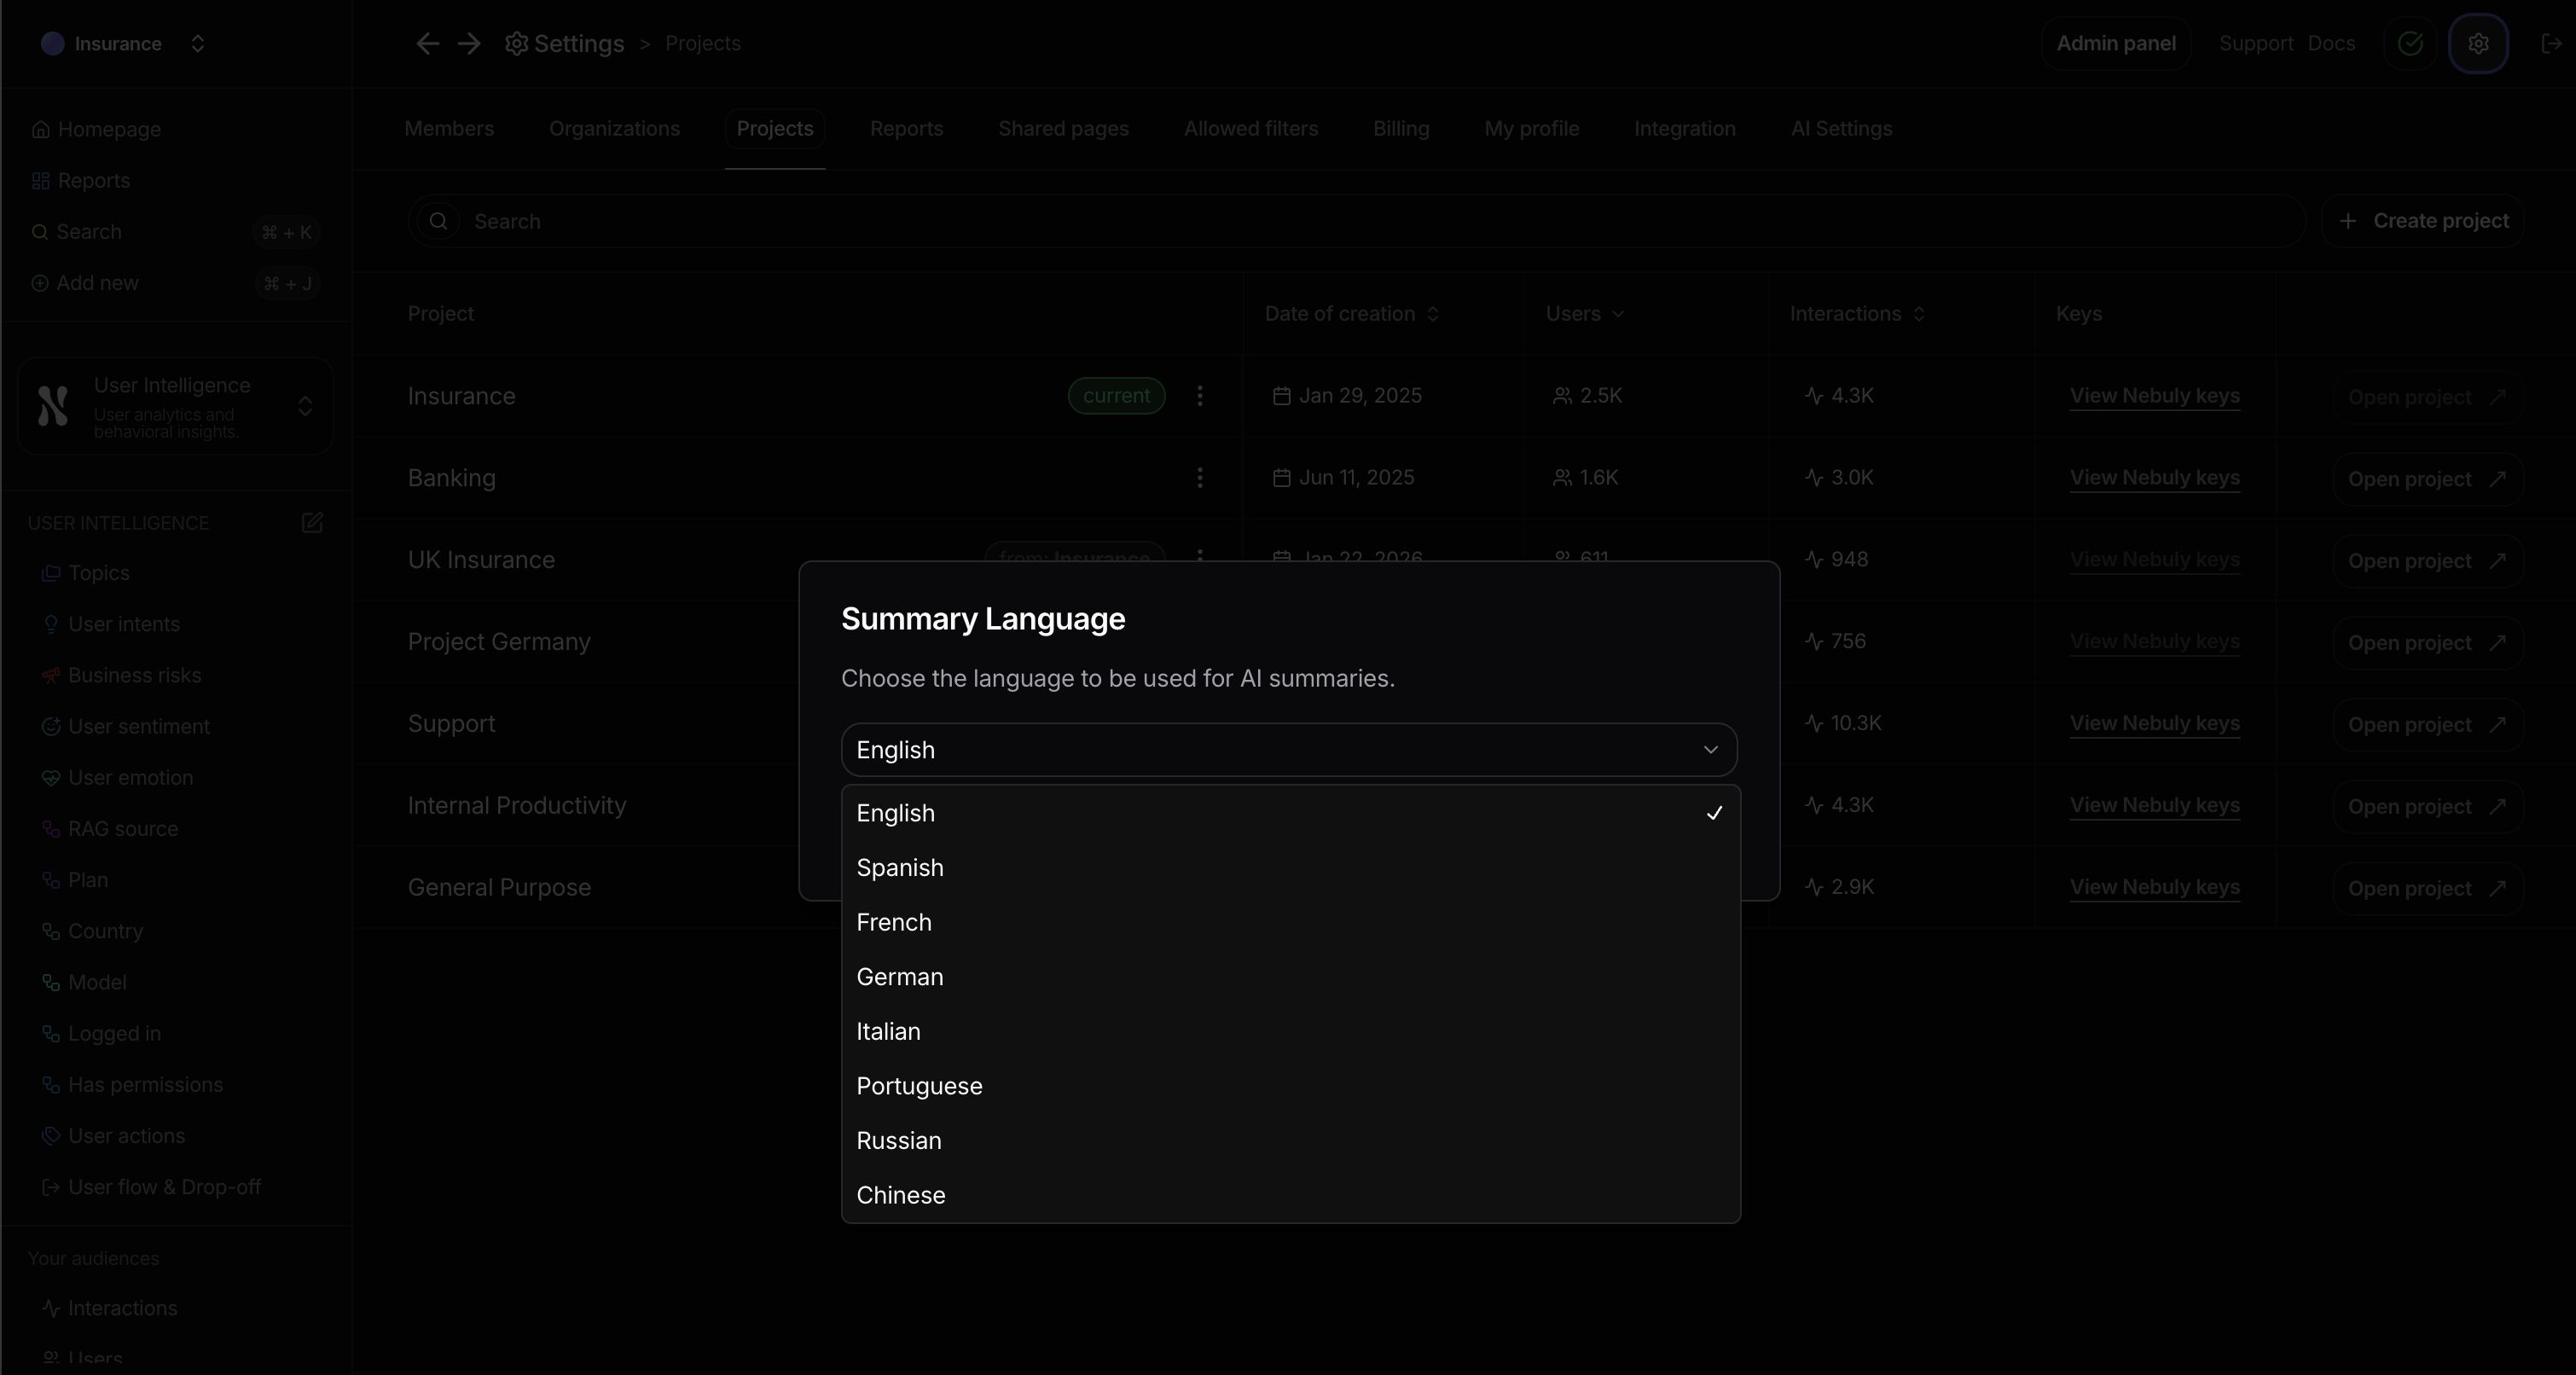
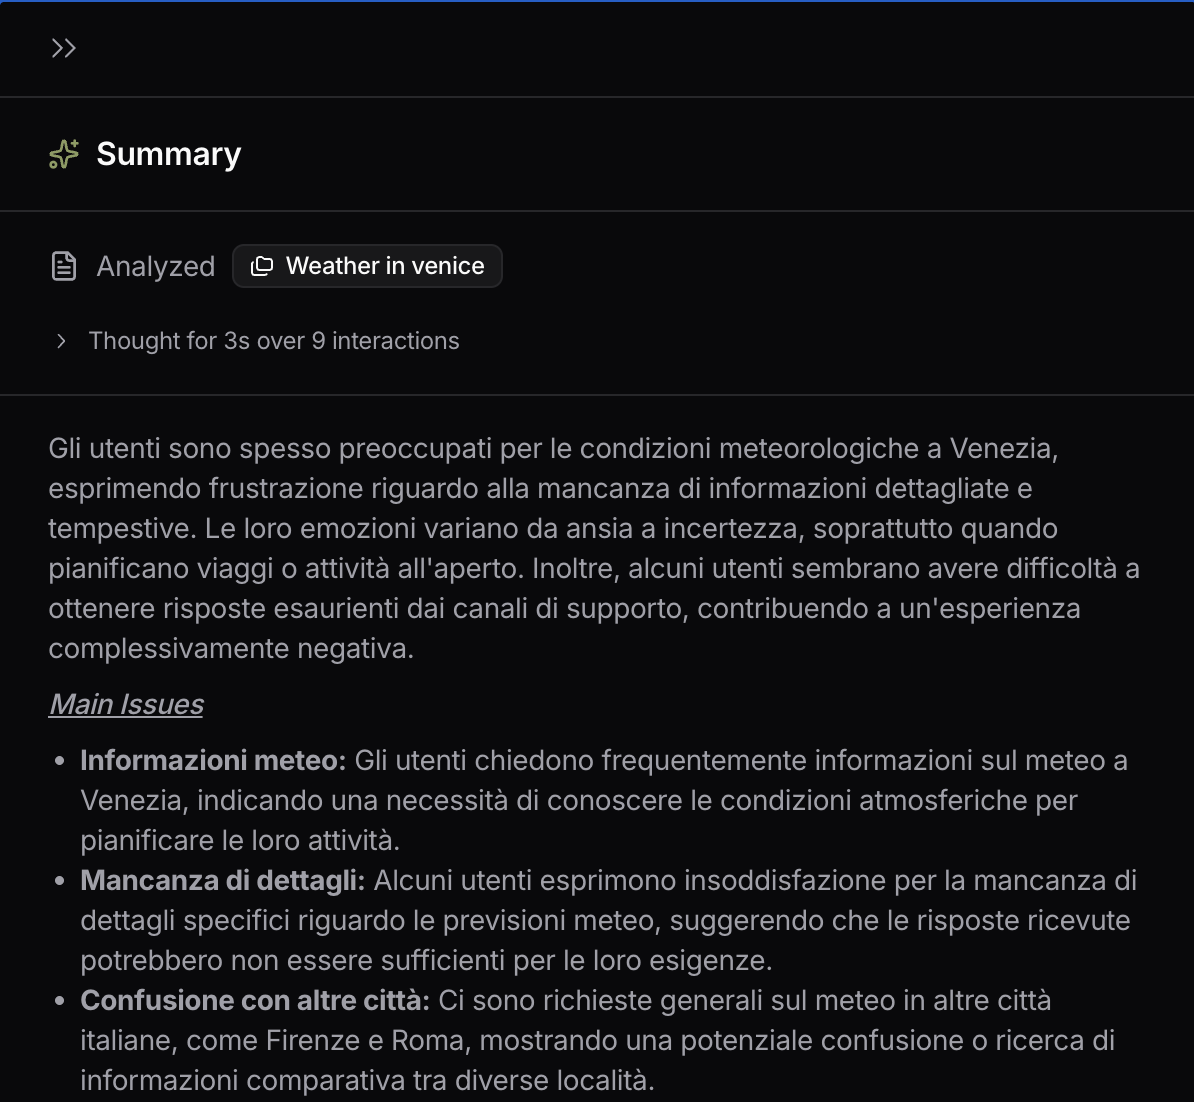
Users can now define custom variables when creating or editing a chart. Custom variables support mathematical formulas, allowing customers to express calculations that were not possible with built-in variables. Formulas can reference both built-in and custom variables, and filters can be applied as usual, enabling businesses to track their metrics that matter most to their usage.AI Summary available in multiple Languages
AI summaries can be generated in different languages now. In order to change the language you need to open the project settings and click on “Summary Language”.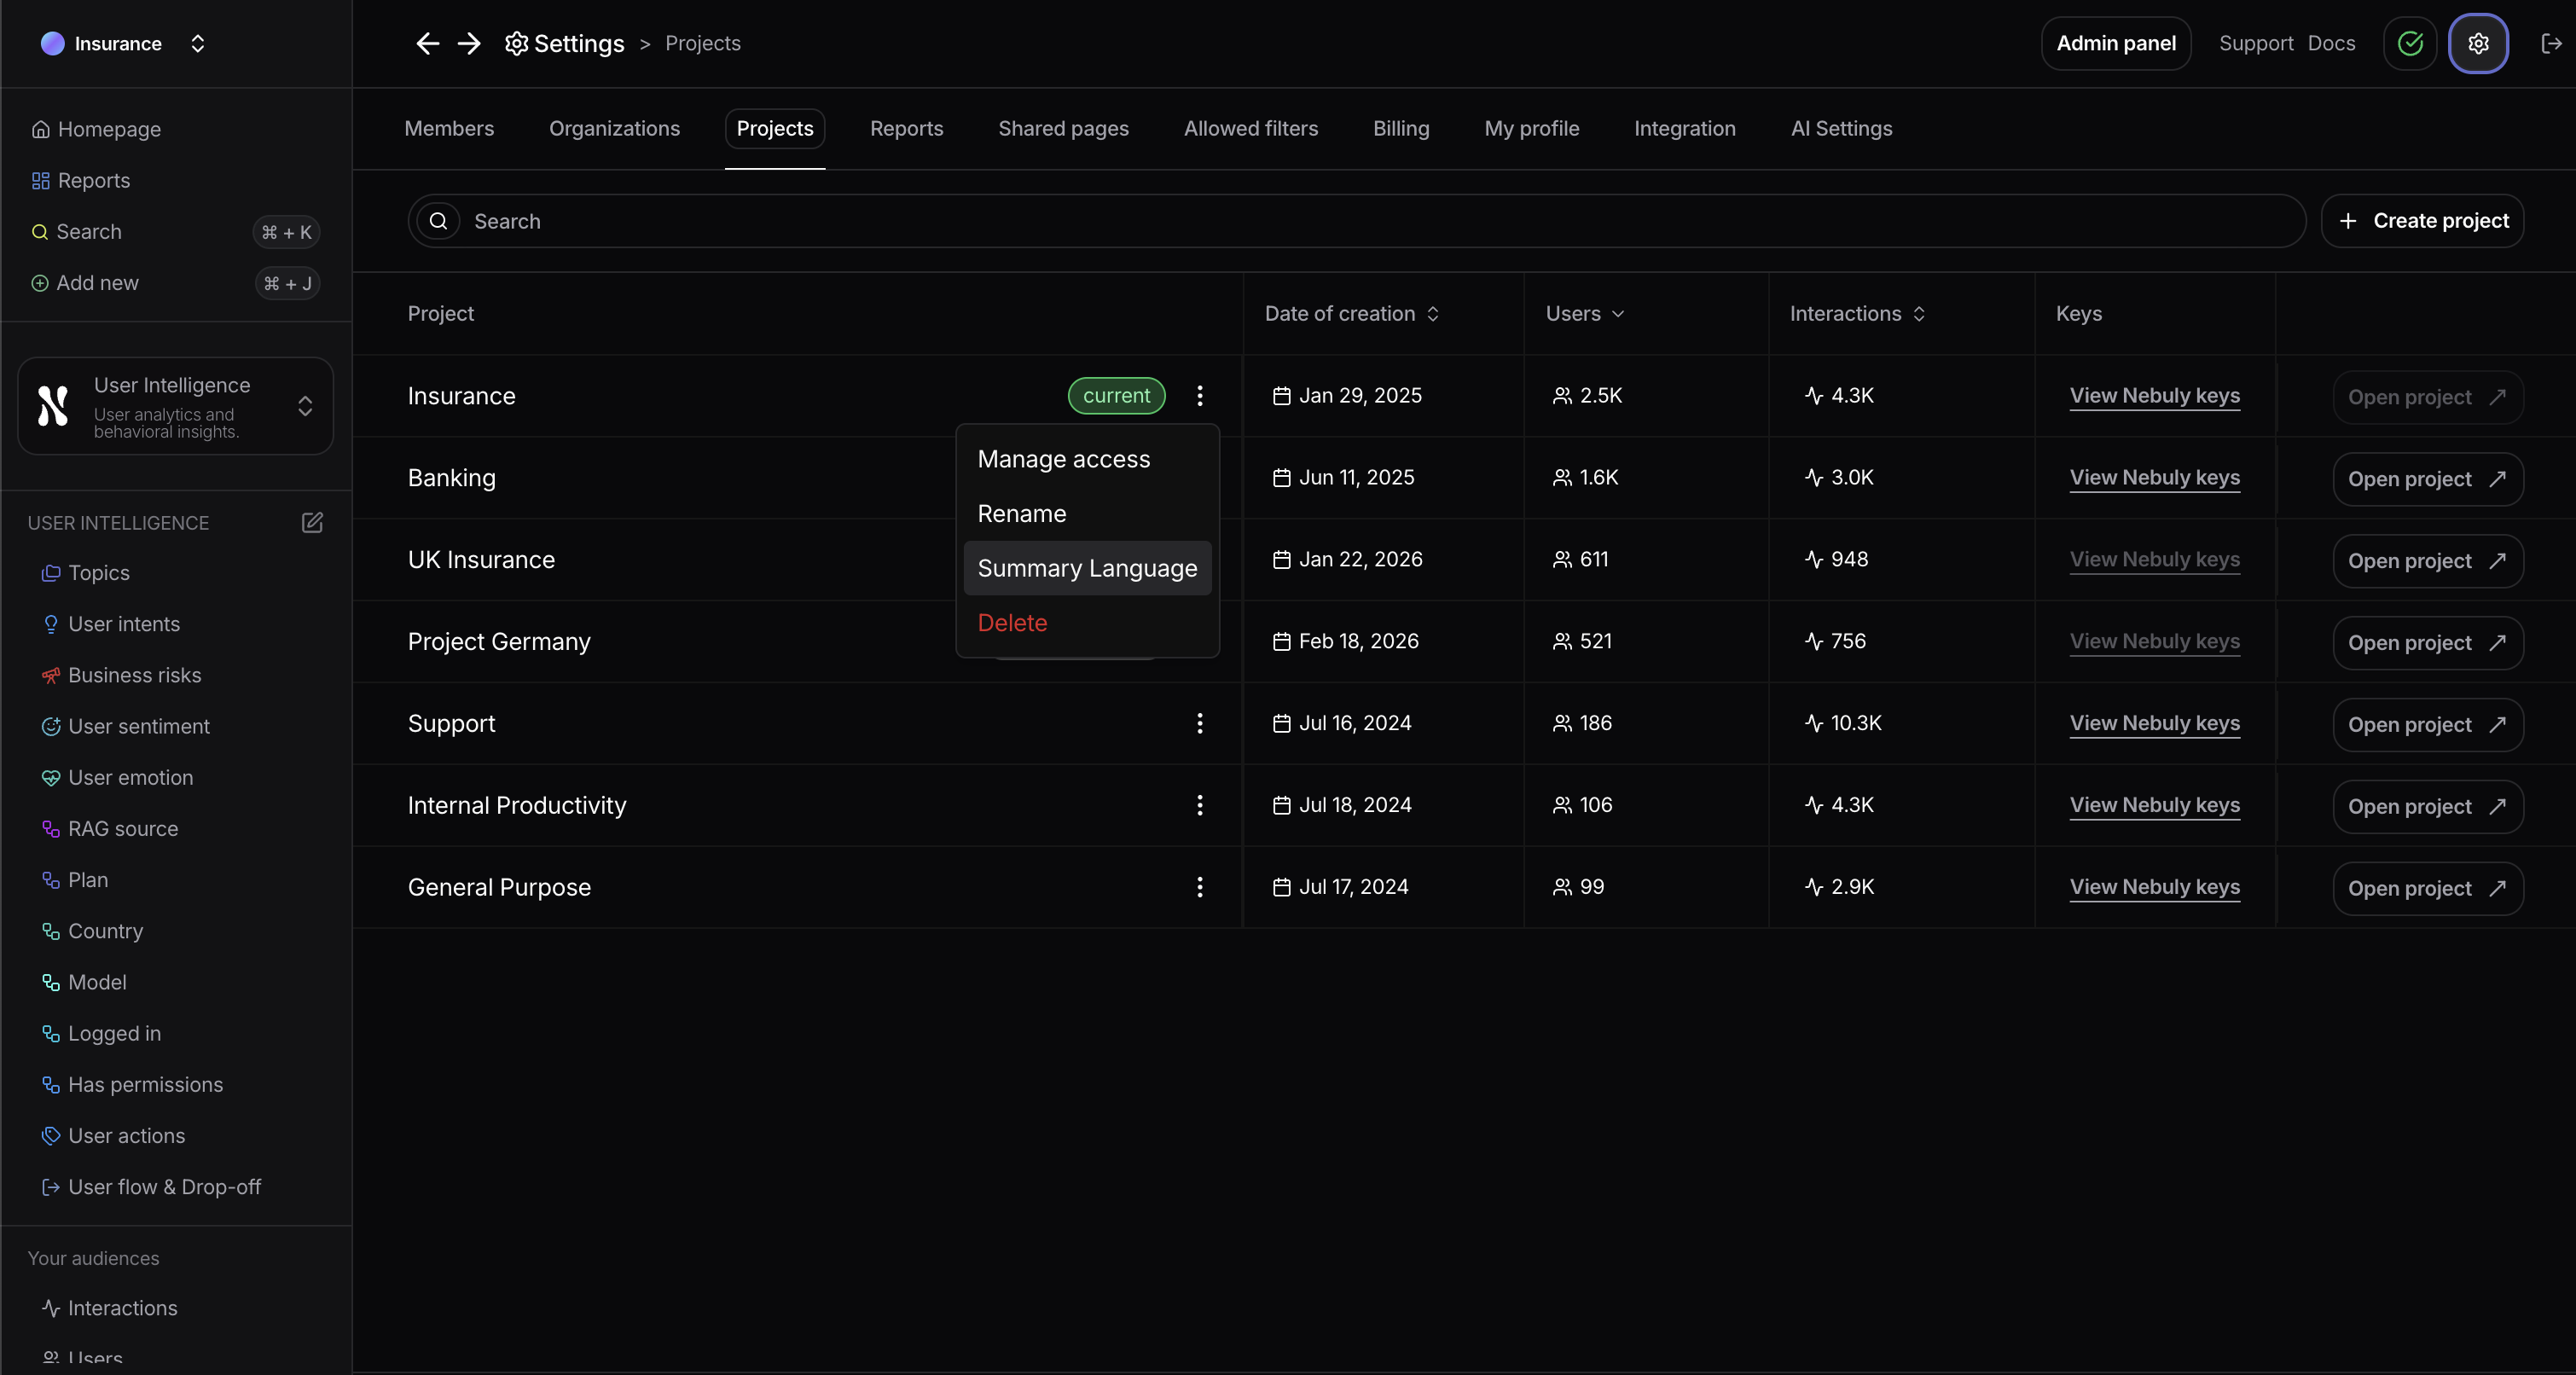
Total Users variable
Added new variable Total Users which computes the total number of users without applying the time range / filters. The variable is usable inside custom variables, but only tags are available as breakdown. If this variable is used among another group ( ex. topic ) the visualized value will always be total users for that project.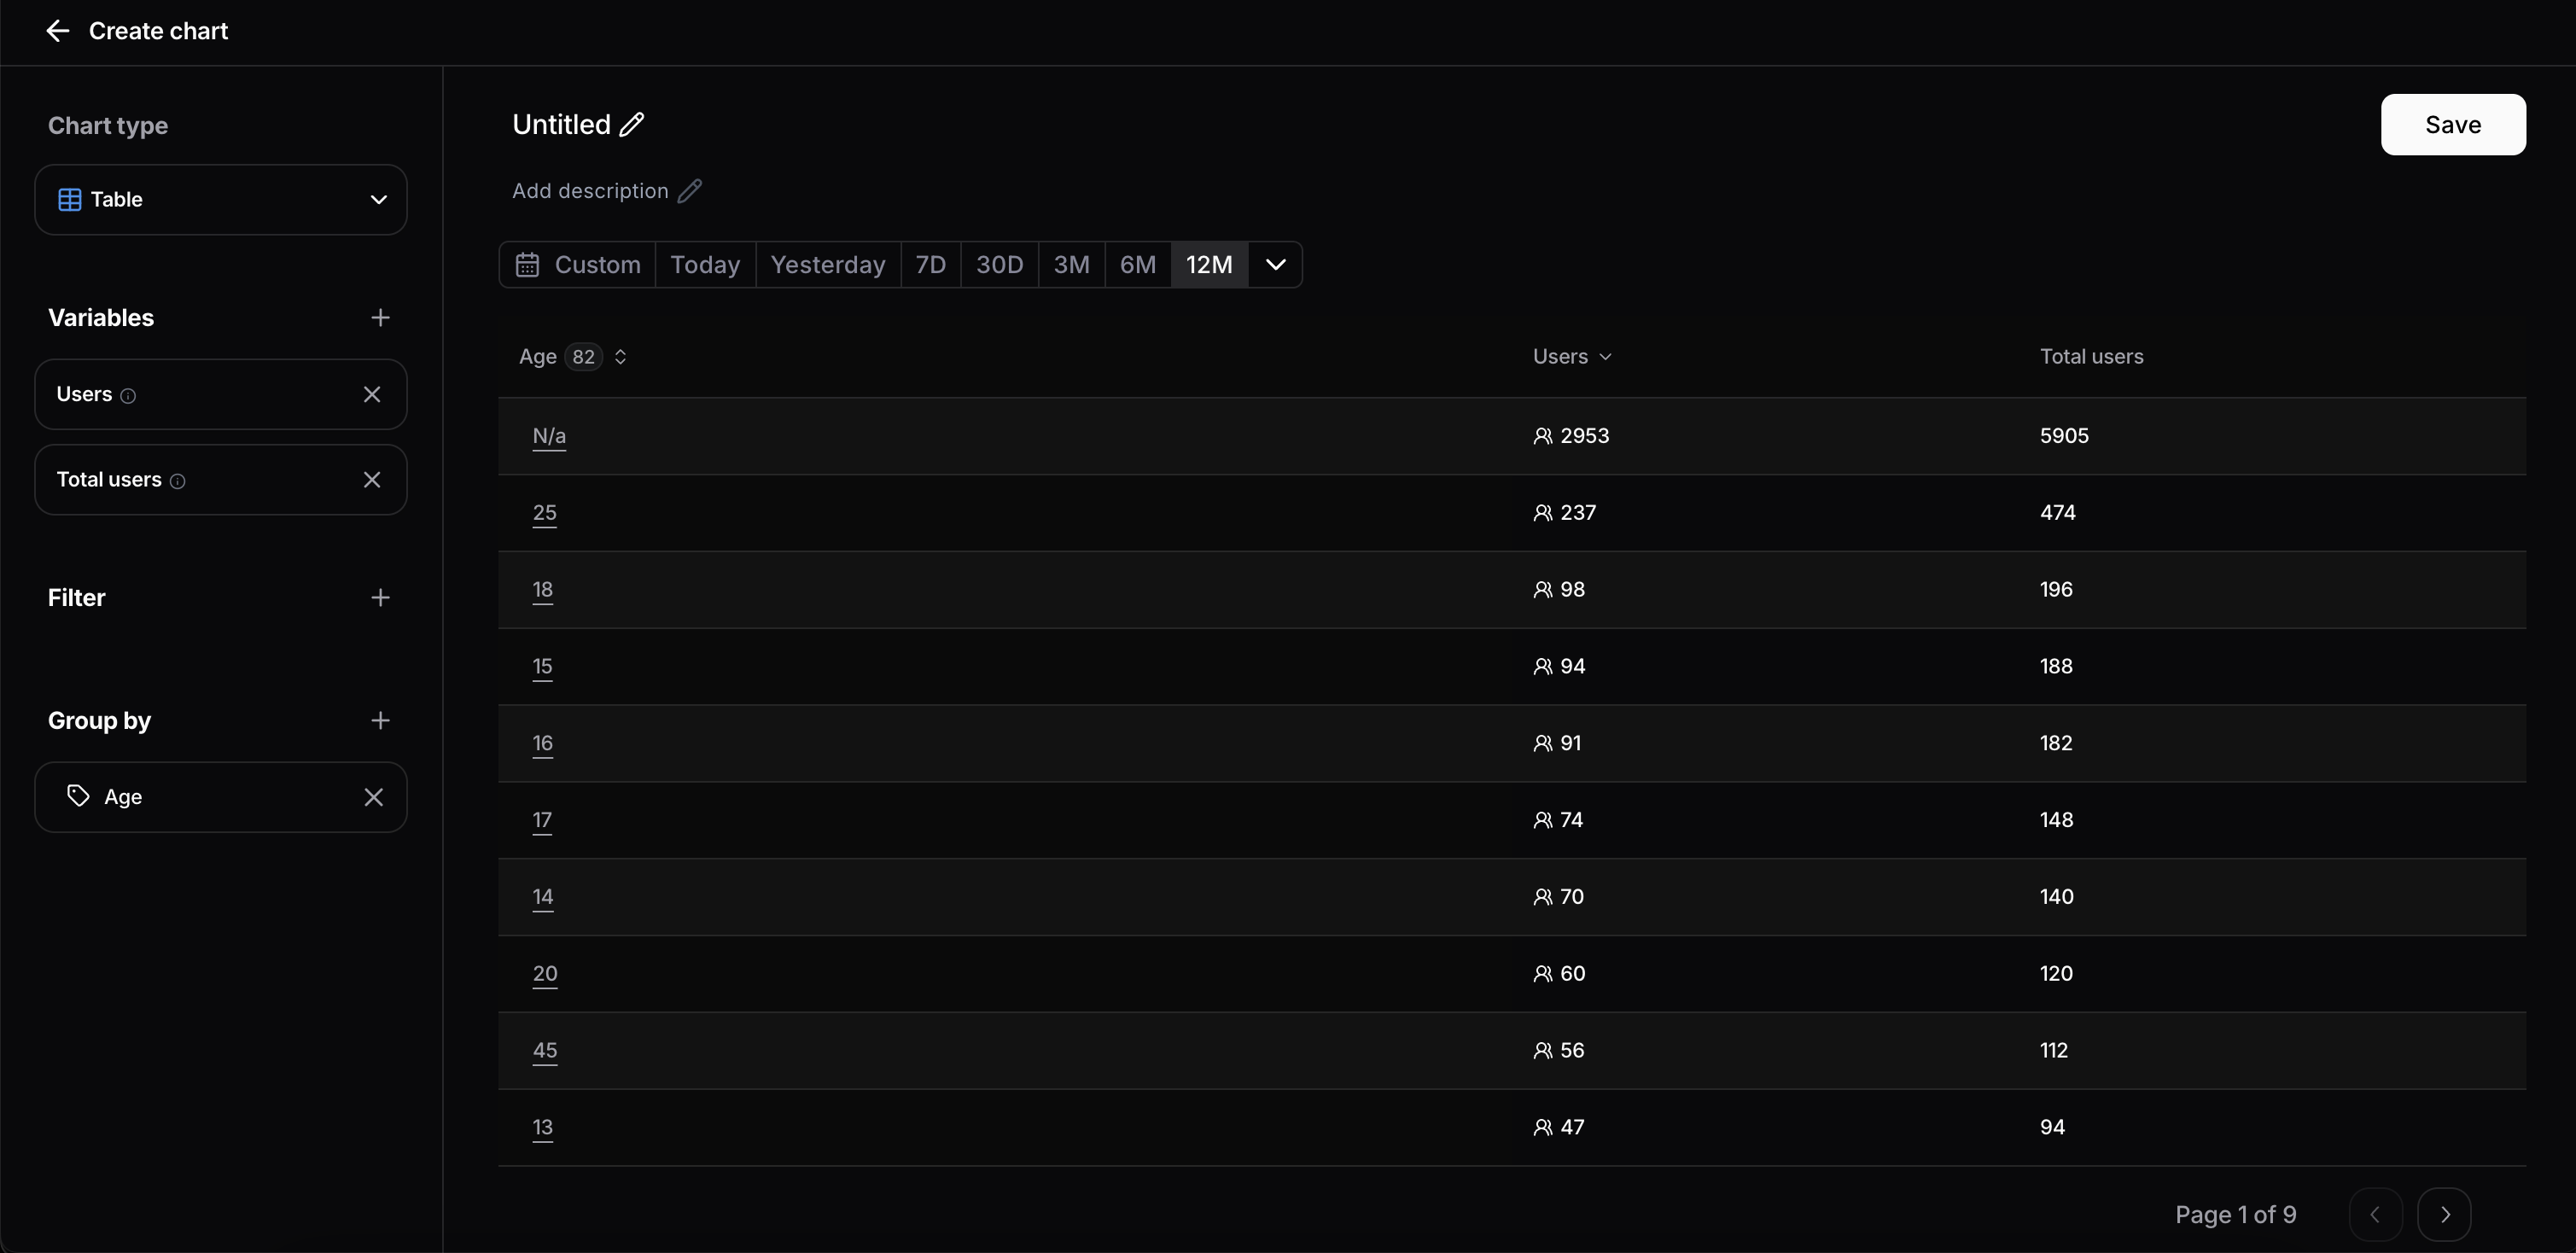
Nebuly-Langfuse native integration
We’ve launched a native integration that lets teams ingest Langfuse observability data directly into Nebuly for user analytics. What’s new:- Full integration option: Nebuly automatically pulls traces from your Langfuse account daily (interval configurable). API keys are securely stored in encrypted vaults.
- Local integration option: Use open-source Python scripts to extract and transform data in your own infrastructure. Full control over data residency and enrichment.
- Seamless data flow: No changes to your existing Langfuse instrumentation. Traces flow automatically to Nebuly for user intent, sentiment, and adoption analysis.
- Tag-based segmentation: Use Langfuse tags to add user context (segment, geography, cohort, role). Analyze adoption by any dimension that matters.