

Microsoft changes labels and navigation between Copilot Studio and Power Apps releases. This guide uses the labels verified in August 2026. If a label differs in your tenant, use the Microsoft documentation linked in References to find the equivalent setting.
Overview
The integration lets people query Nebuly analytics and invoke Nebuly actions from an agent in Microsoft 365 Copilot or Teams.
Agent-level Microsoft authentication and tool-level Nebuly authentication are separate.
Microsoft signs a user into the agent, while the private Nebuly OAuth connection authorizes that user’s MCP calls.
Prerequisites
Microsoft tenant
Microsoft 365 or Power Platform administrator Confirm the tenant has:- A Microsoft 365 Copilot license or an applicable Copilot Studio entitlement for the agent maker. Licensing depends on the agent type and tenant billing configuration.
- A Power Platform environment in which the agent and generated connector can be created.
- Copilot Studio authoring access for the agent maker.
- Tenant policy that allows agents with AI features to be published.
- Permission to publish to the Teams and Microsoft 365 Copilot channel.
- Administrative approval for the organizational catalog when required by company policy.
- A Nebuly account.
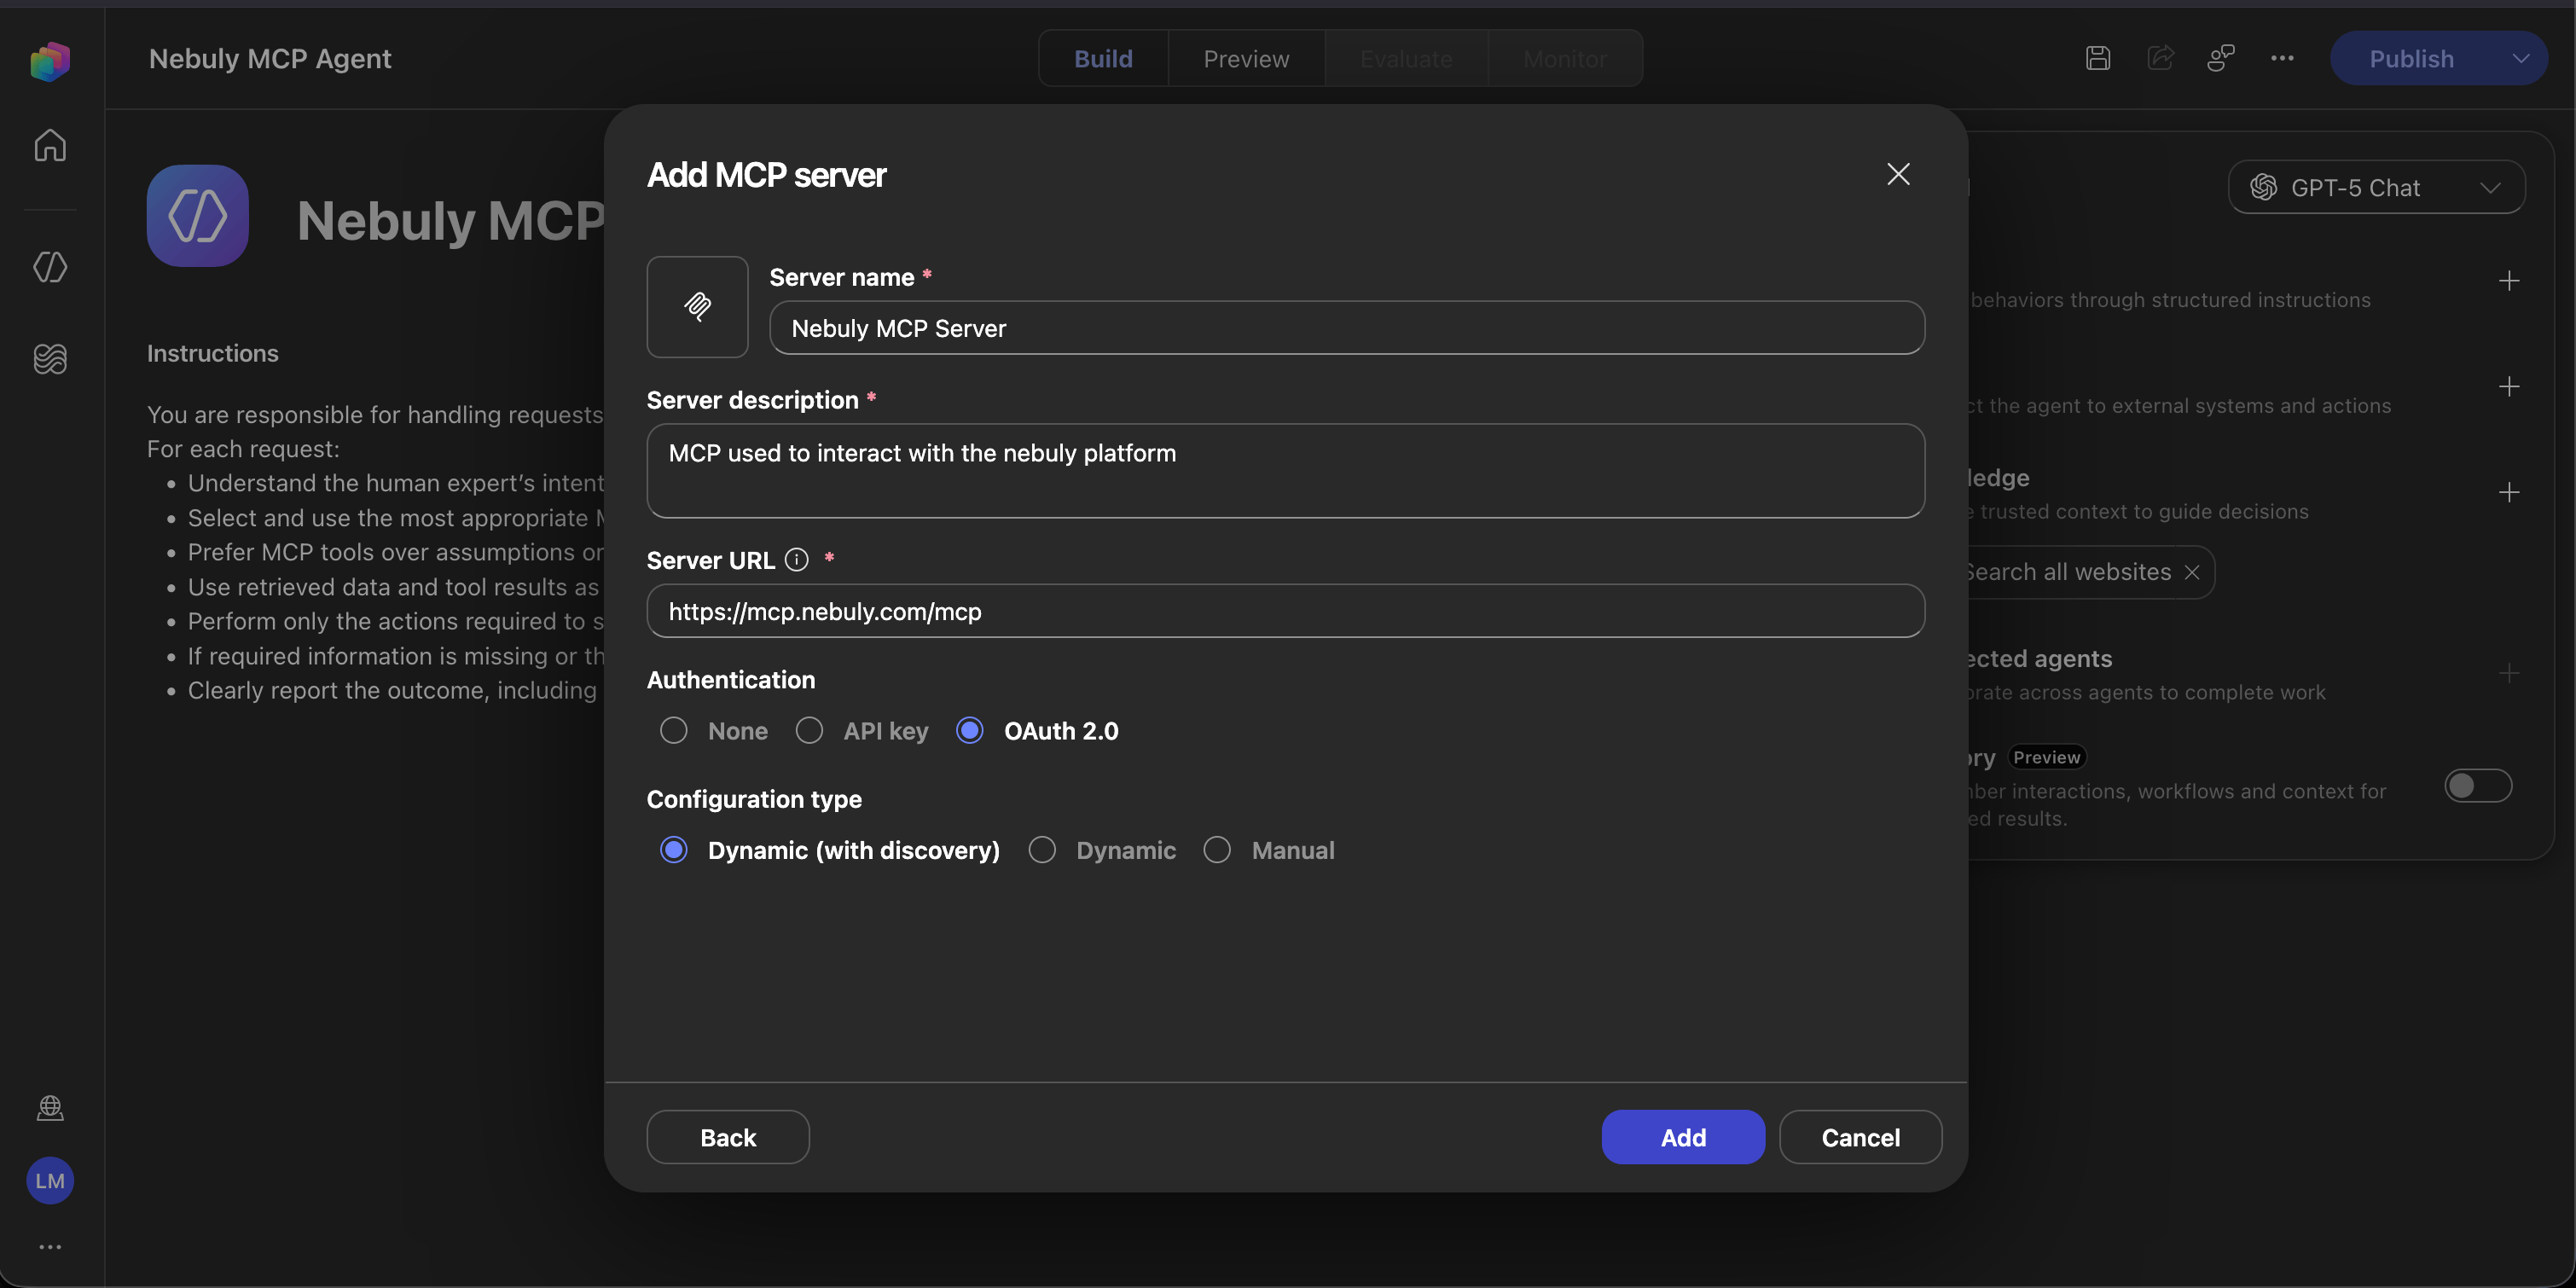
- The Nebuly MCP server URL. SaaS users with non custom login page can use
https://mcp.nebuly.com/mcp.
SaaS users with a custom authentication URL and self-hosted customers should contact their Nebuly representative to enable MCP access. Once enabled, use
https://<YOUR_AUTH_URL>/mcp.Create the agent
Agent maker- Open Microsoft Copilot Studio.
- Select Agents, create a new agent, and wait for its overview page to open.
- Configure a clear name, description, model and instructions.
Add the MCP server
Agent maker- Open the agent.
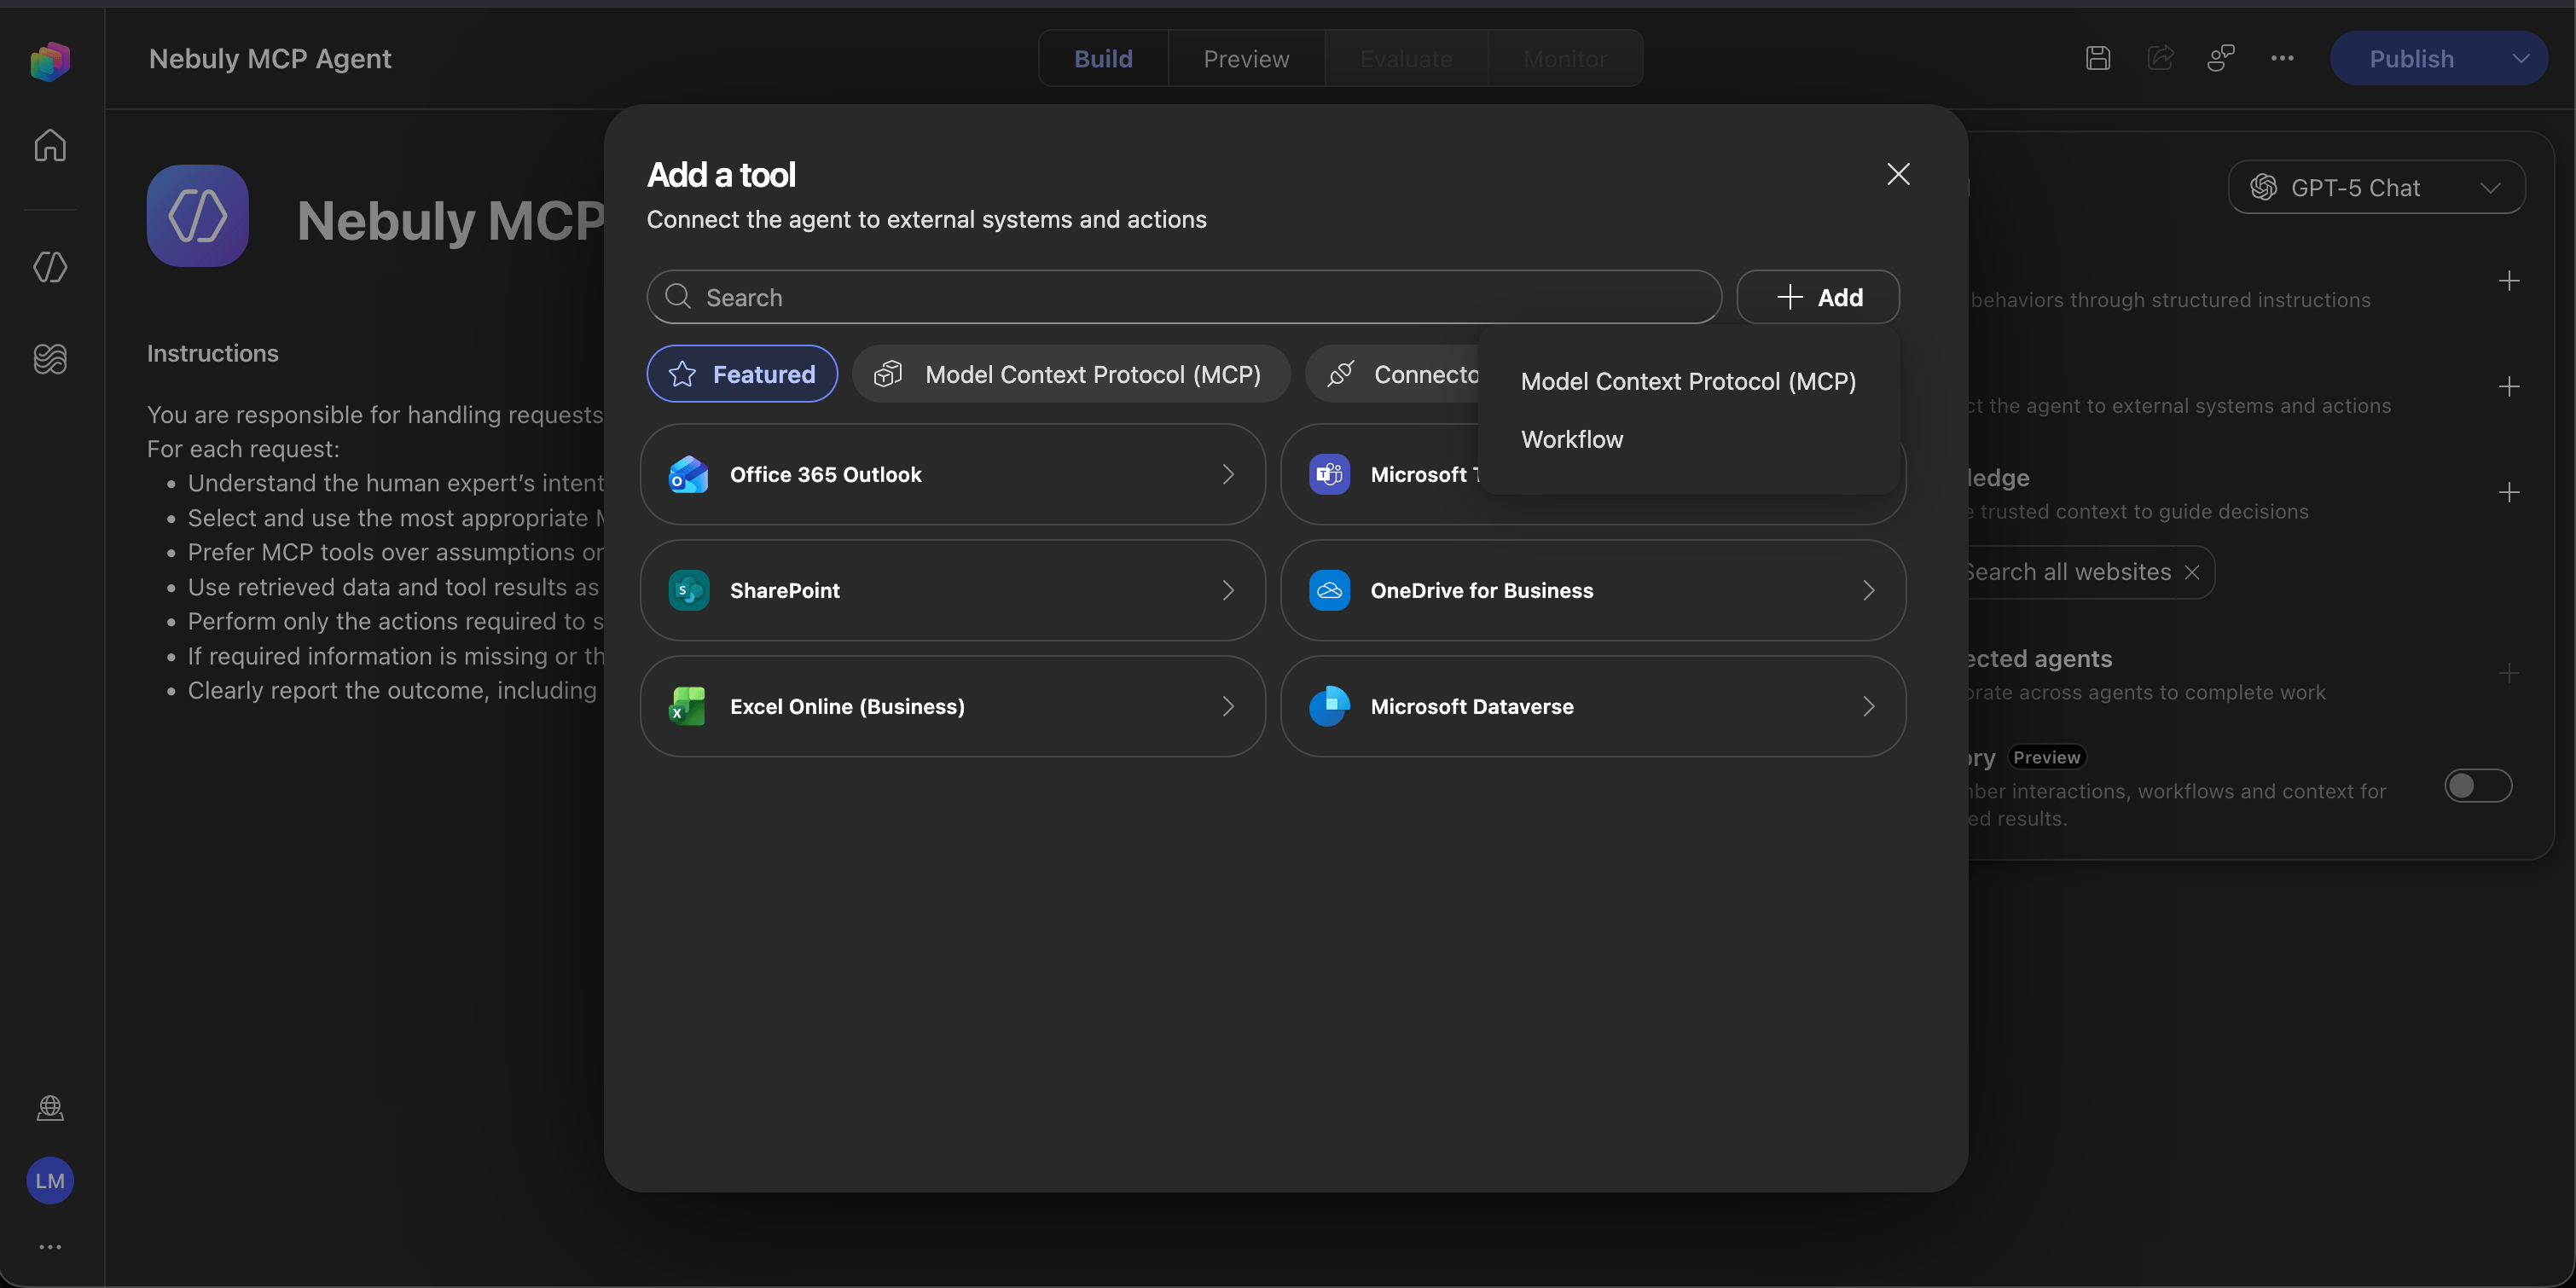
- Click the + icon on Tools.
-
Select + Add, then select Model Context Protocol (MCP).
-
Enter the required information, for Authentication, select OAuth 2.0
and for the OAuth type, select Dynamic (with discovery).
-
Select Add, then select Create new connection.
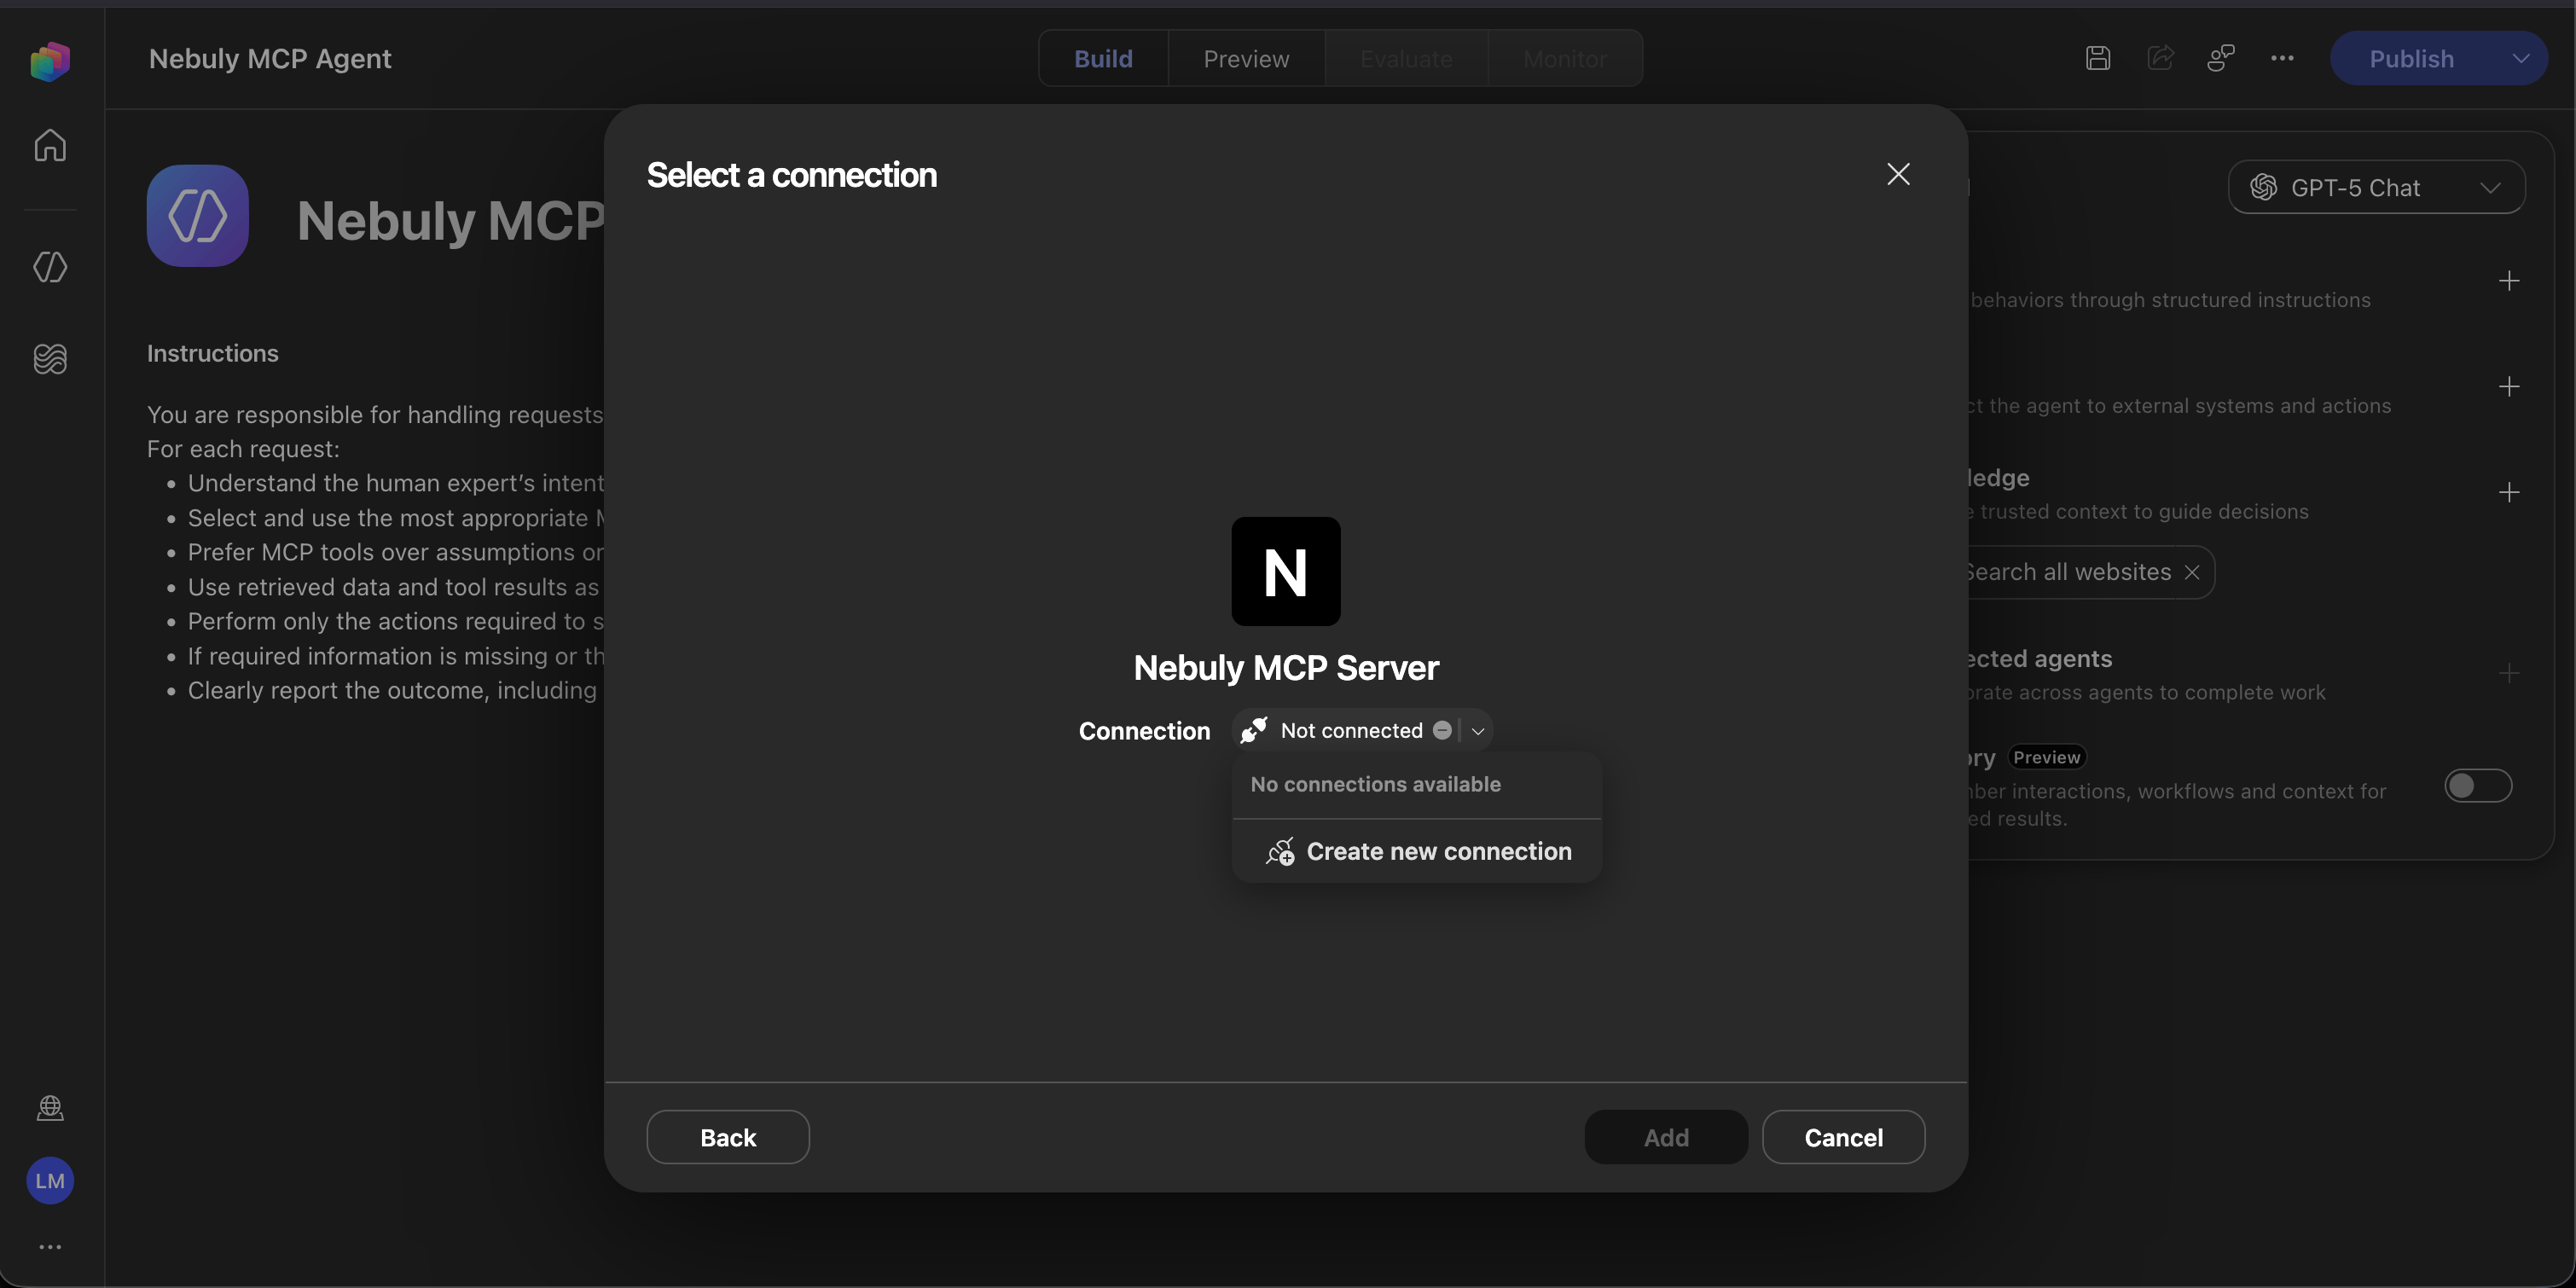
- Complete the Nebuly authorization flow using your own Nebuly account.
-
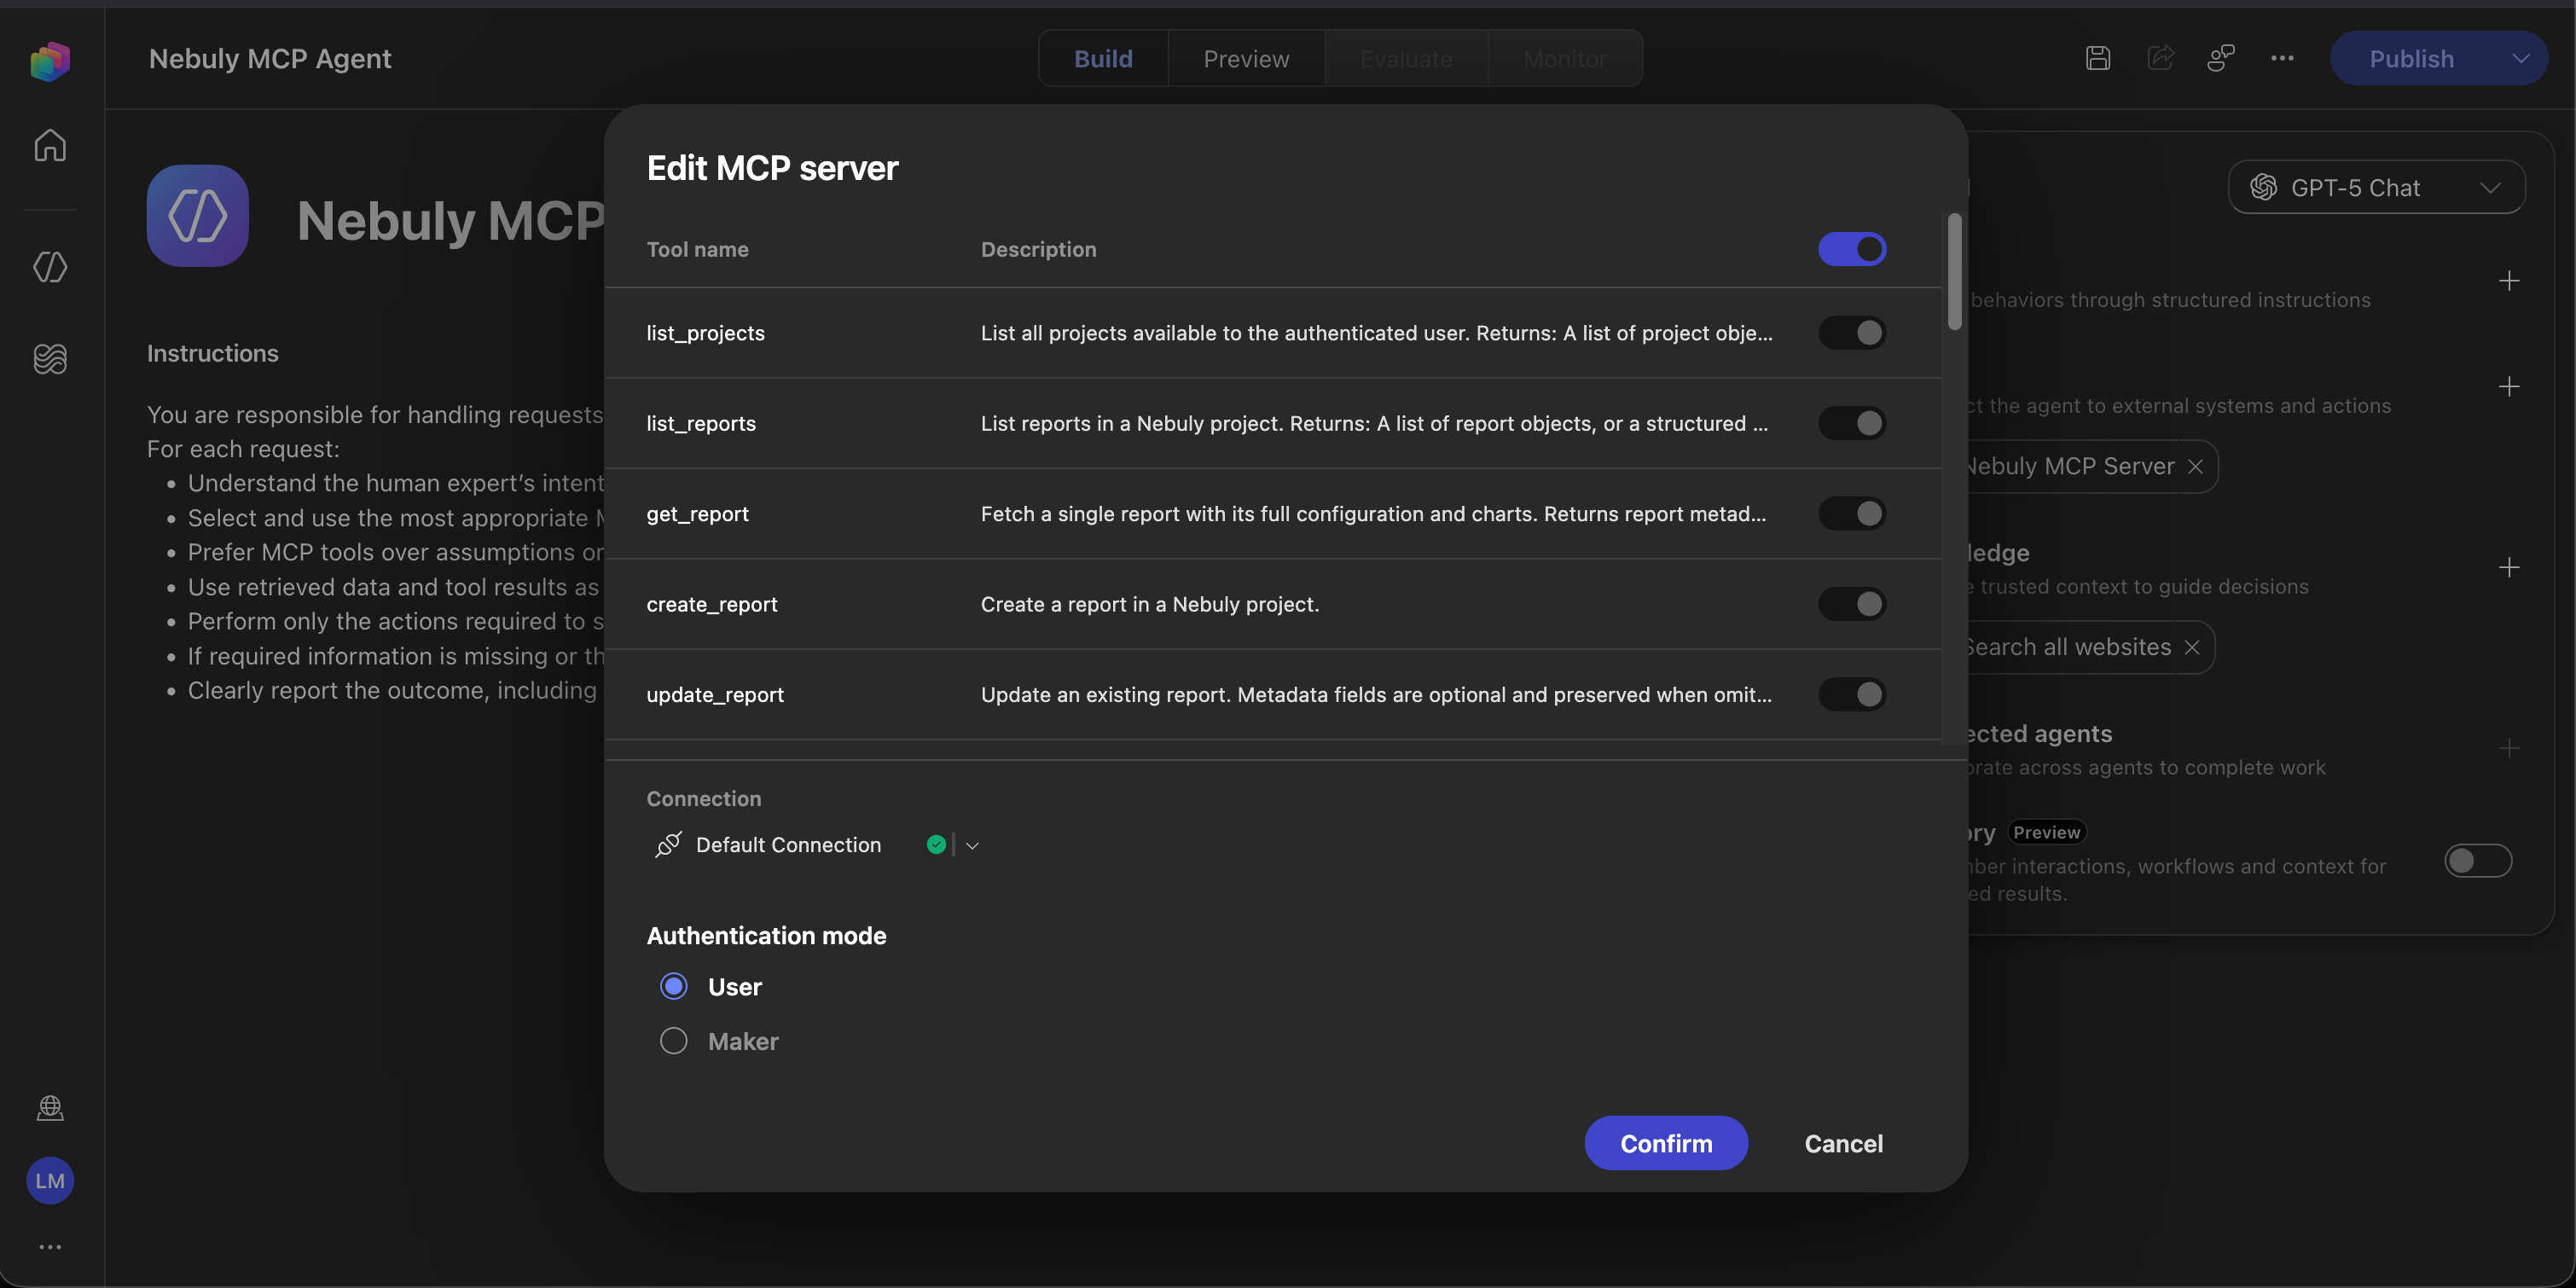
Click on the added MCP server and ensure that Authentication Mode is set to User
Test and publish the agent
Test the tool
Agent maker- Open the Copilot Studio Preview panel and start a new chat session.
- Ask the agent to list the Nebuly projects available to your account.
Publish and configure channels
Agent maker-
Select the little arrow near Publish and enable Teams + Microsoft 365 publication.
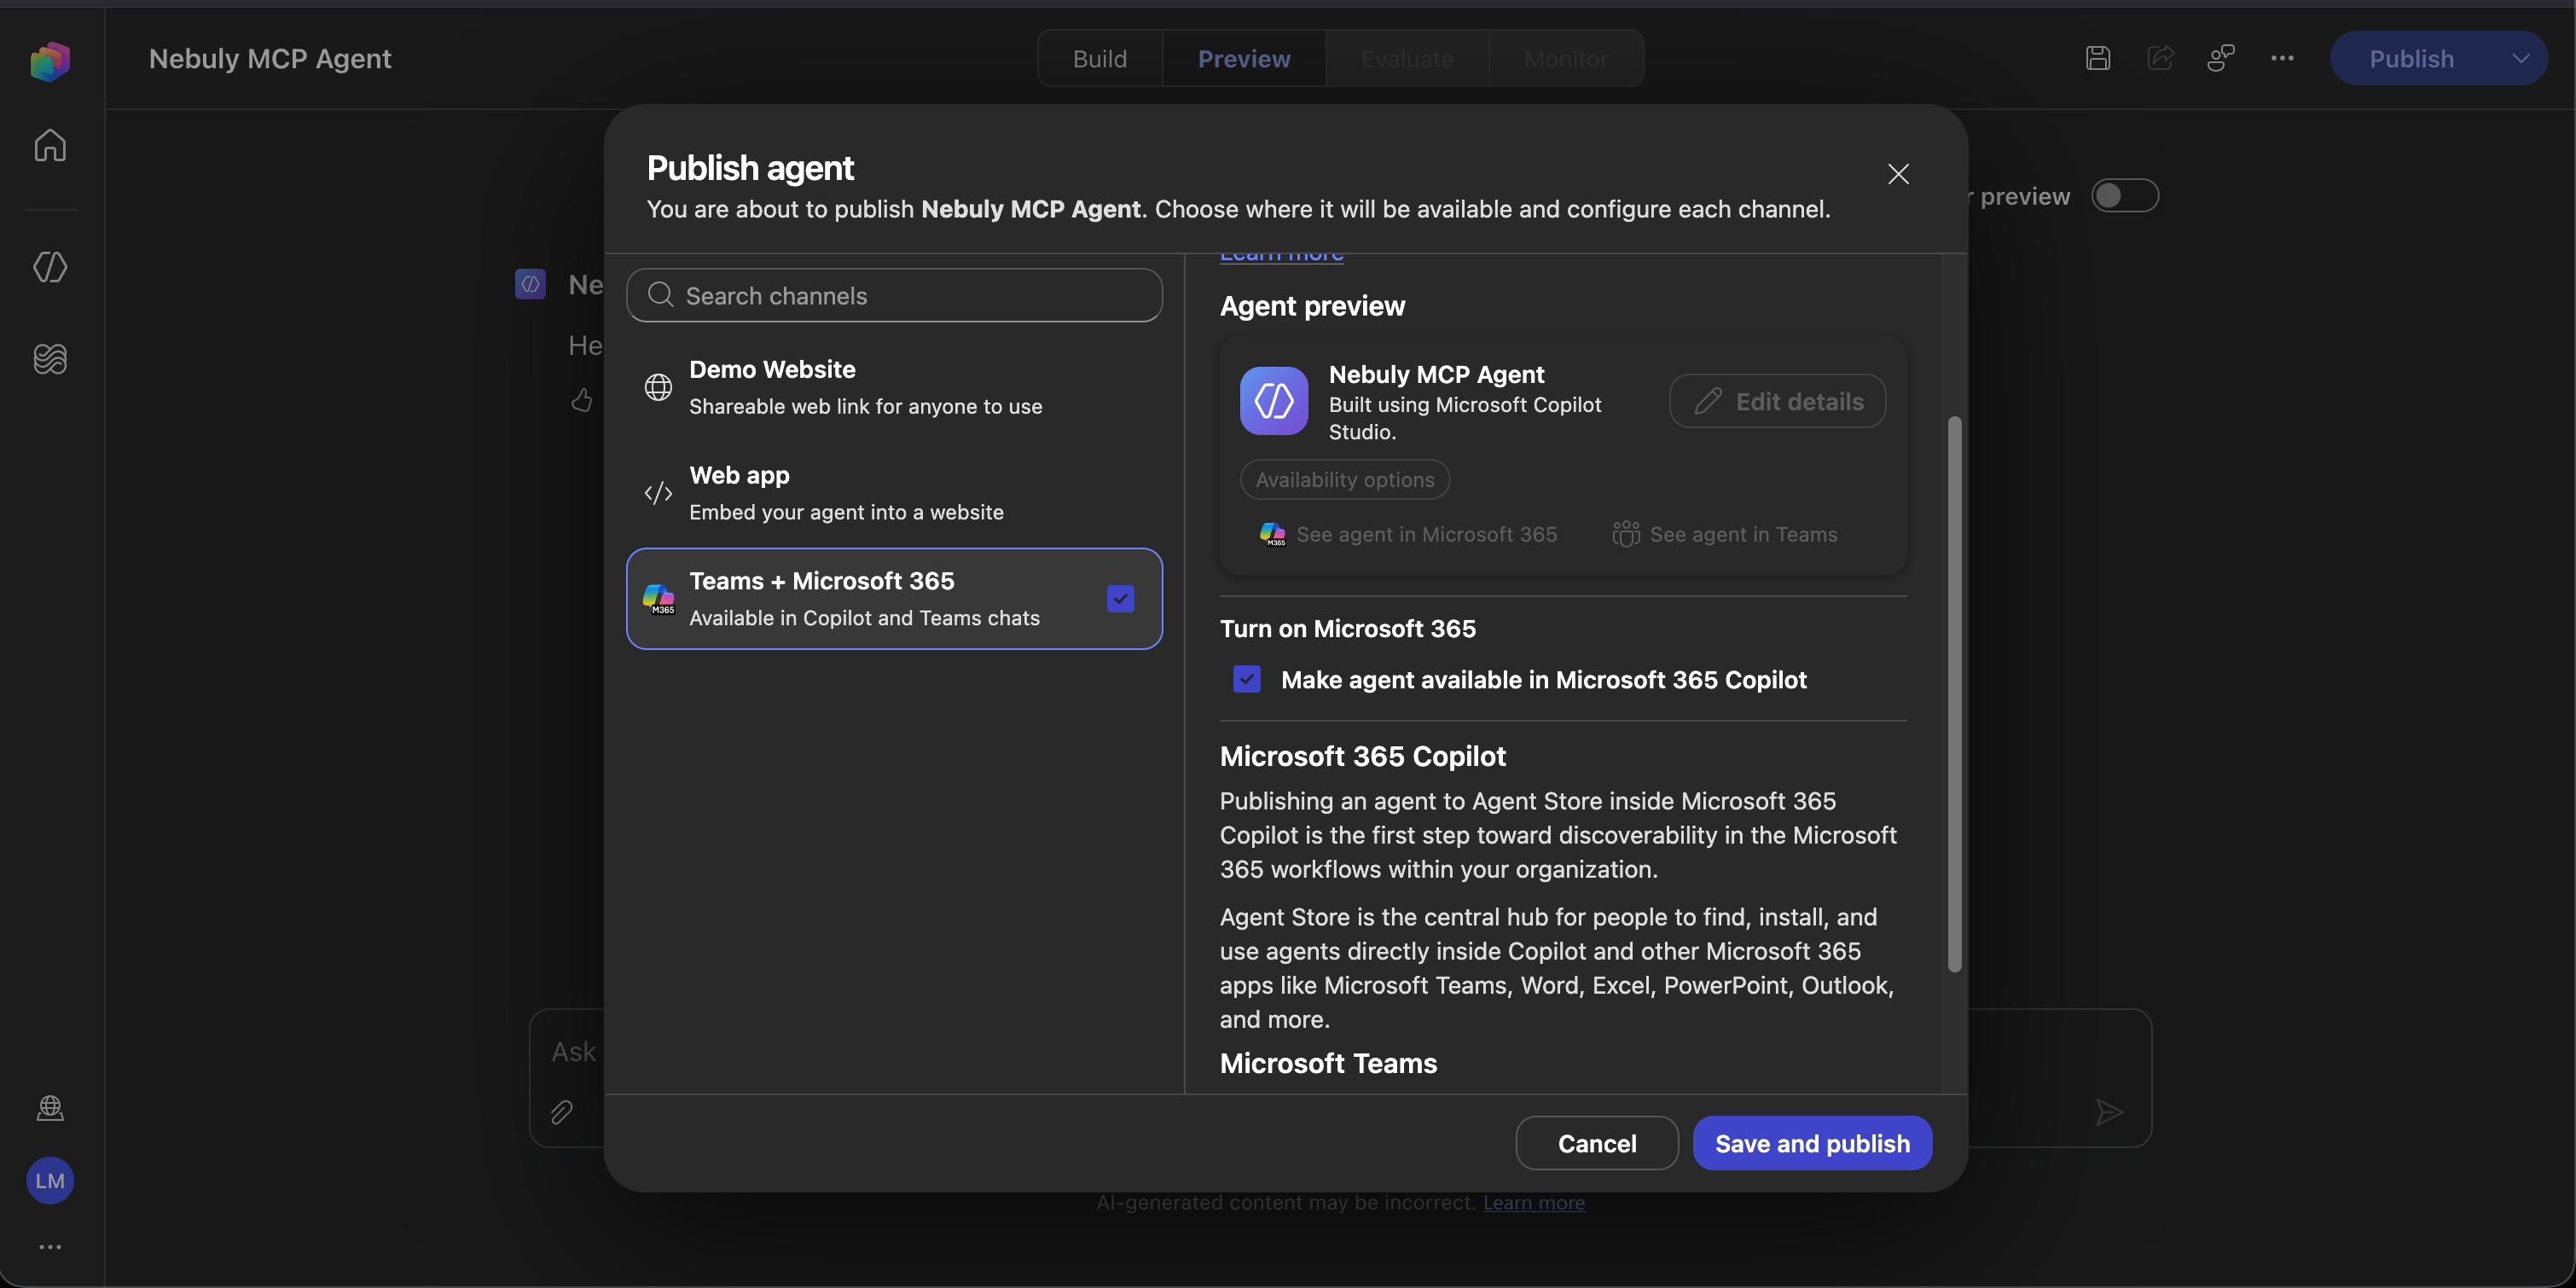
- Save and publish the agent.
- Once published you can update the agents details to enrich details for your users
- Click on the share icon in the top bar
- Enable End user access permissions and share
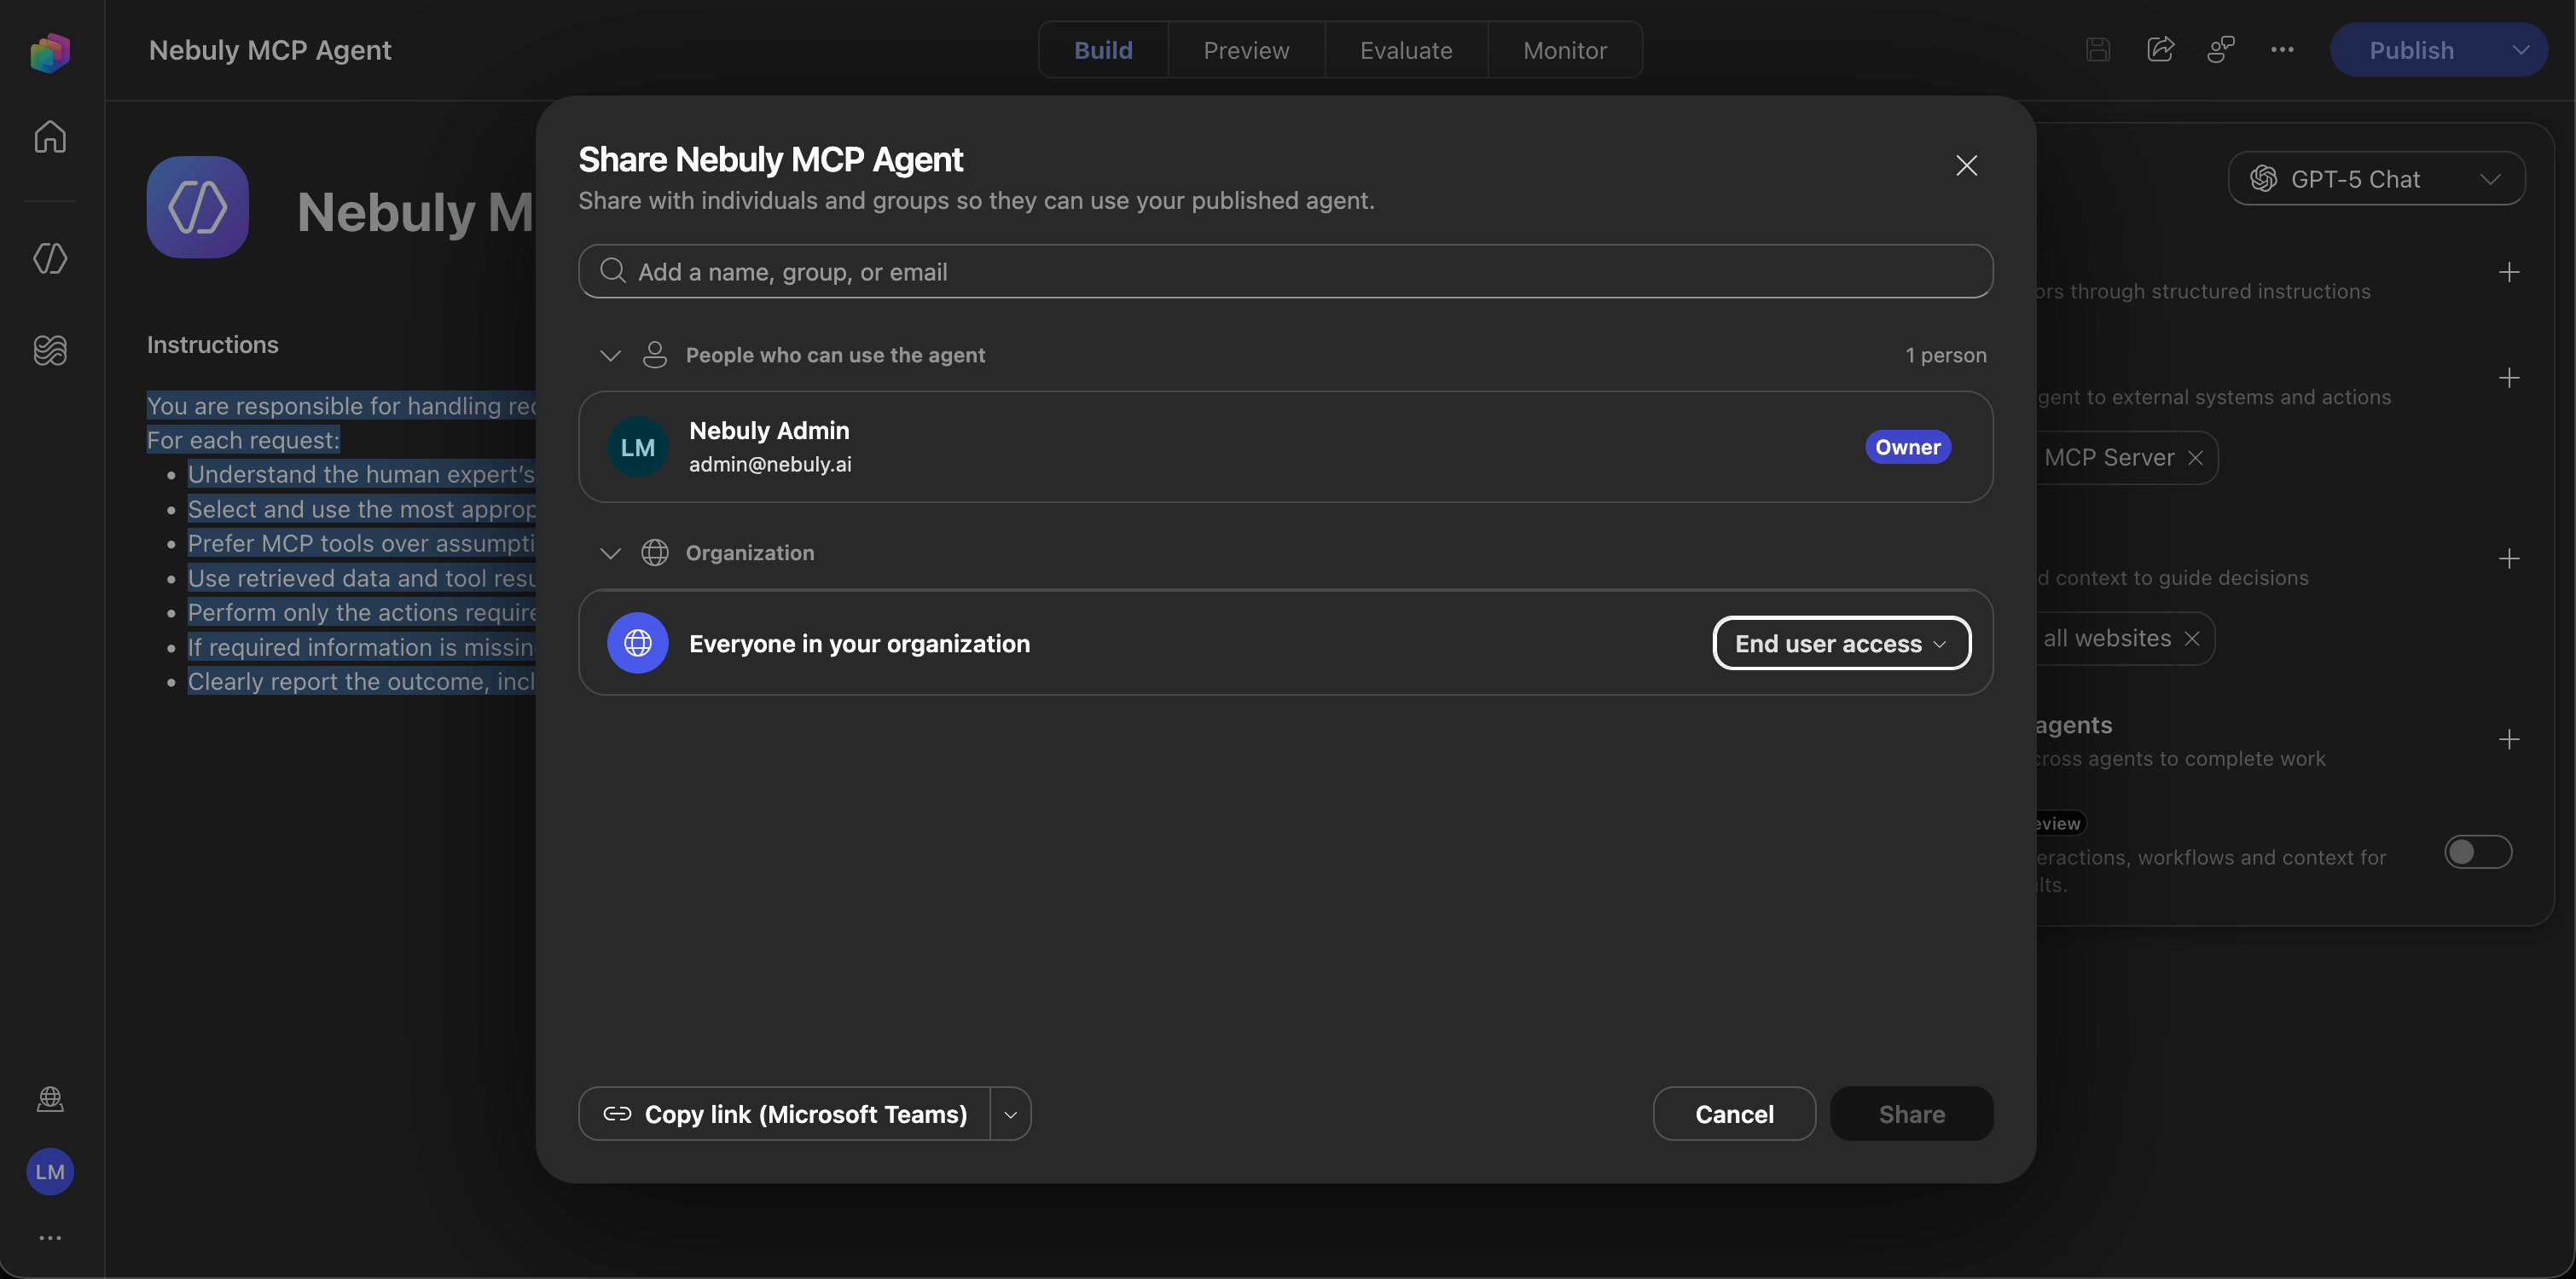
- Copy links for Copilot or Teams to share the agent with users
- Before users can actually connect one more step is needed, head to Microsoft Powerapps
- On the left bar select Custom connectors, if not visible select More and Discover all.
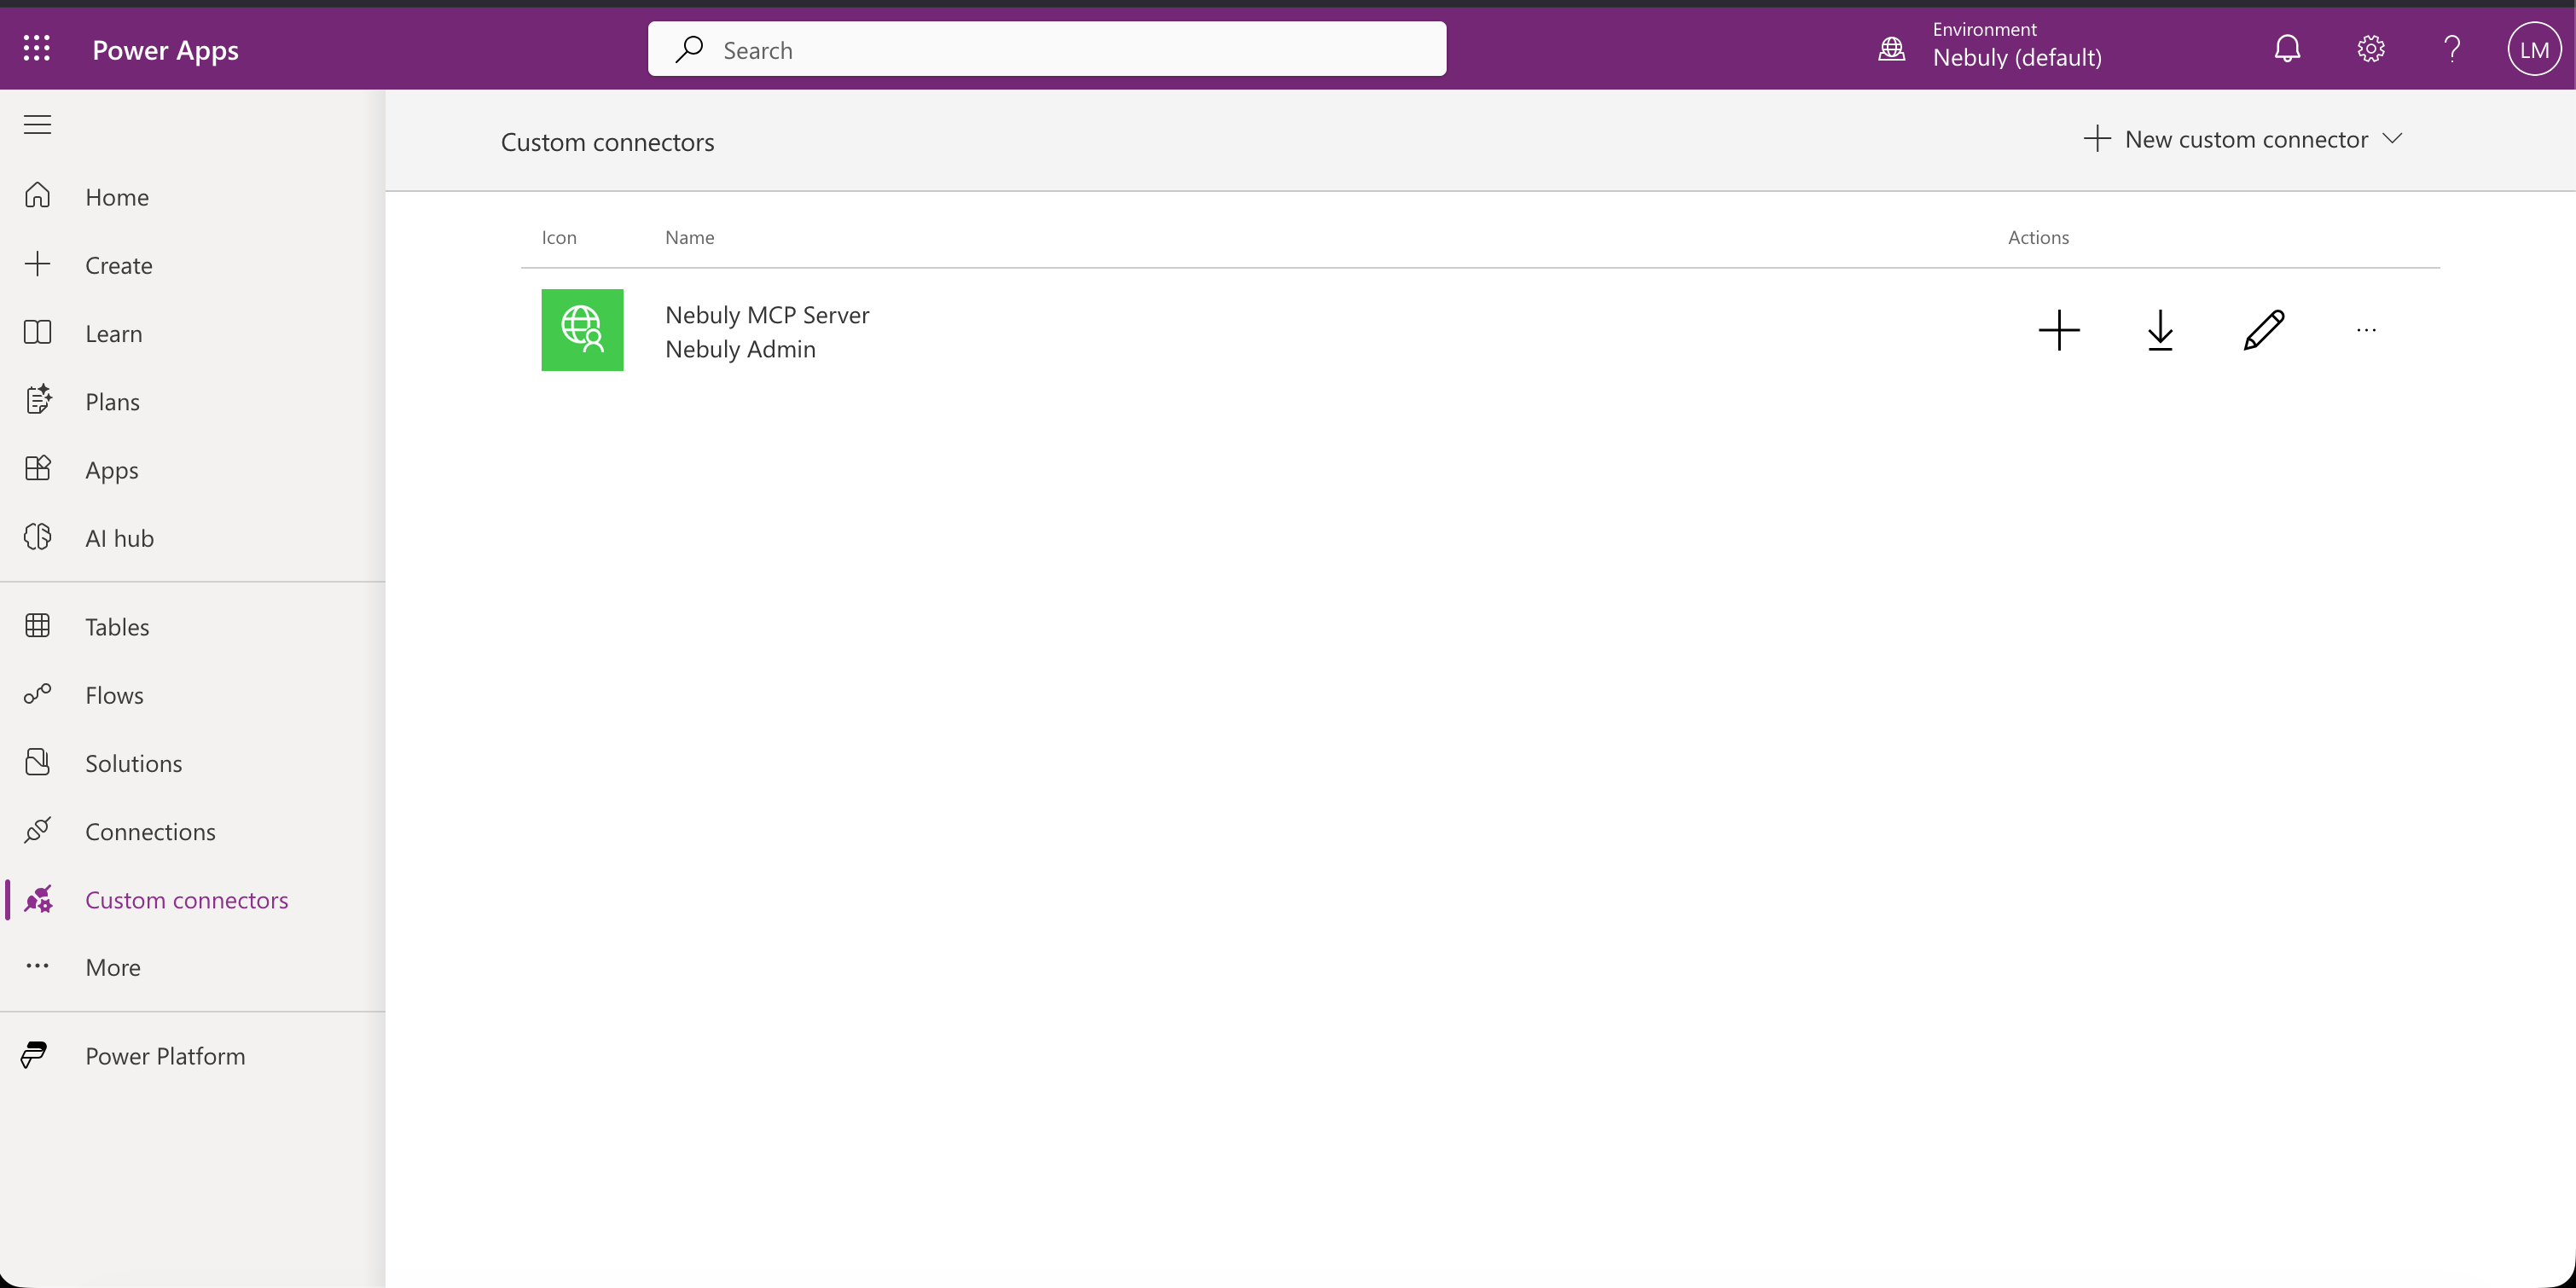
- Click on the three dots icon, then Invite another user.
- Share the agent with the organization or target user groups, then save.
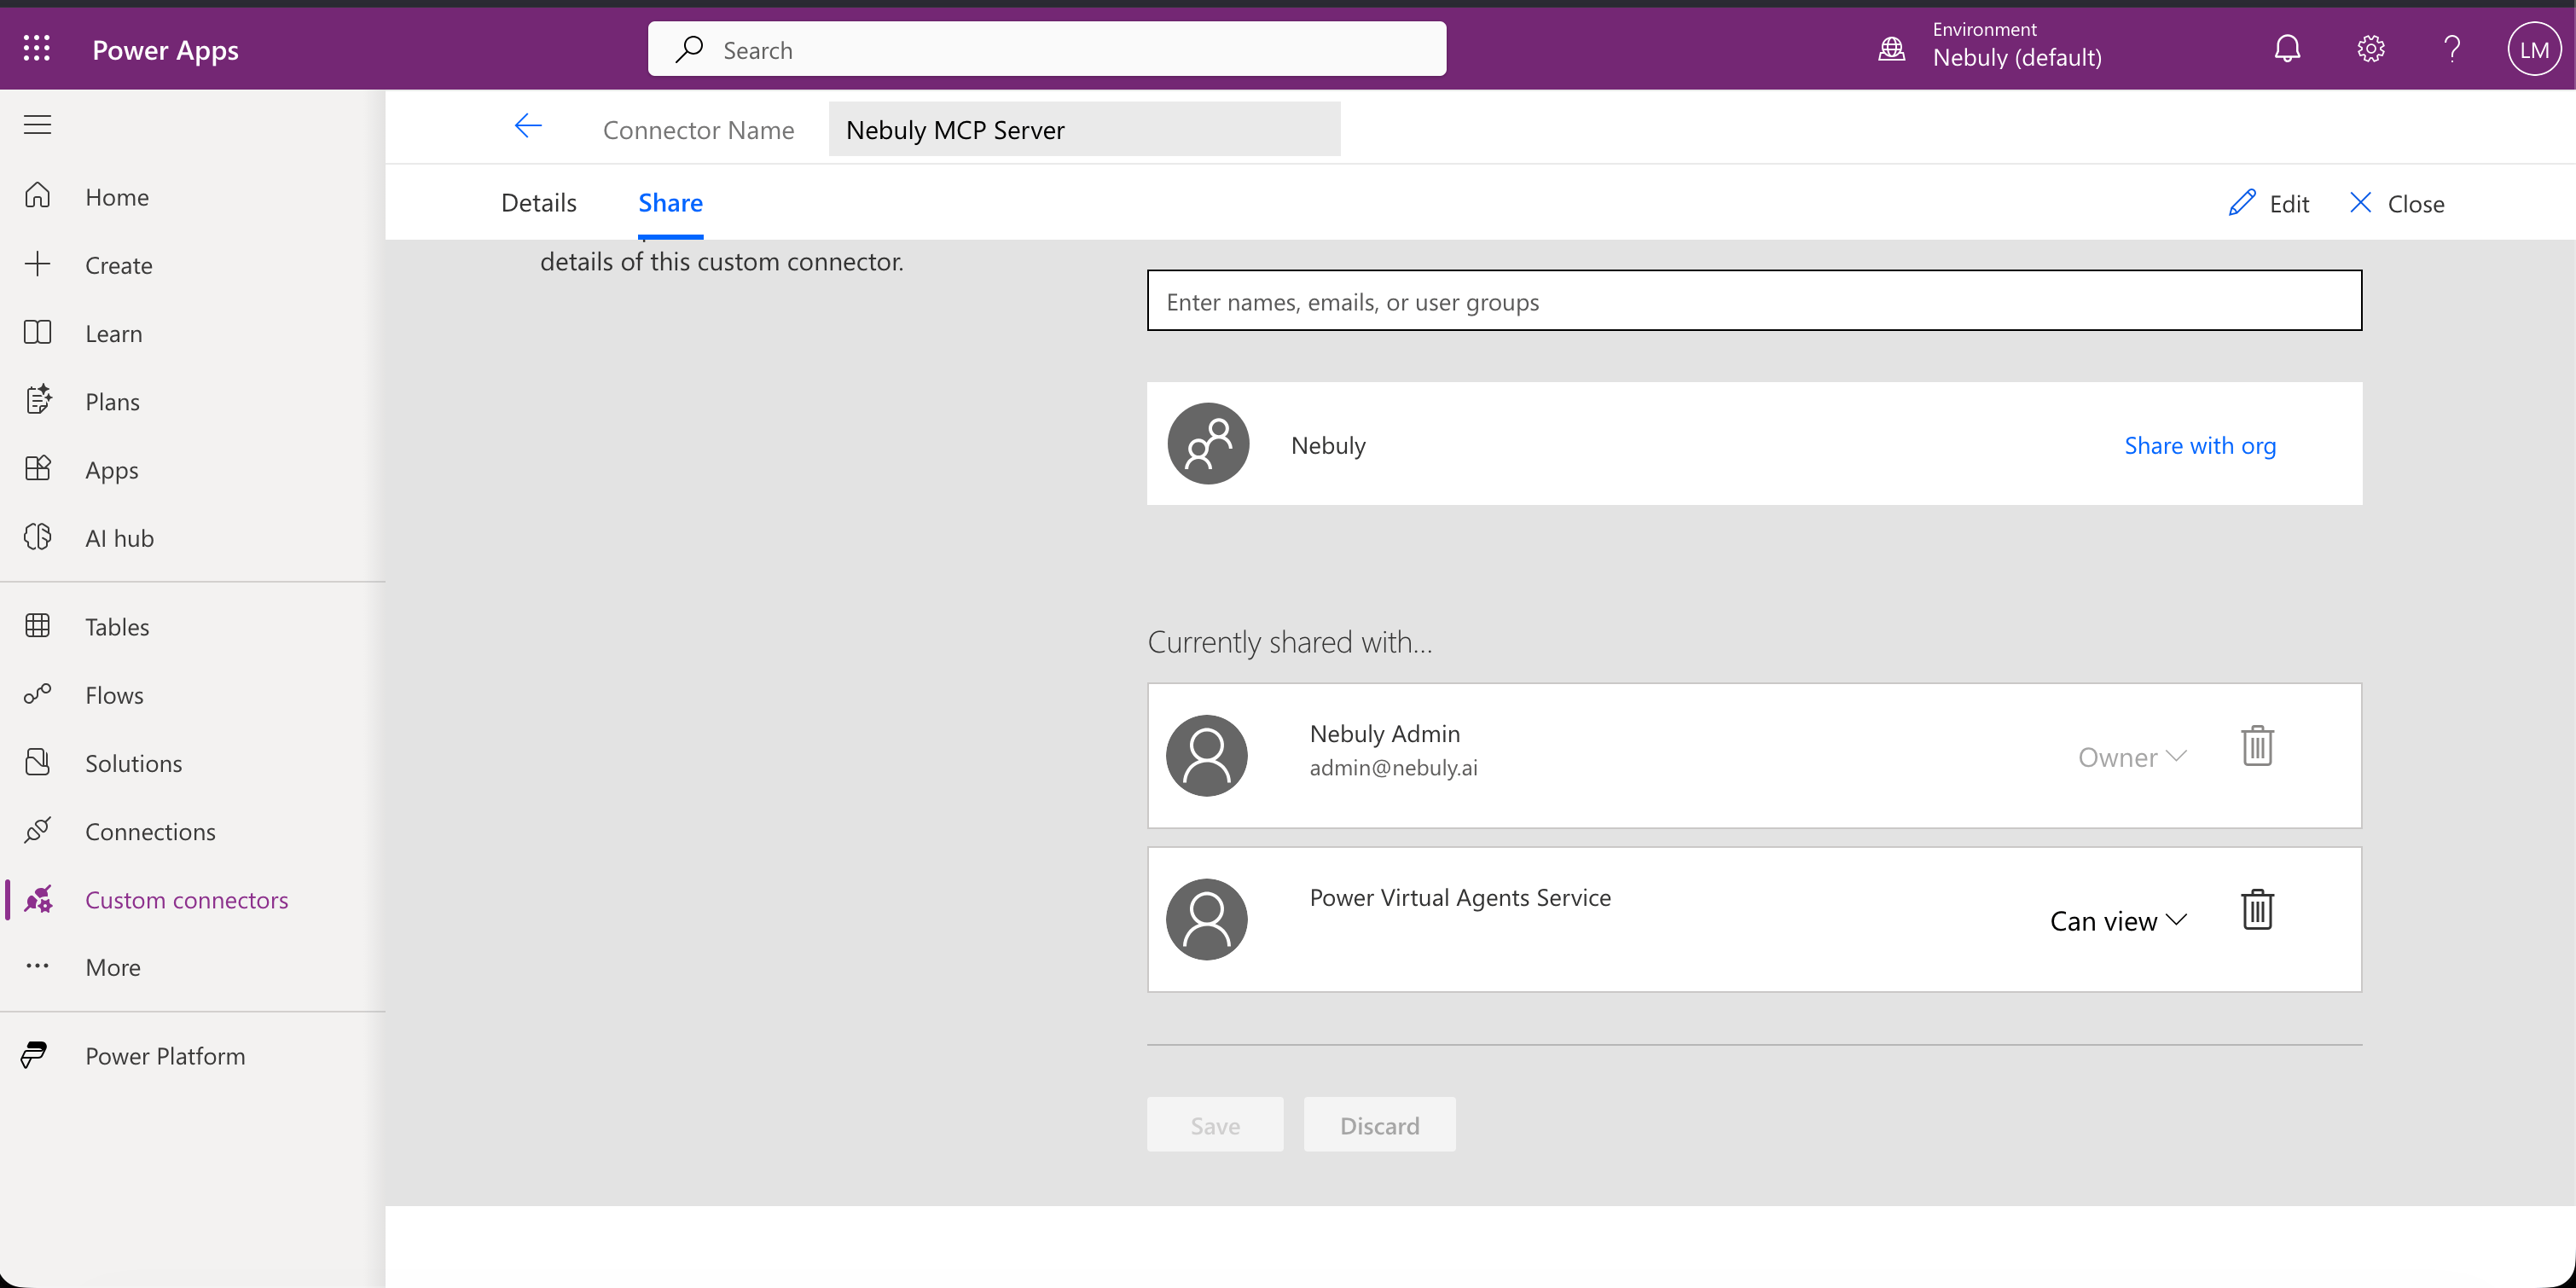
- Users are now enabled to create new connections, they’ll login with their accounts to access the Nebuly platform.
- Review the agent, connector, requested permissions, and tenant policies.
- Approve the agent for the organizational catalog when required.
- Confirm the intended users can install or open the agent.
Onboard additional users
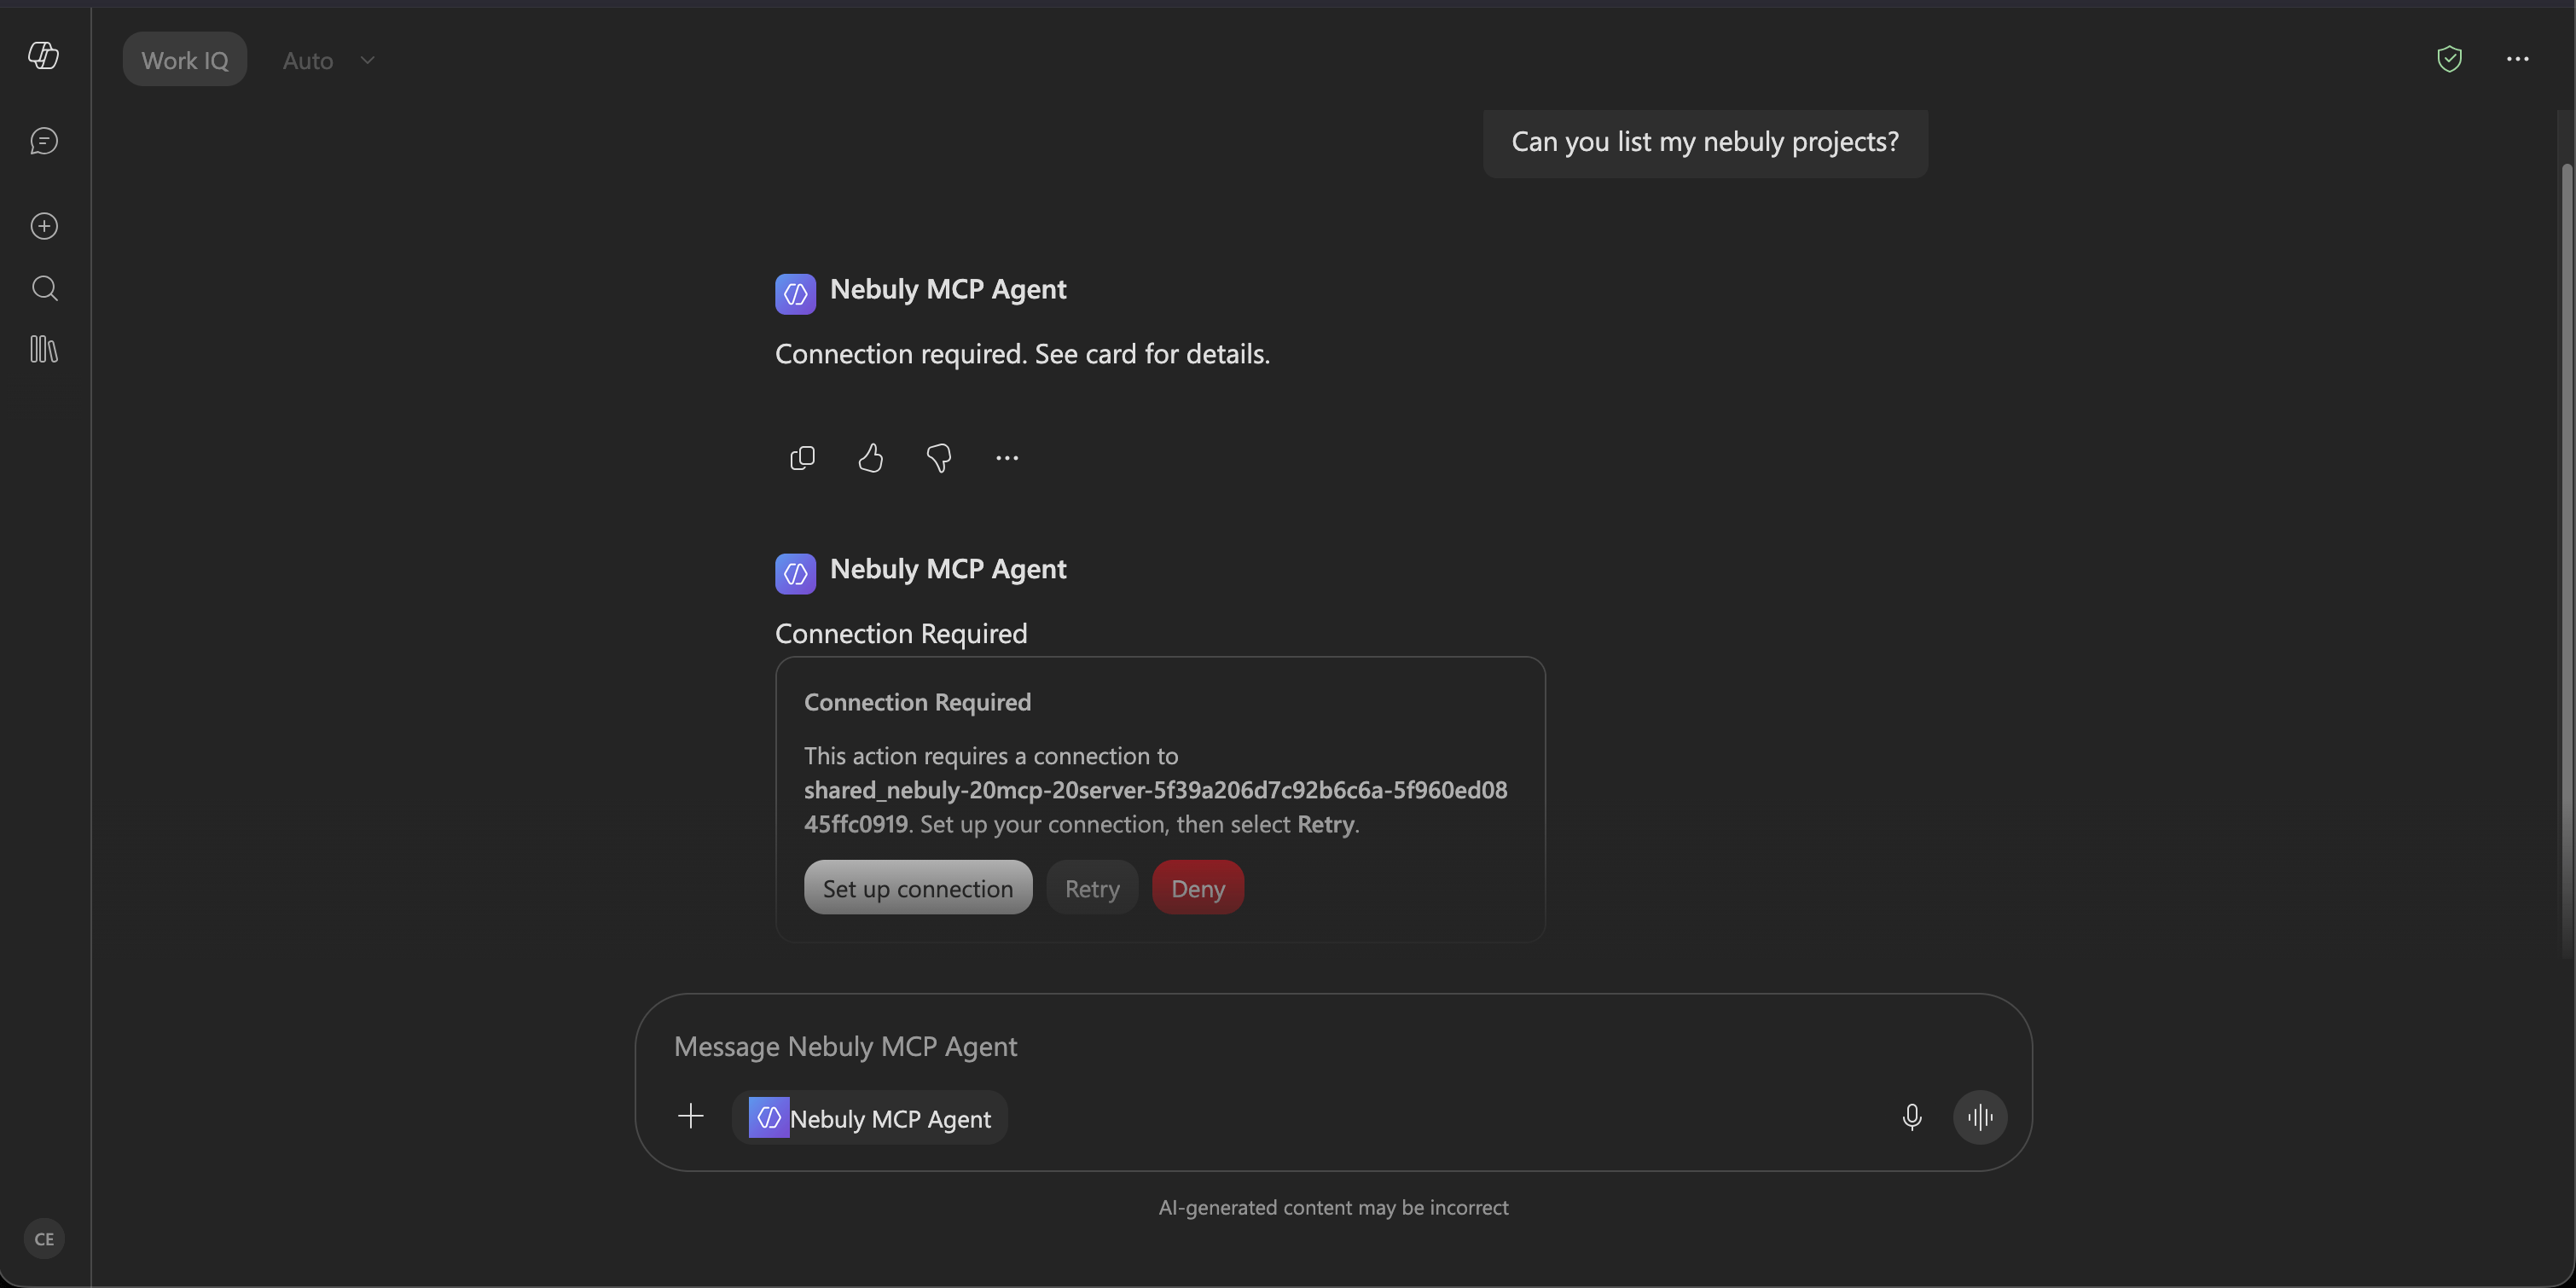
End user- Open the agent after it is made available to you, alternatively you can invoke the agent in a chat with @ followed by the agent selection.
- Ask a question that uses a Nebuly tool.
-
When prompted, open Setup connection. The label can vary by Microsoft experience.
-
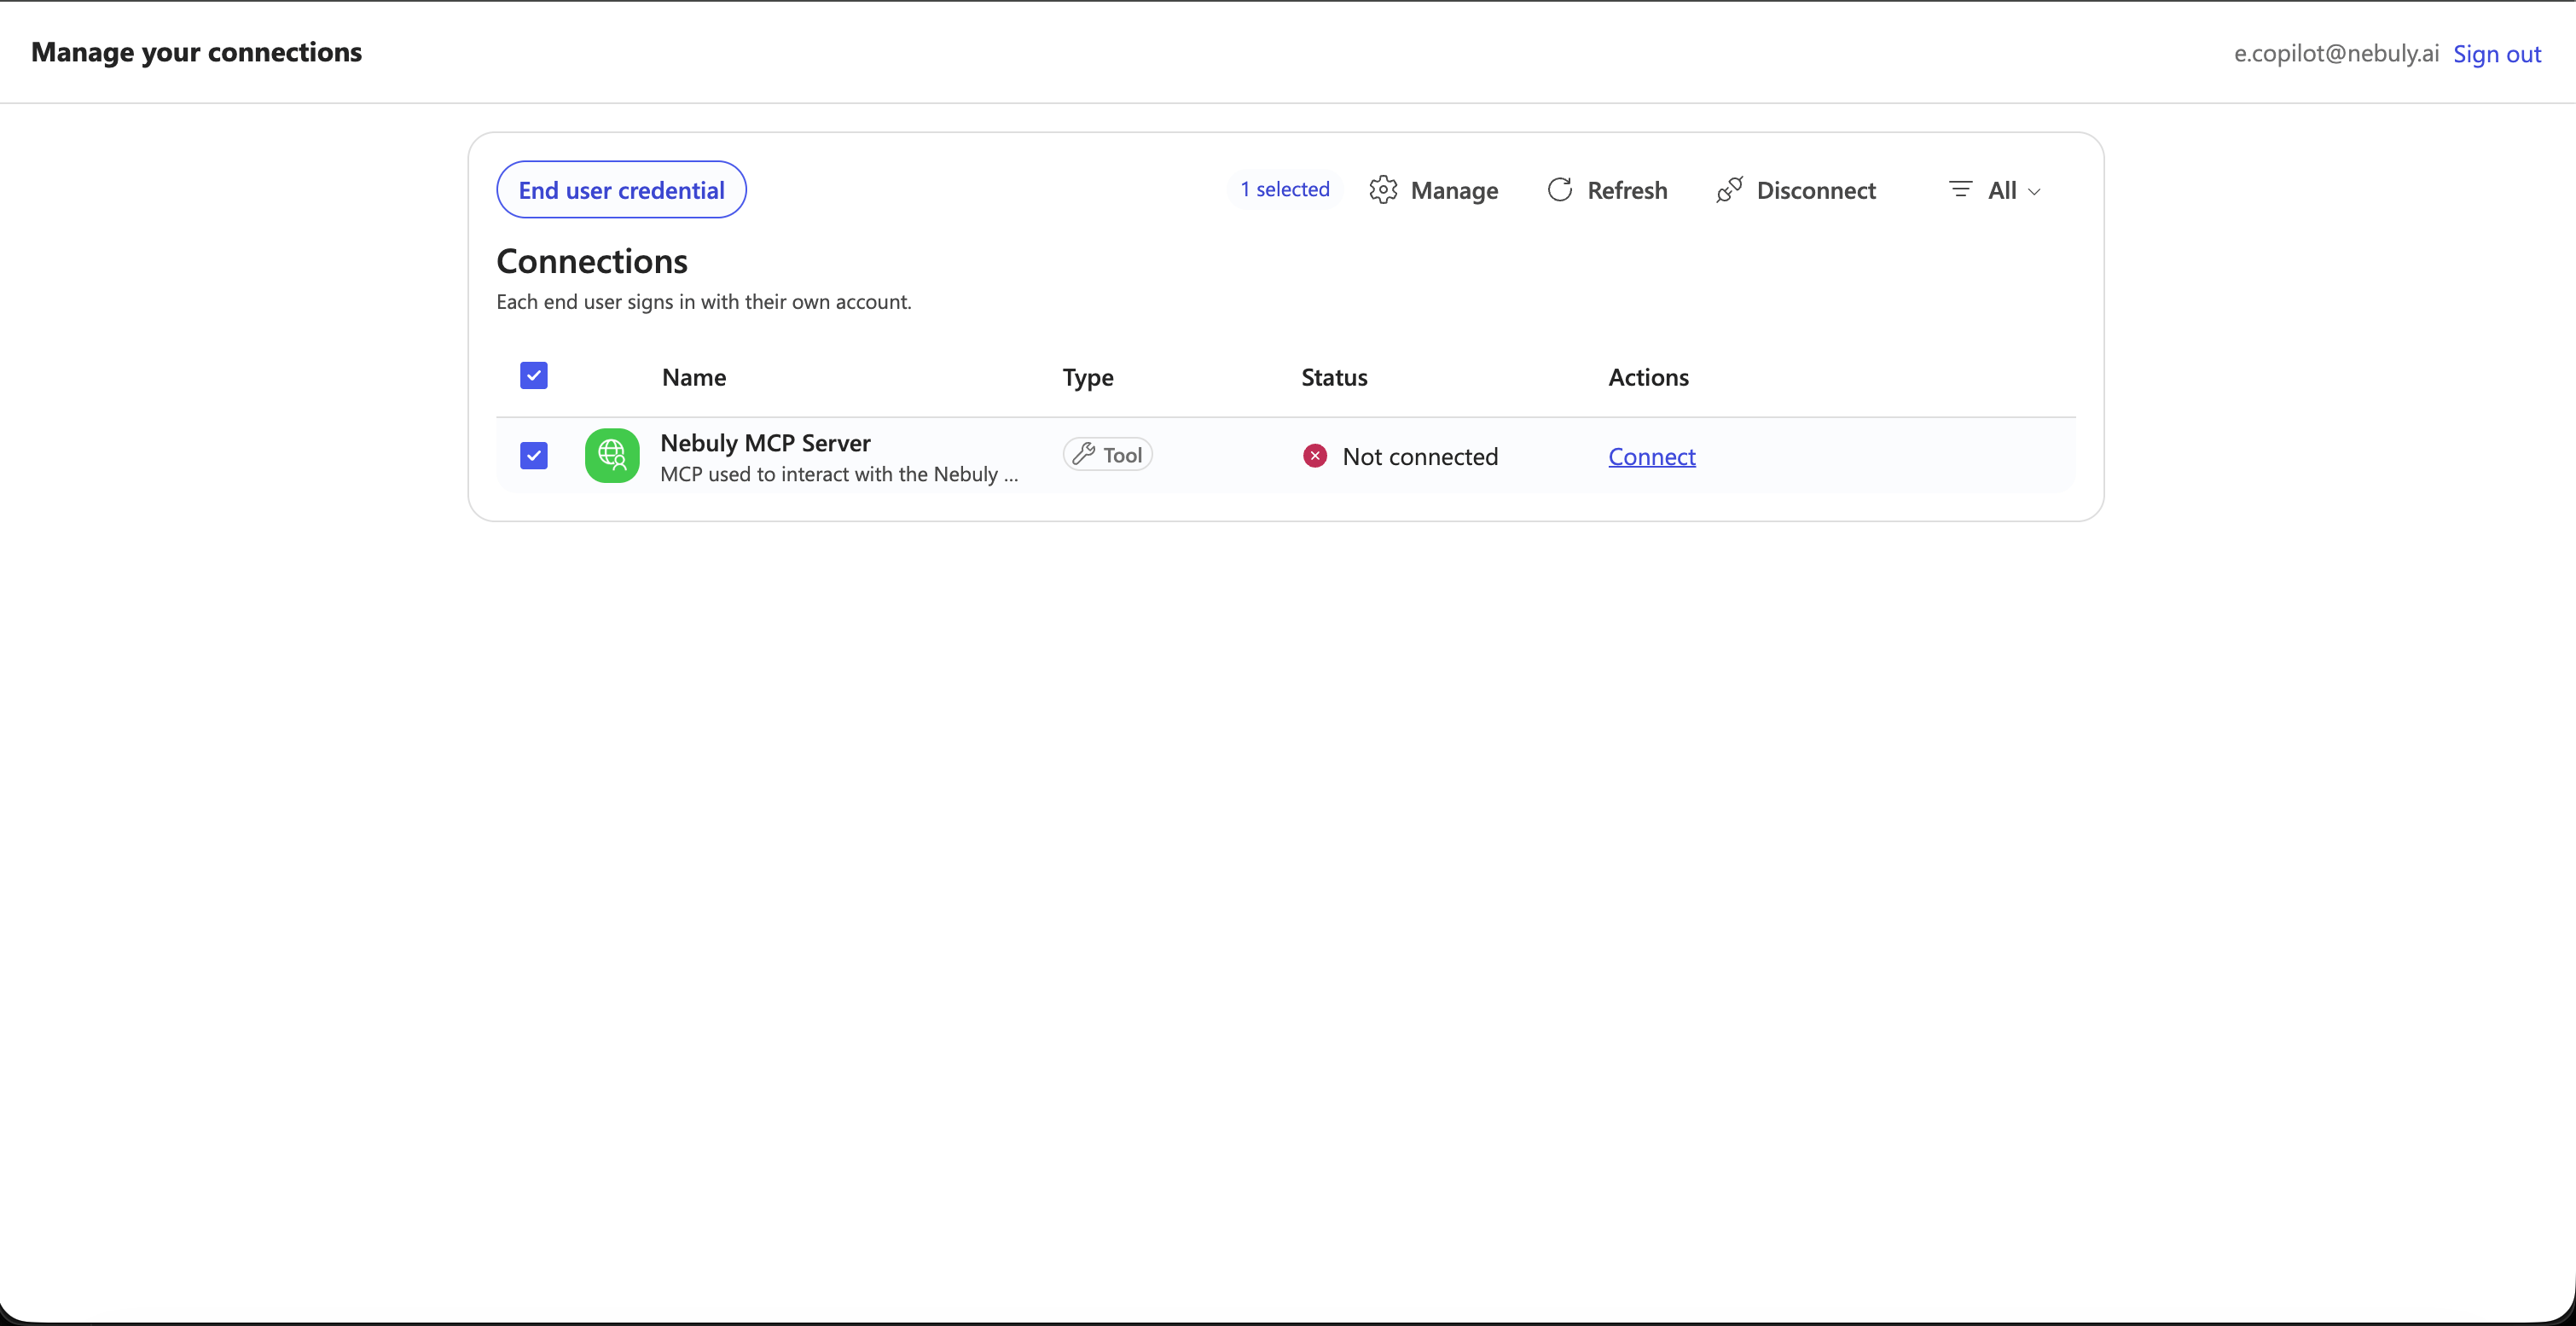
Click on Connect and follow the steps to create a new connection, you’ll be redirect to Nebuly login page to complete the authentication.
- Return to the agent and retry the connection.
- You are now able to use the MCP server.
Troubleshooting
Publishing is blocked despite a Microsoft 365 Copilot license
This failure occurs in Microsoft 365 or Power Platform before any request reaches the Nebuly OAuth server. Microsoft 365 or Power Platform administrator- Confirm the Microsoft 365 Copilot or applicable Copilot Studio license is assigned to the same account that authors and publishes the agent.
- Check whether Microsoft Copilot Studio Viral Trial is also assigned to the account.
- Remove the viral trial if it conflicts with the paid entitlement.
- In the Power Platform admin center, go to Manage → Tenant settings and verify Publish bots with AI features is enabled.
- Verify the user belongs to any security group configured under Copilot Studio authors.
- Verify the user has access to the selected environment and the required environment role.
- Sign out of Microsoft 365, Copilot Studio, and Power Apps, then sign back in after the changes propagate.
Users cannot create their own connection
First confirm that the affected user has access to the agent. Then identify the custom connector generated when the Nebuly MCP tool was created:- Open Power Apps in the same environment as the agent.
- Open Custom connectors. If it isn’t visible in the navigation, use the environment-specific custom-connectors page.
- Find the connector whose name and endpoint correspond to the Nebuly MCP tool.
- Inspect the connector’s sharing permissions separately from the permissions under Connections.
- Never share the agent author’s personal connection as a workaround.
- Allow time for Power Platform permission changes to propagate, then retry from a fresh browser session.
Connection changes do not take effect immediately
Power Platform permission, connector, and connection changes can take several minutes to propagate. Use this recovery sequence:- Save the configuration.
- Wait several minutes.
- Republish the agent if the tool configuration changed.
- Hard-refresh Copilot Studio.
- Start a new conversation.
- Use an InPrivate browser profile if identity caching is suspected.
- Recreate only the affected private connection if necessary.
References
- Extend Microsoft 365 Copilot with agents
- Extend an agent with MCP
- Connect an existing MCP server
- Publish and deploy an agent
- Configure Teams and Microsoft 365 Copilot channels
- Share agents with users
- Share a custom connector
- Troubleshoot Copilot Studio publishing licence errors
- Faq Billing and Licensing